Master Data and Setup
Purpose
This page describes master data and basic setup in BE-terna Manufacturing. First prepare the central production setup, then make sure that items, routings, production BOMs, locations, and additional validation logic are maintained so that later production orders work with consistent defaults.
Prerequisites
- Core manufacturing functionality in Business Central is set up and users can access items, routings, production BOMs, production orders, and Manufacturing Setup.
- Number series, locations, work center groups, and vendors for subcontracting are aligned from a business perspective where required.
- Item templates or similar master data defaults are available if consumption and output locations should be prefilled systematically.
Recommended Sequence
- Complete all Manufacturing-specific switches and standard values in Manufacturing Setup.
- Maintain item templates and item master data including location defaults, item tracking, and optional item versions.
- Create or open routings and production BOMs directly from the item card.
- Configure additional rules for routing link codes, location transfers, and work center groups.
- Test the effect with a sample item and an initial production order.
Area: Master Data and Setup
Use Manufacturing Setup as the central control point
Several BE-terna Manufacturing extensions are activated centrally through Manufacturing Setup. This includes automatic defaults for Assigned User ID in the production order, a Default Gen. Bus. Posting Group, a Default Output Location Code, transfer of production details, validation logic for routing link codes, and calculation methods for output and consumption.
If you want to use automatic planning runs, the related planning options also belong in this step, as well as activation of production family planning where needed. For reporting and corrections, decide early which automation should be allowed in the output journal.
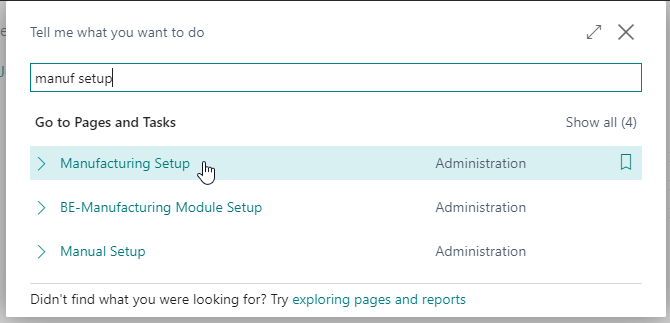
In practice, the quickest way to reach the page is usually through search:
At minimum, review the following switches and fields in this step:
- automatic defaulting of Assigned User ID in production orders
- Default Gen. Bus. Posting Group
- Default Output Location Code
- activation of the calculation method for output and consumption
- correction proposal switches for consumption and output entries
- activation of production family planning
- routing link code validation and related Manufacturing checks
Maintain item master data and create routings and production BOMs automatically
On the Replenishment FastTab of the item card, the fields Routing No. and Production BOM No. are available with assist actions. This lets you create the header of a routing or production BOM directly from the item without switching into separate lists first.
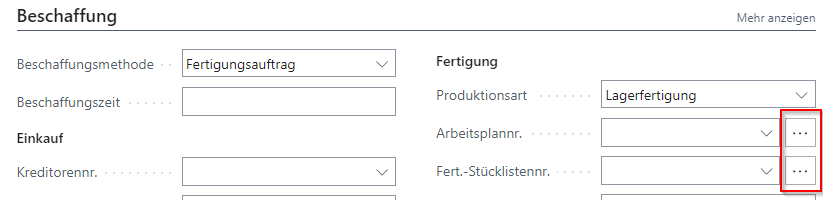
When created automatically, number, description, description 2, and search description are transferred from the item. If a number already exists, the assist action opens the existing record directly or, for certified versions, the active version.
For new production items, the typical sequence is:
- Open the Item Card.
- Go to Replenishment.
- Use the assist action in Routing No. or Production BOM No..
- Complete the automatically created records with operations, components, and certification status.
- Only then continue with operational planning or production order creation.
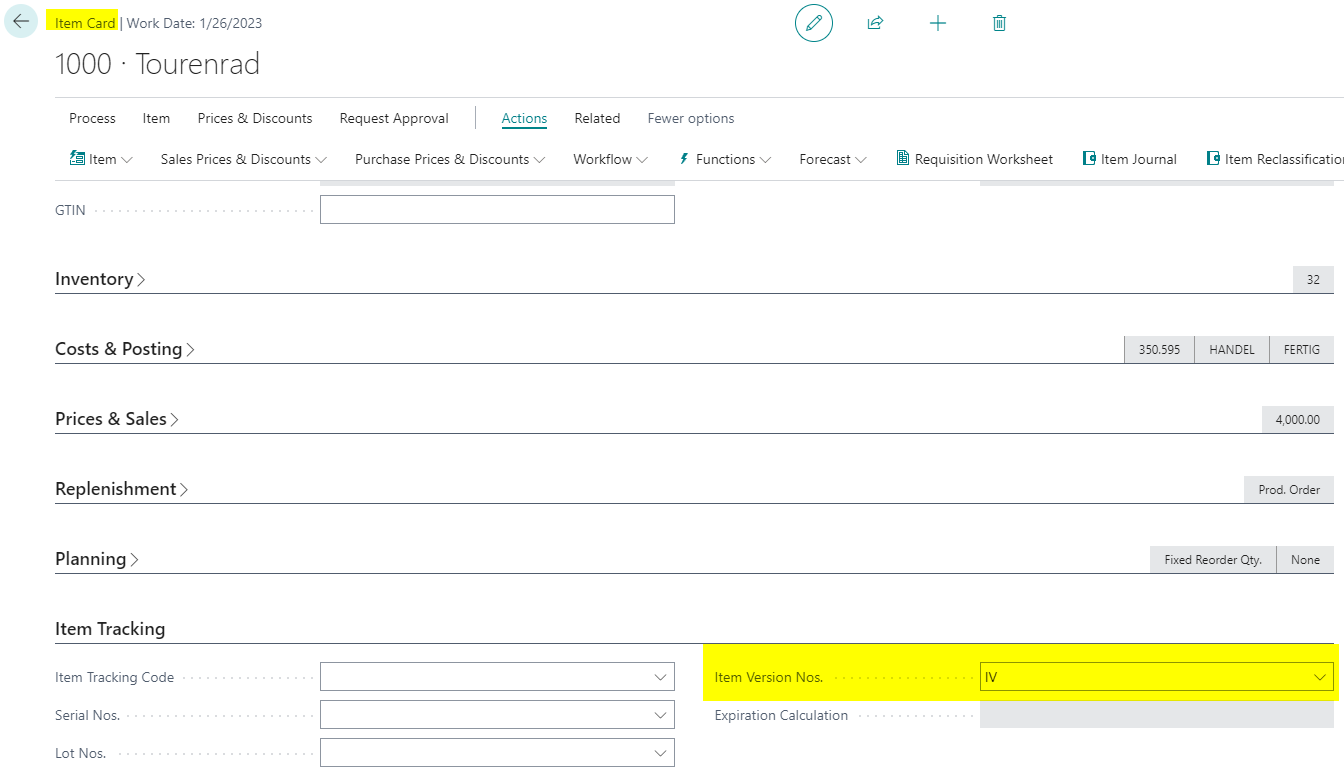
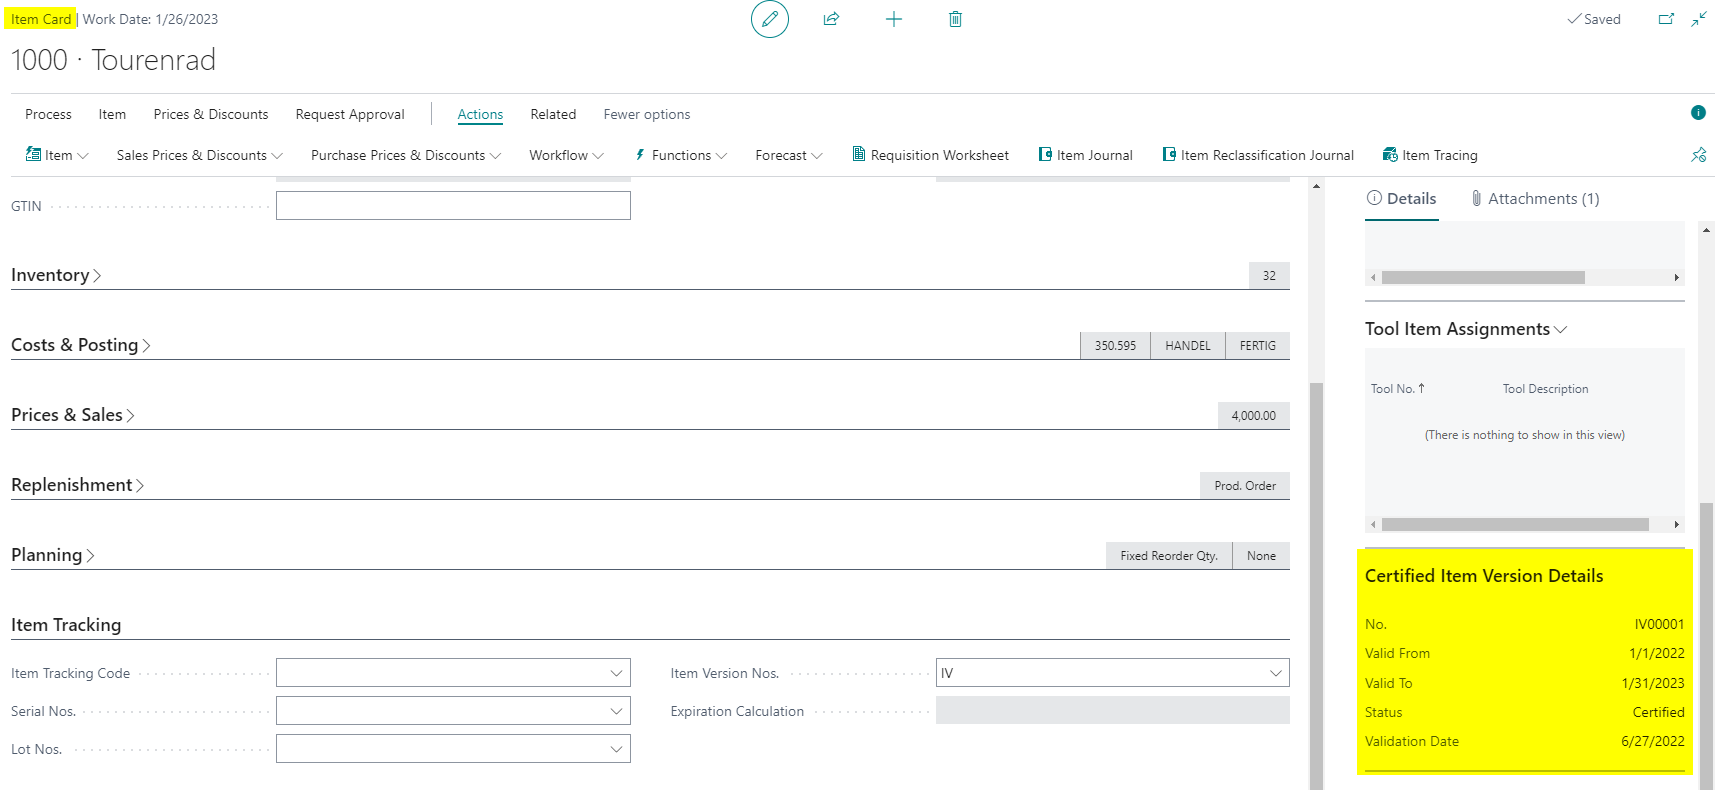
Maintain item versions and traceability
For products with frequent design changes, you can maintain item versions with their own number series, validity period, status, validation date, and drawing index. Only one version per item can have the status Certified. That certified version is transferred into the production order line when production orders are created and refreshed, which keeps it traceable throughout the process.
Use this sequence to set up and verify item versions:
- Open the Item Card and assign the number series for item versions.
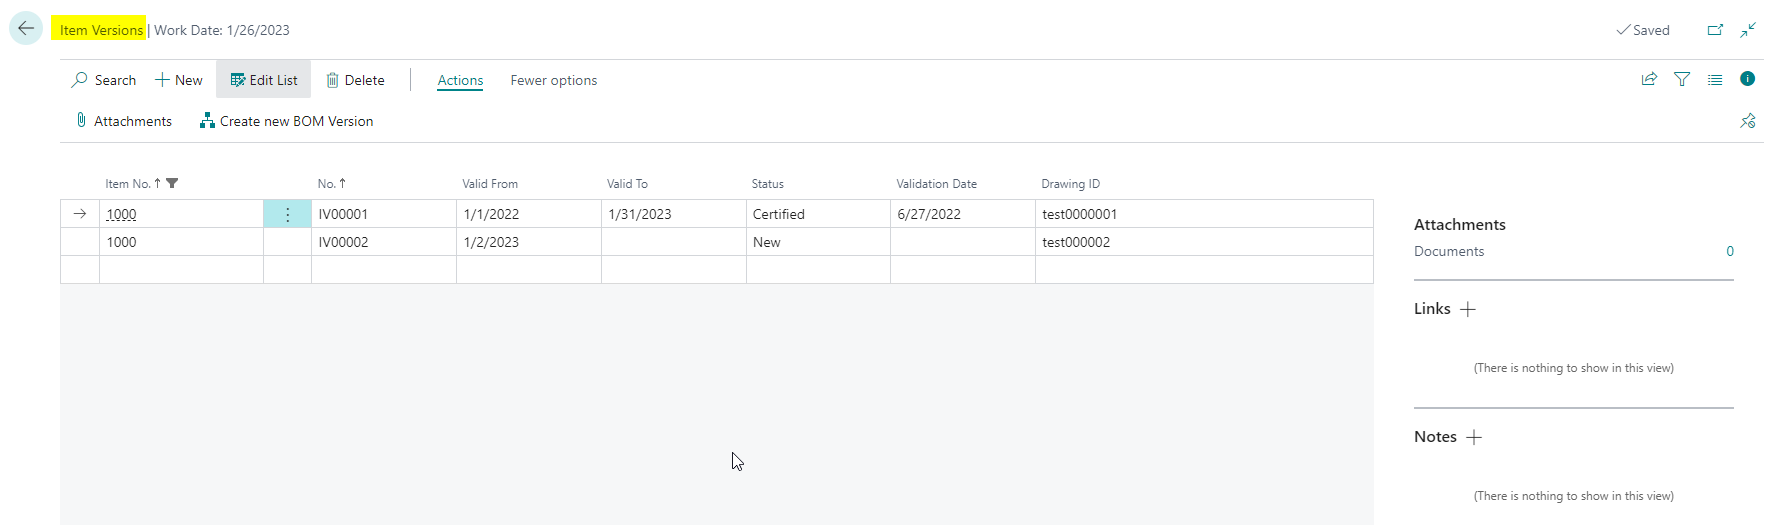
- Open Item Versions from the Item menu. The page is available from both the item card and the item list.
- Create new item versions and maintain at least Valid From, Valid To, Status, Validation Date, and Drawing Index.
- Add Links, Notes, and Attachments where required.
- Set only the released version to Certified. A second certified version for the same item is not allowed.
- Check the FactBox on the item card and item list to verify that the certified version is displayed correctly.
- Create a production order or refresh an existing one and verify that the certified item version is transferred into the production order line.
Align locations, item templates, and subcontracting logic
When production detail transfer is active, Consumption Location Code and Output Location Code can be transferred from item templates into the item card and from there into production orders, production order components, output journals, and planning components. This reduces manual corrections, especially when several locations are managed per item.
For subcontracted production, you can additionally maintain a vendor and a Component from Location Code on the Work Center Group. If that work center group is used in an operation and the related component is linked through a routing link code, the system transfers the location from the work center group into the affected production order components.
Check the transfer logic explicitly in this order:
- Maintain Consumption Location Code and Output Location Code on the item template or directly on the item.
- Verify that these values were transferred to the Item Card.
- Create a production order and check the location transfer in production order lines, production order components, and output journals.
- If subcontracting is involved, also maintain Vendor and Component from Location Code on the Work Center Group.
- Then verify whether the linked production order components now use the location from the work center group.
For the business check, this transfer chain matters most:
- The Consumption Location Code from the item template or item flows into production BOM lines, production order components, production journals, and planning components.
- The Output Location Code from the item template or item flows into the production order and its lines and therefore into the reporting context for the produced item.
- The Default Output Location Code from Manufacturing Setup is only a fallback for manually created production orders when the item itself does not already provide its own output location.
For subcontracting, this additional rule applies:
- The work center group can override the component location only if a Vendor is maintained there.
- The routing must contain an operation that uses exactly that Work Center Group.
- The production BOM or affected components must use the same Routing Link Code.
- Only those linked components inherit the Component from Location Code from the work center group; other components stay on the item-driven location logic.
Validate routing link codes before certification
Routing link codes control which components belong to which operation. Since duplicated routing link codes can cause duplicate or unexpected postings during backward flushing, the check Check Routing Link Codes on Routing Certification should be enabled. When a routing is changed to Certified, the system then warns about duplicate codes.
The validation switch is also located directly in Manufacturing Setup:
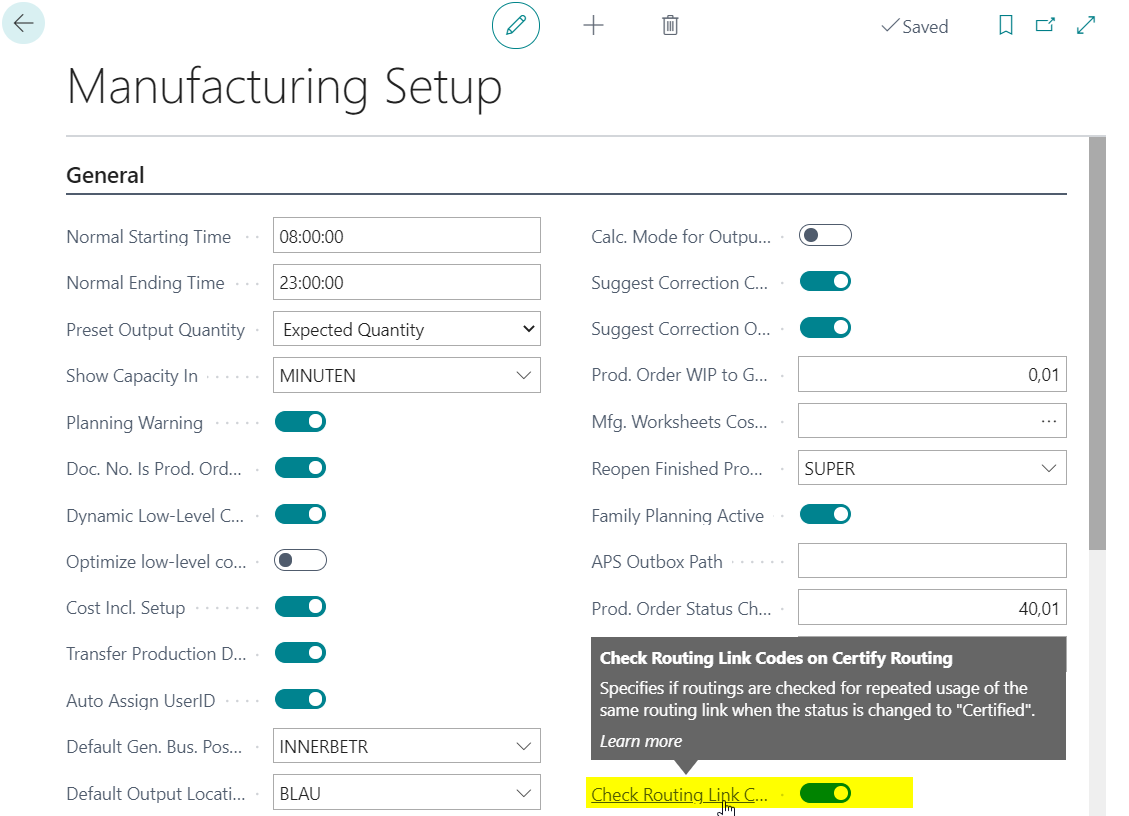
The timing matters: activate this validation before certifying productive routings. Only then will the warning be shown reliably during the switch to Certified.
For a quick functional test, use this sequence:
- Activate the validation in Manufacturing Setup.
- Create a new Routing and leave the status at New.
- Enter at least two routing lines with the same Routing Link Code.
- Then change the status to Certified.
- Verify that the warning identifies the duplicated routing link code clearly enough.
This test checks not only the setup but also the business purpose of the feature: the same routing link code on multiple operations would cause the same components to be hit multiple times during backward flushing.
Process Important sequence rules These checks prevent follow-up errors in routings, production orders, and journals.
- Activate the required automation in Manufacturing Setup first, then test it with a sample item.
- Keep only one certified item version per item so that transfer into production orders stays unambiguous.
- Use consumption and output locations consistently either through item templates and items or deliberately through work center groups for subcontracting, not in conflicting ways.
- Use routing link codes only where a true business relationship between component and operation is required, and enable the validation check before routing certification.
- The default output location from Manufacturing Setup is only used for manually created production orders when the item itself does not carry its own output location.
Links