Sales
The sales mode of the cash register opens with the Sales button after cashier login.
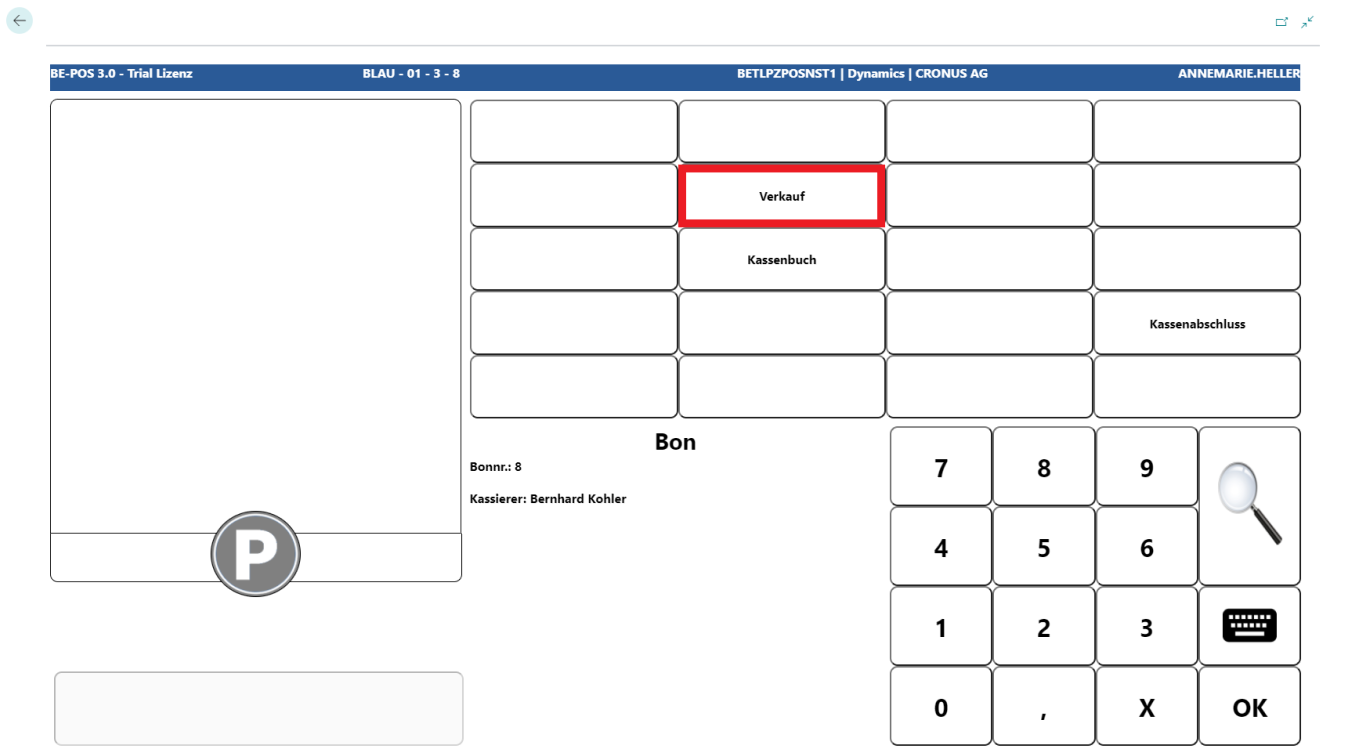
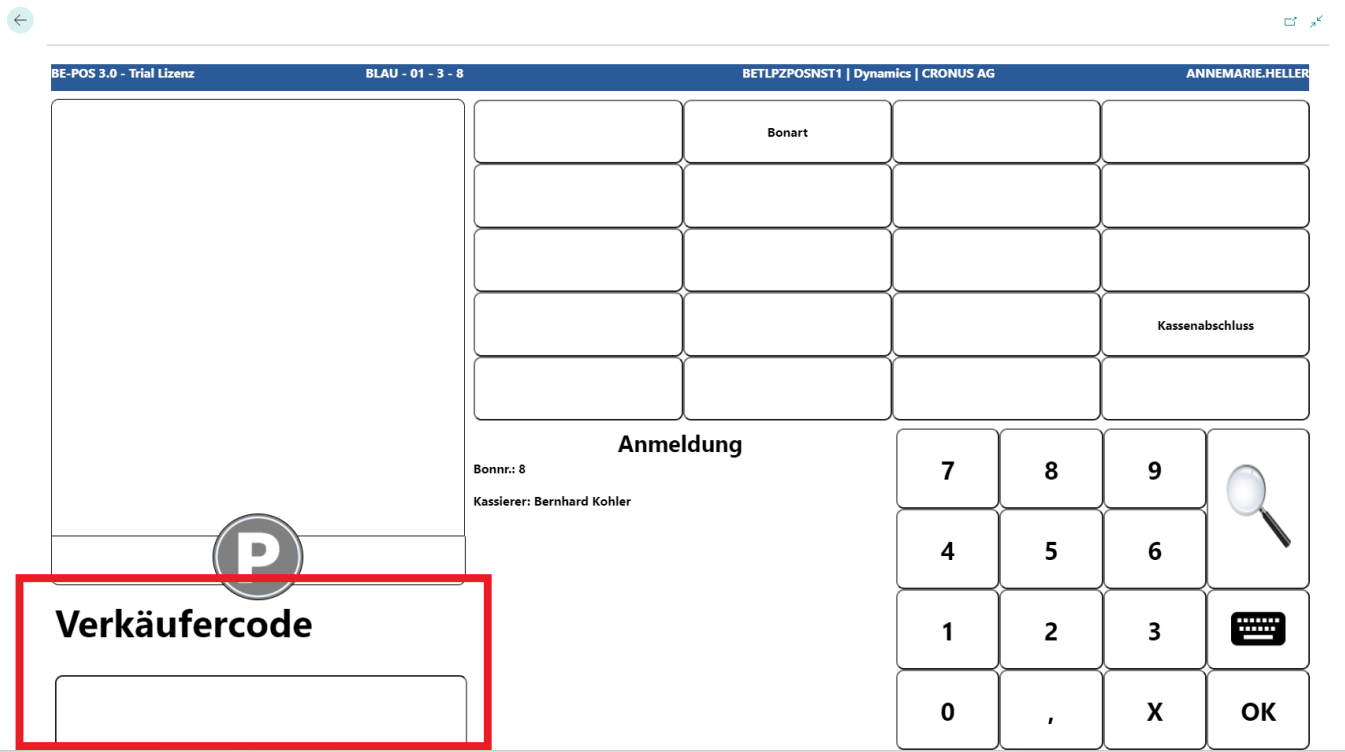
Salesperson Login
If the cash register is set up accordingly, a salesperson must be entered before every receipt.
 Click to enlarge
Input Item
After entering the salesperson number, the POS program is in sales mode.
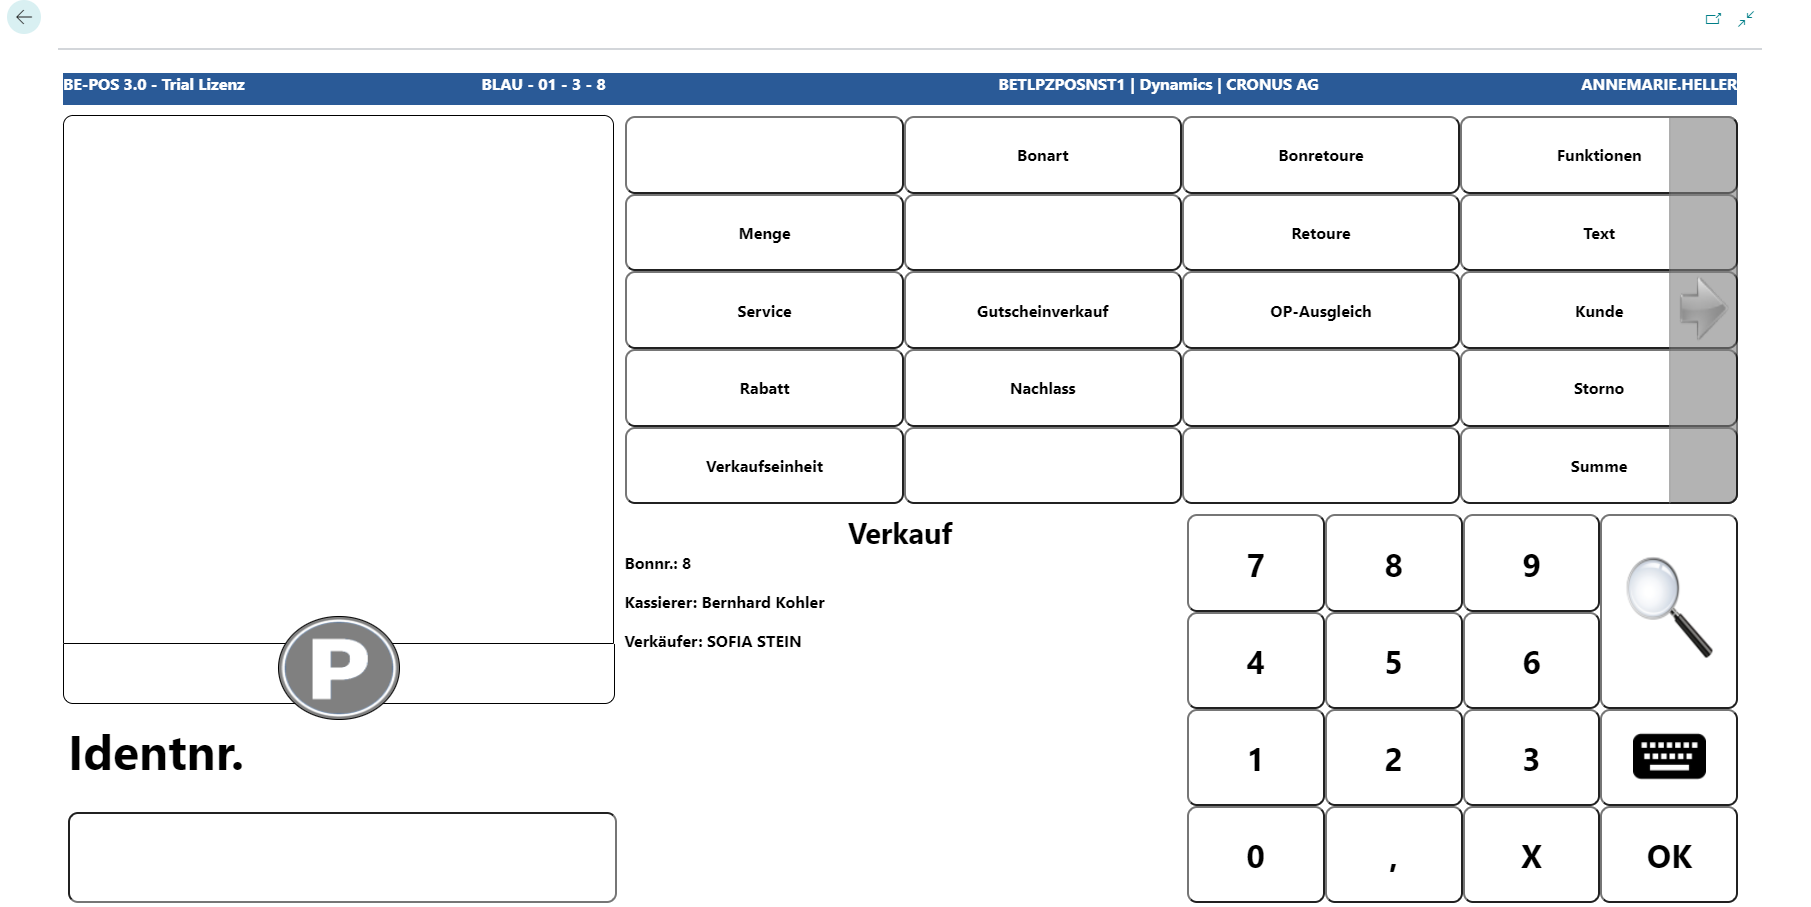
For the sales transaction, the barcode can either be scanned or entered manually if the scanner is not working.
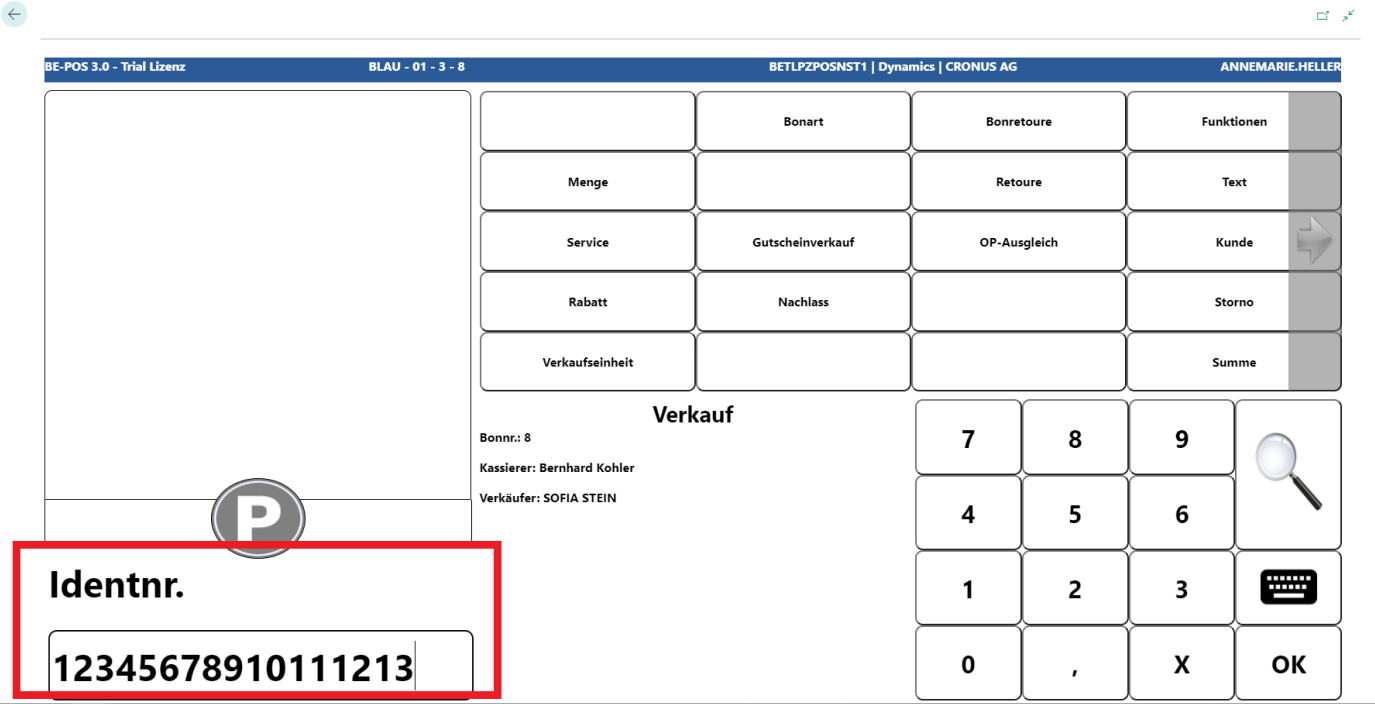
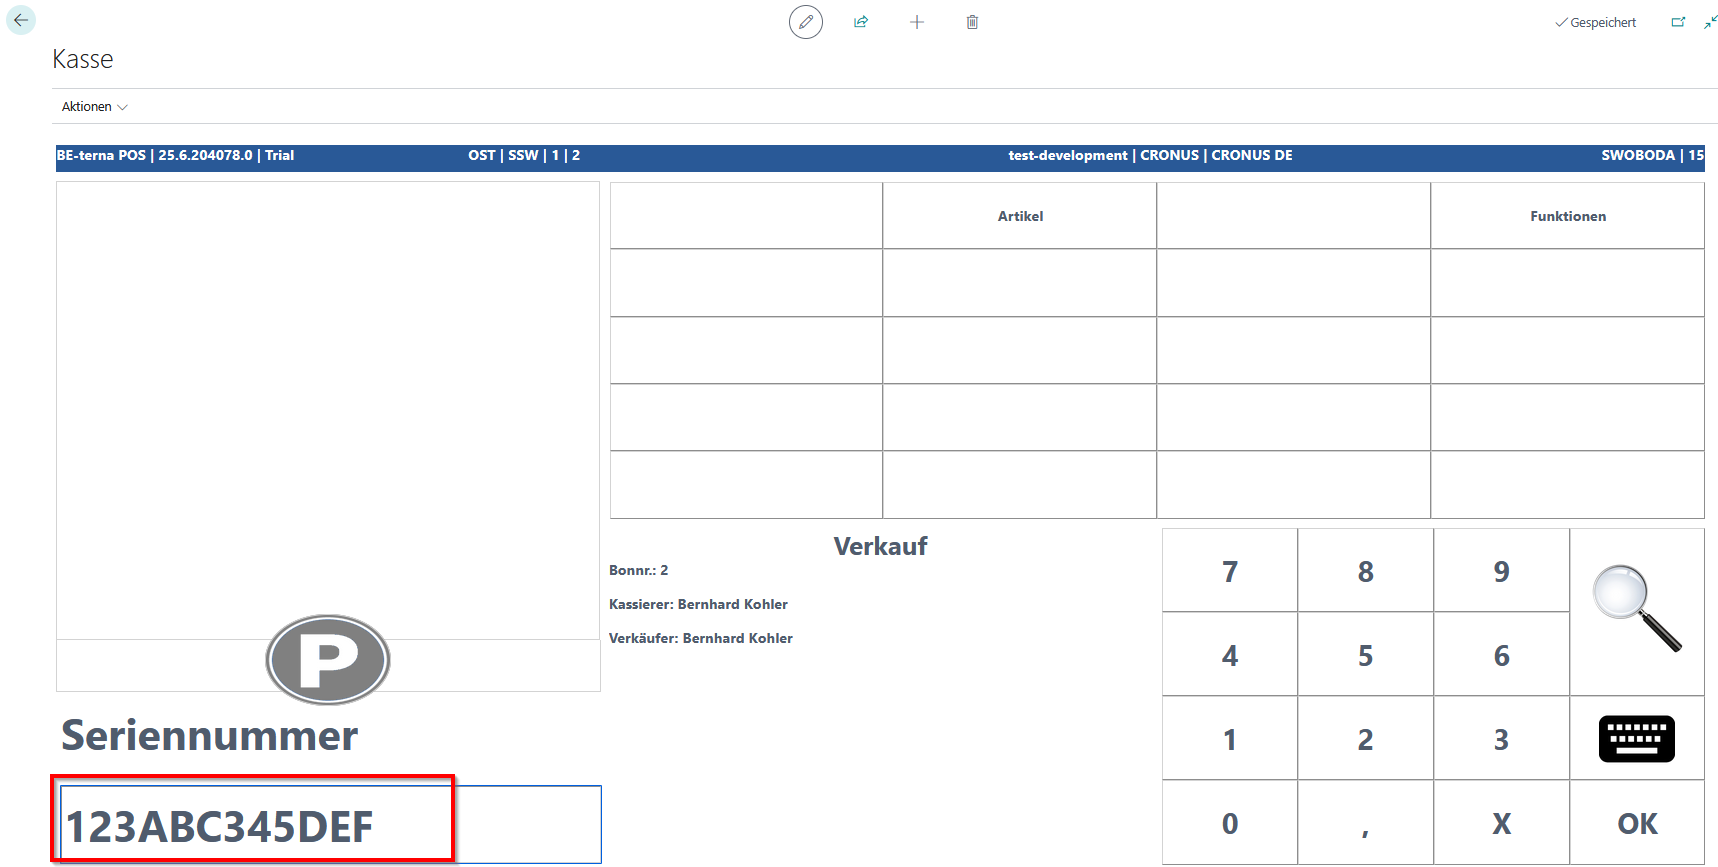
Enter Serial Number
If items are managed with serial numbers, and “Serial No. Avail. Sales” is enabled for the item tracking code assigned to the item, the cash register switches to serial number entry after the item has been entered. Depending on the serial number tracking setup, the register supports entry in different ways.
“Serial No. Information Required” is disabled
Because no serial number information card is required, any value can be scanned into the input field:
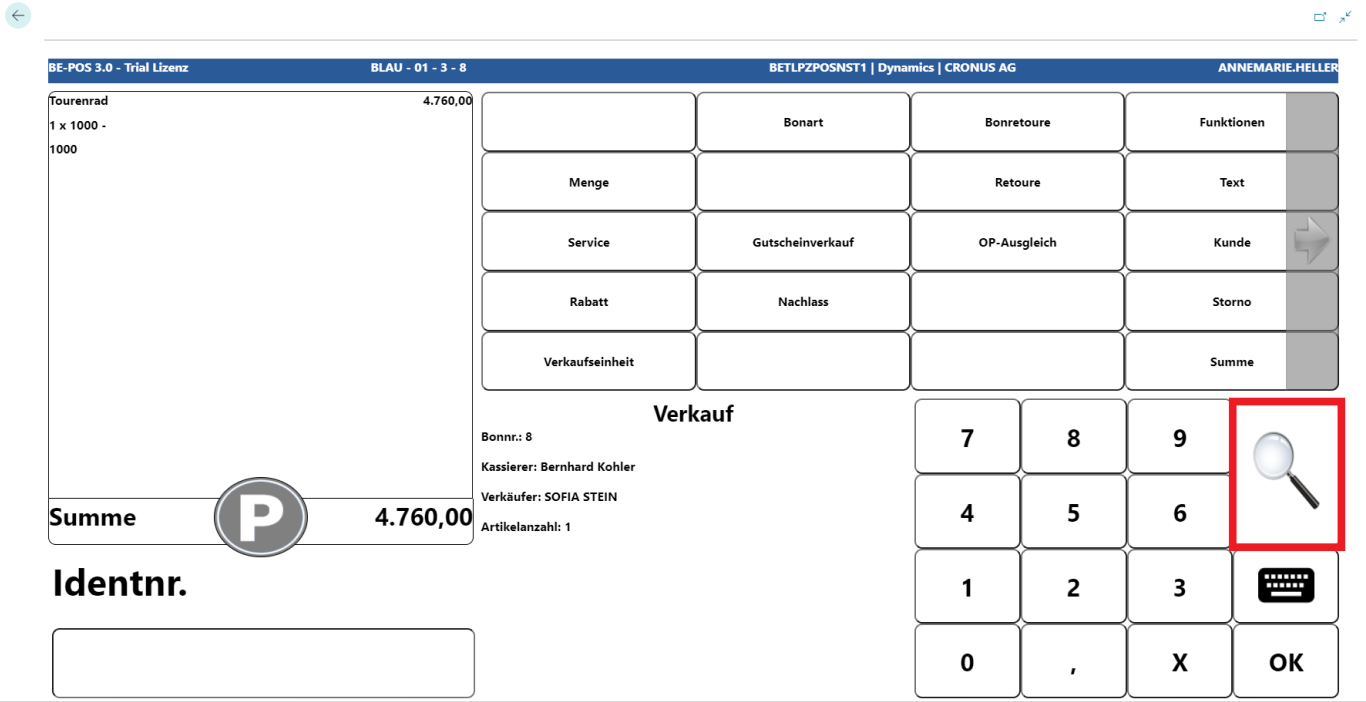
Using the magnifying glass button on the checkout screen, an entry aid for capturing the serial number can be opened if no scannable serial number code or physical keyboard is available:

This entry aid can also be triggered automatically by enabling “force immediate opening” in the setup of the serial number overview.
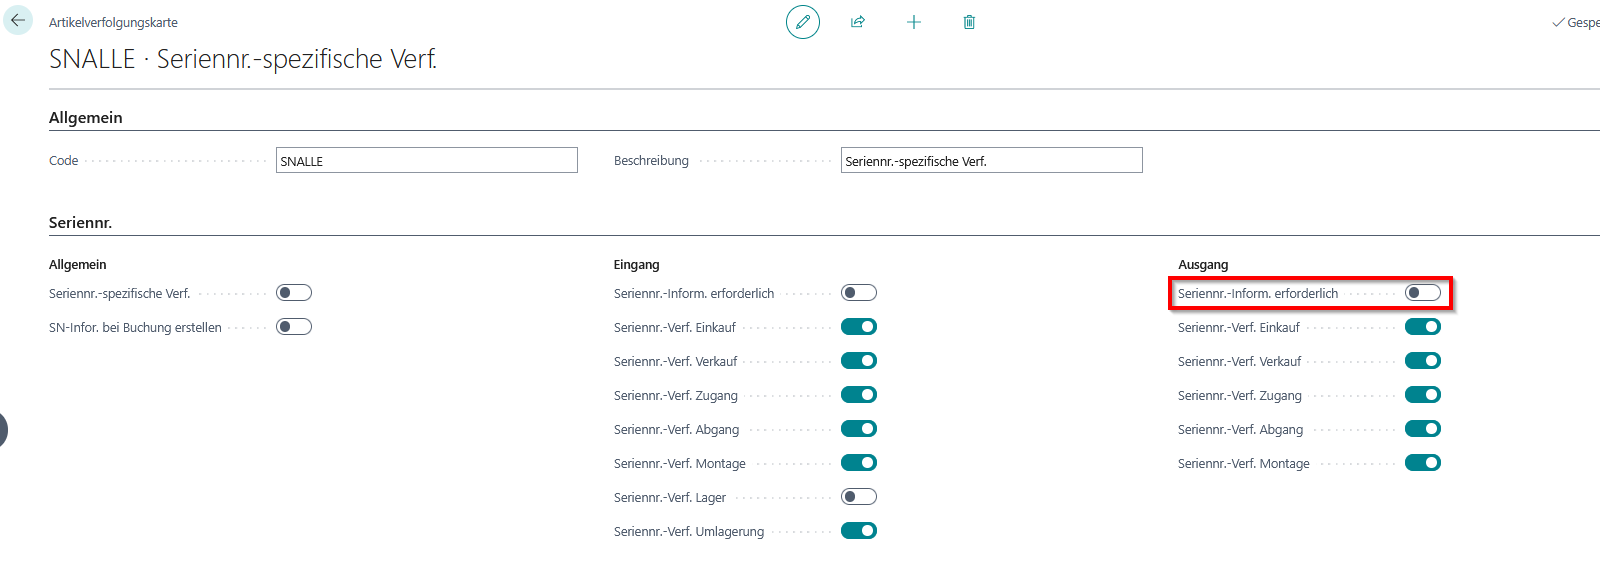
“Serial No. Information Required” is enabled
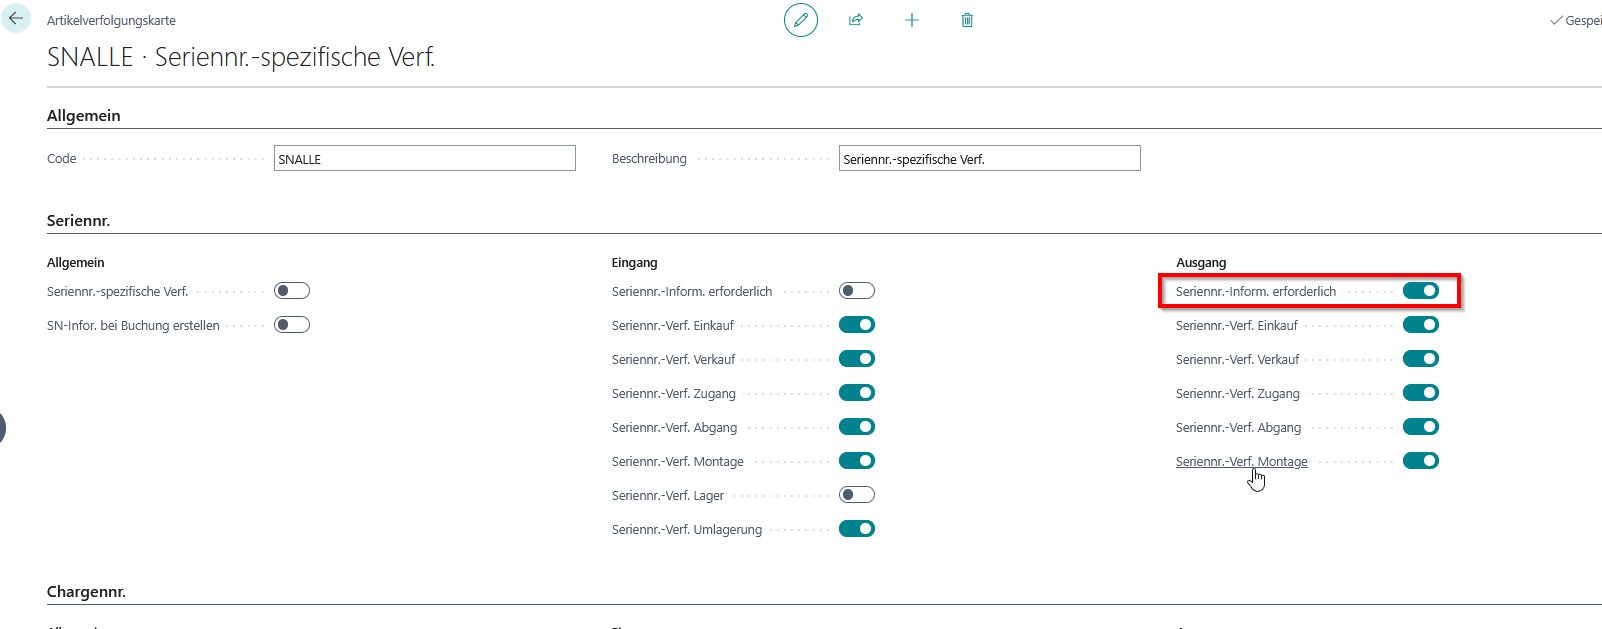
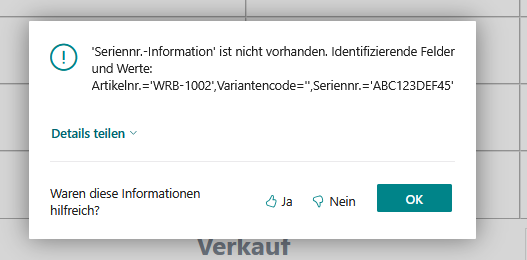
Because a serial number information card is now required, only serial numbers that exist as serial number information can be entered. If a serial number that does not exist is entered, a corresponding error message appears:
If the magnifying glass button is used here, the overview of serial number information cards assigned to the item, serial number list, opens:
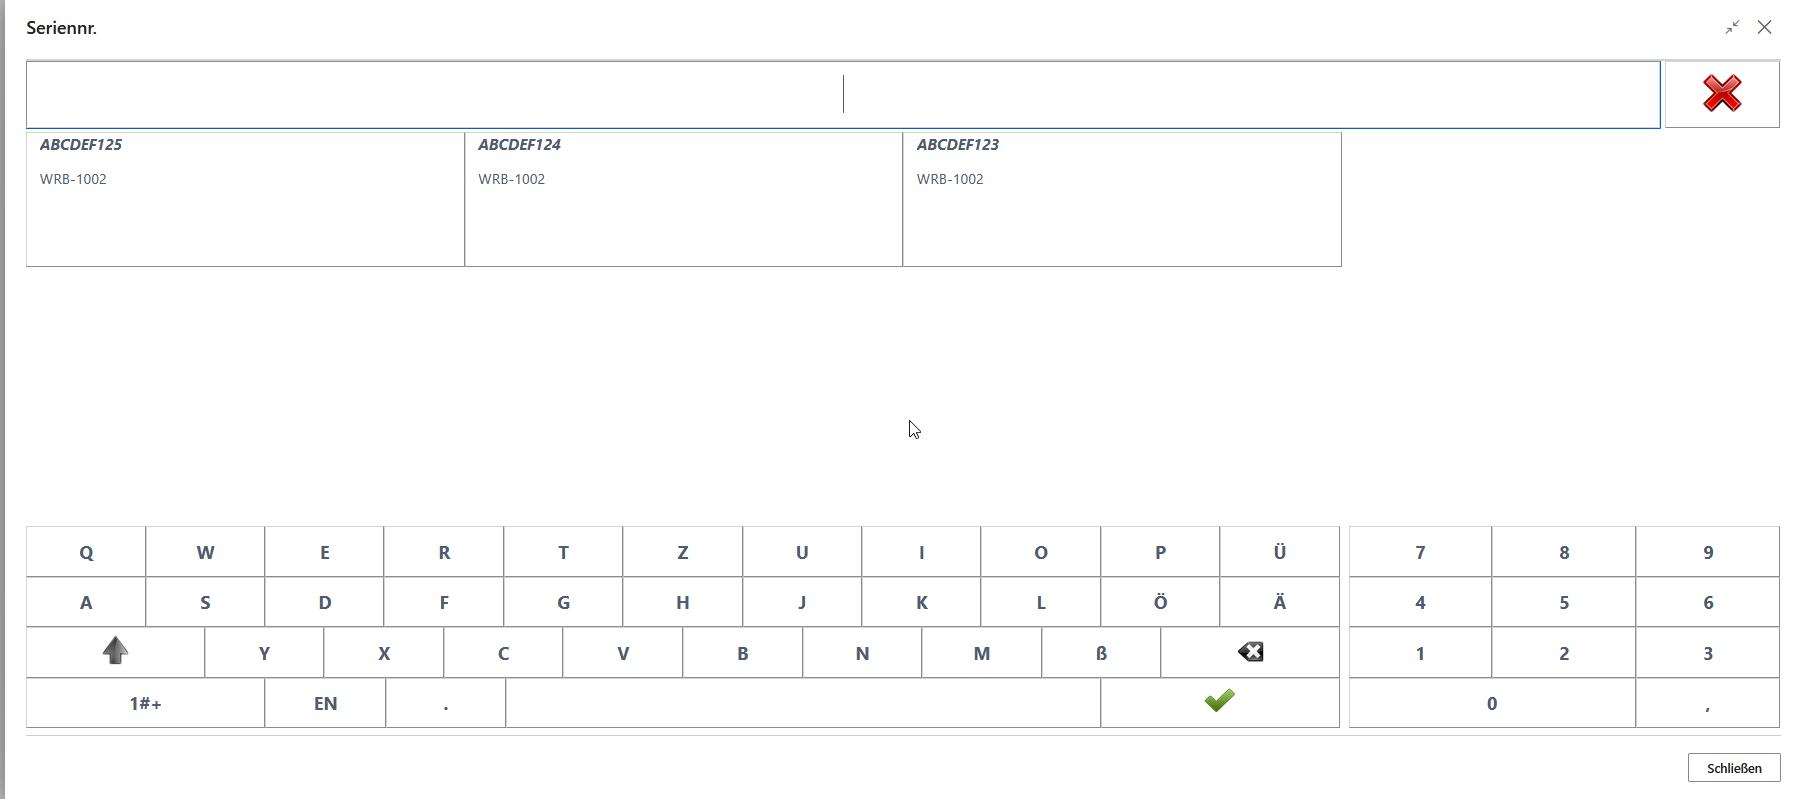
Selecting a serial number transfers it to the receipt.
This serial number overview can also be triggered automatically by enabling “force immediate opening” in the serial number overview setup. By specifying filters in the setup, the serial number list can also be opened with filters applied, for example only with serial numbers that are in stock at the sales location.
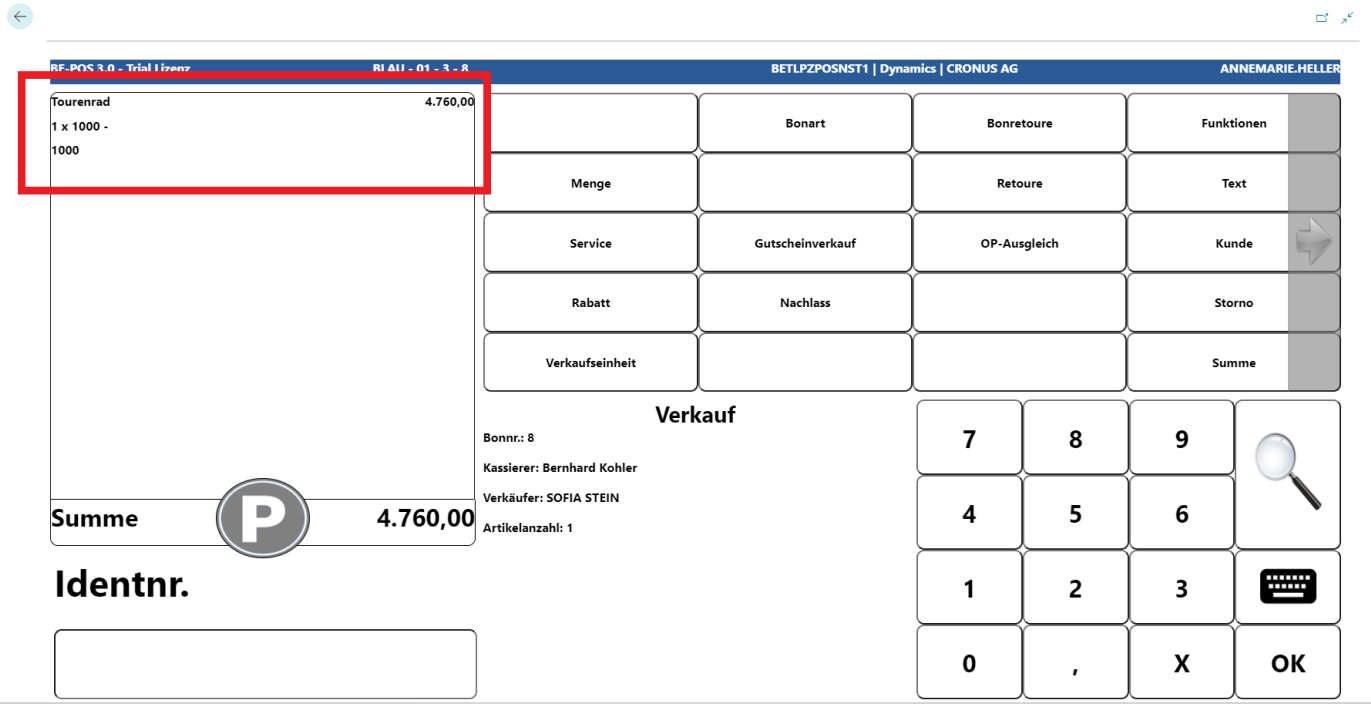
After successfully scanning or entering the item number and, if applicable, the serial number, the item is displayed on the receipt roll with the current price.
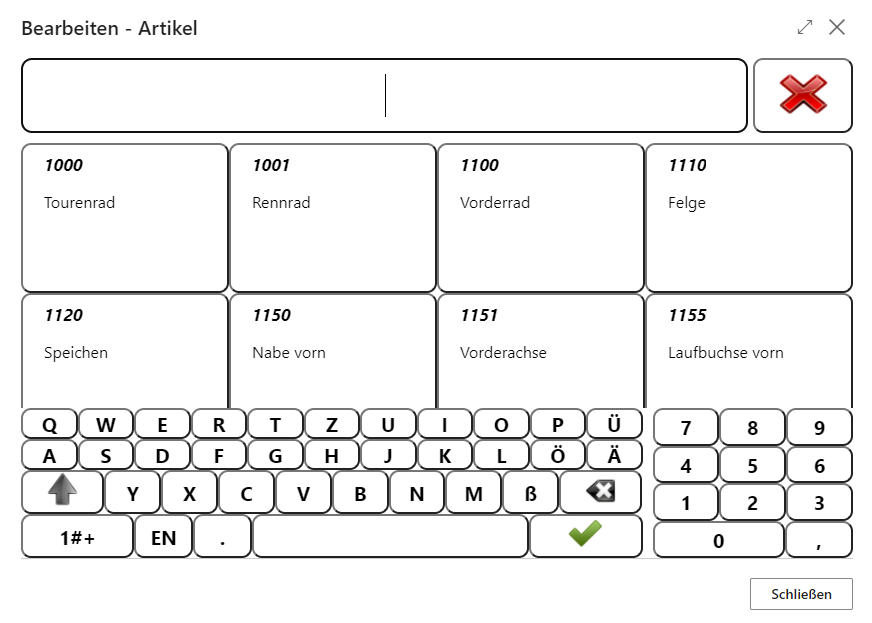
If no barcode is available or it cannot be read, items can be searched for using the magnifying glass function.
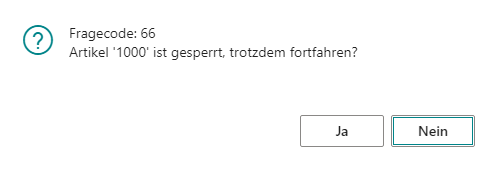
If the entered item is marked as blocked in the system, a prompt appears asking whether it should still be sold.
If the unit to be used for the item is flagged for automatic quantity changes, for example for weighted goods, the checkout process switches directly to quantity entry afterward.
Sum and Payments
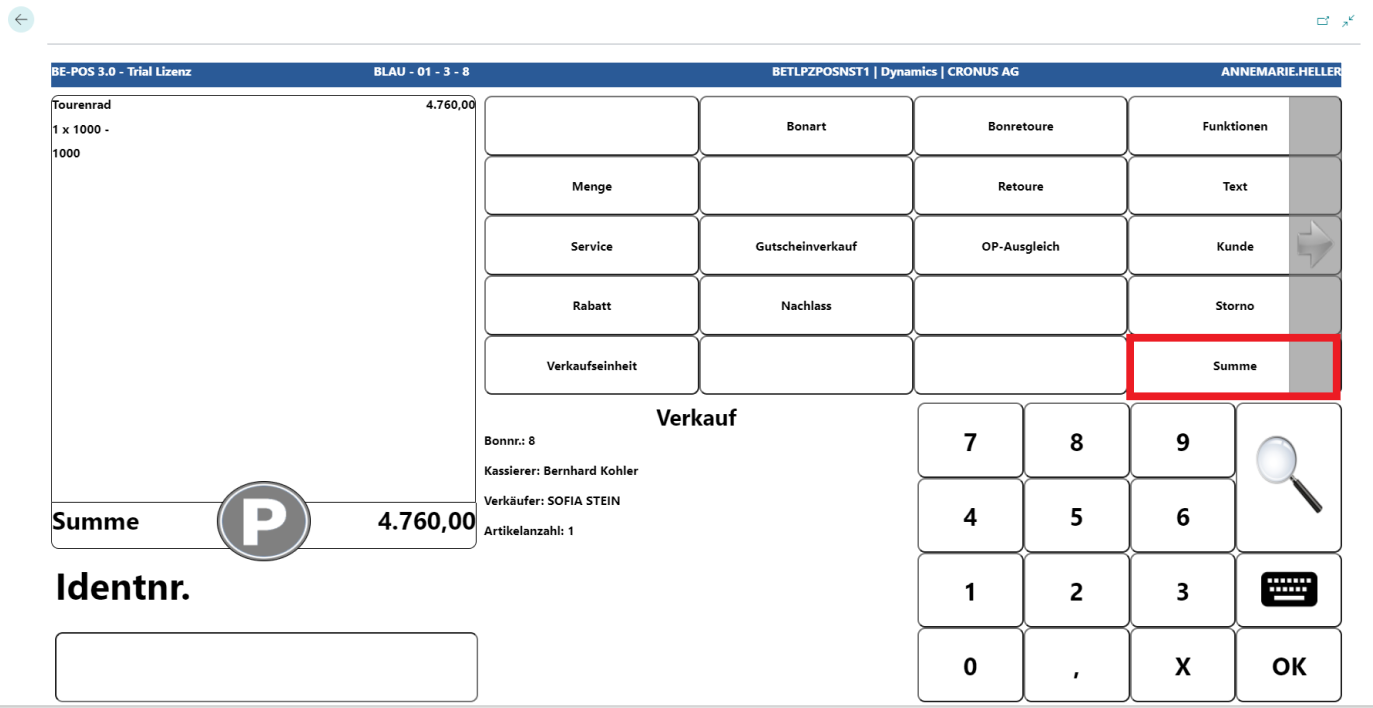
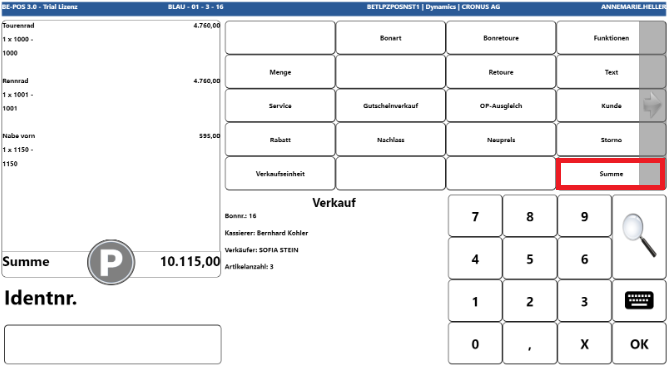
To complete the receipt, press the Total button.
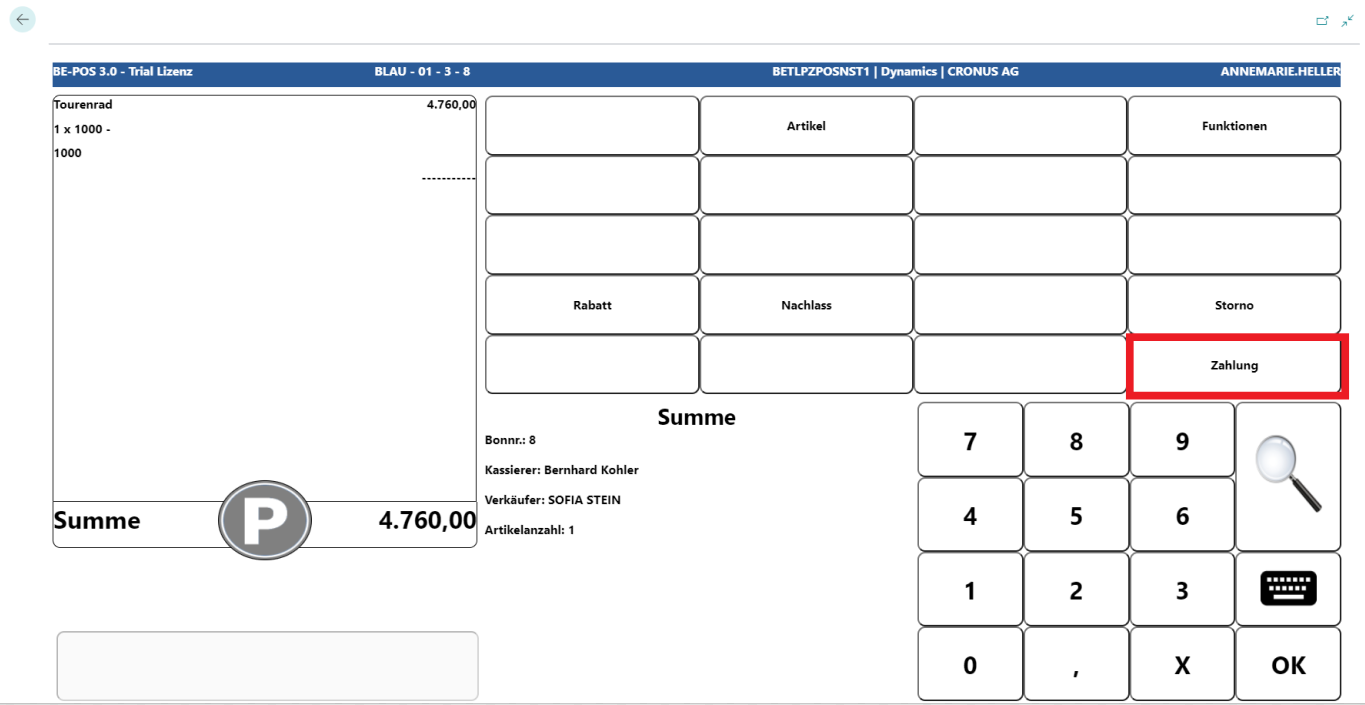
A new window appears in which the Payment button is selected.
When the Payment button has been pressed, the cash register is in payment mode and the receipt total, including VAT, is displayed on the receipt roll.
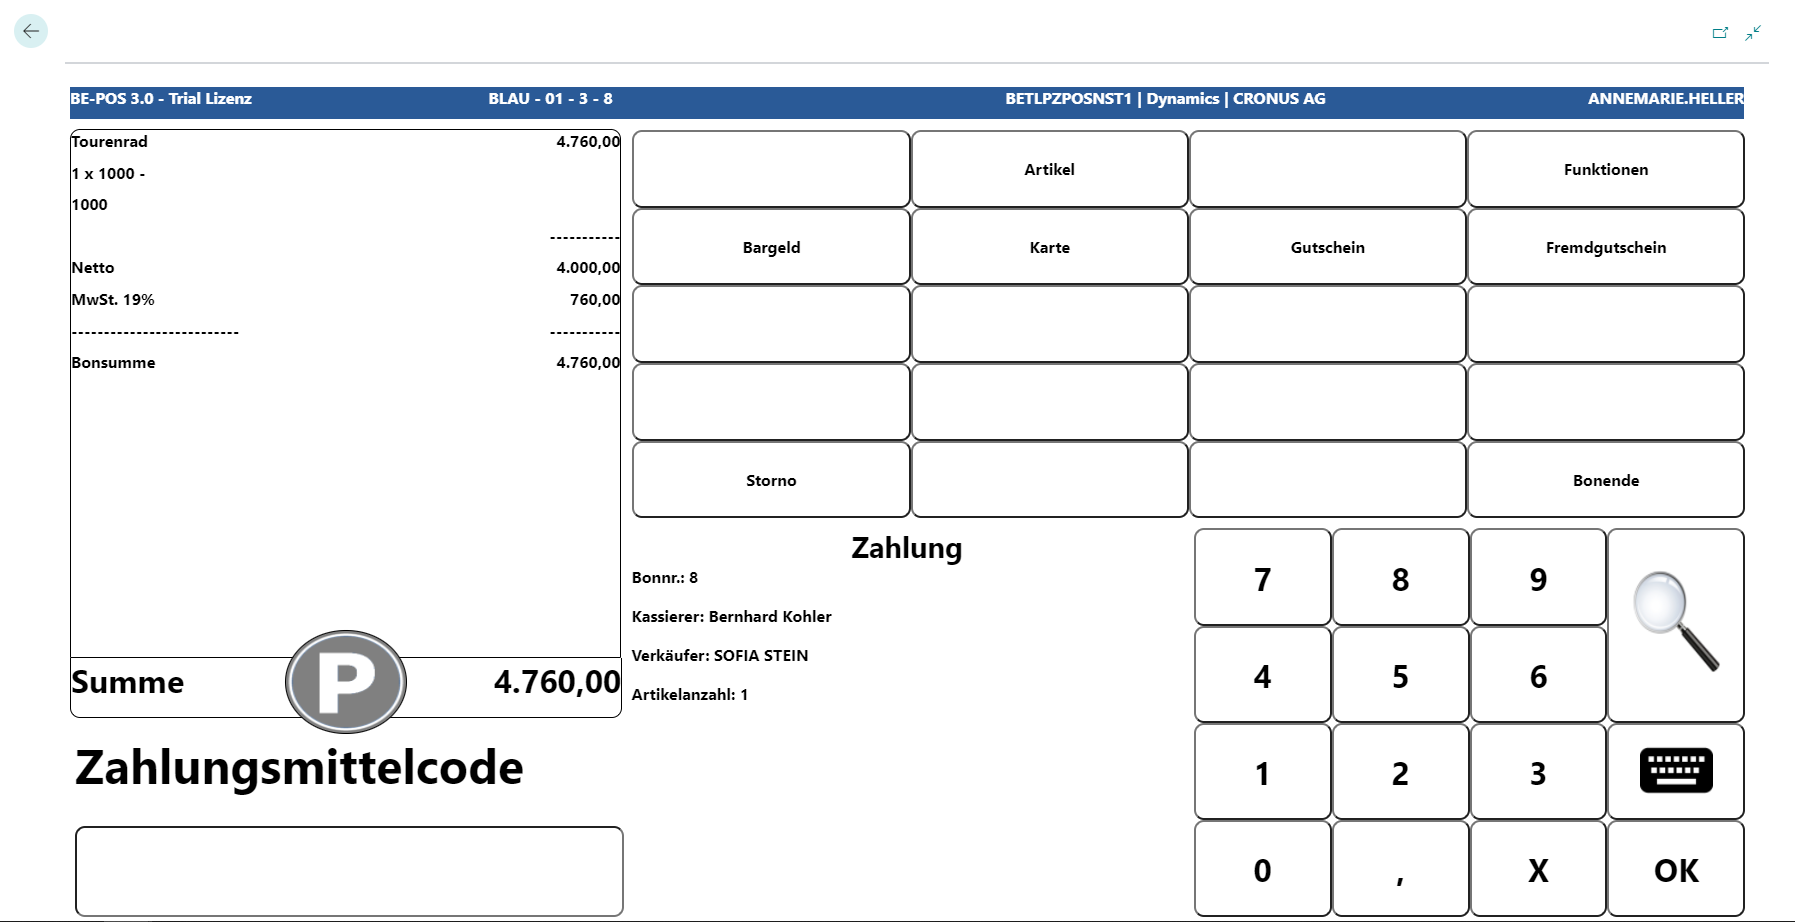
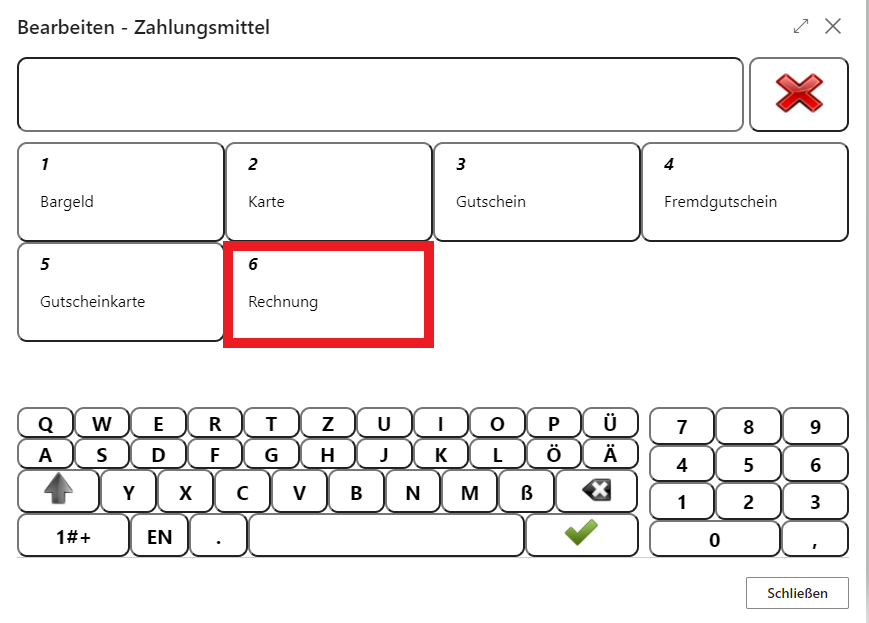
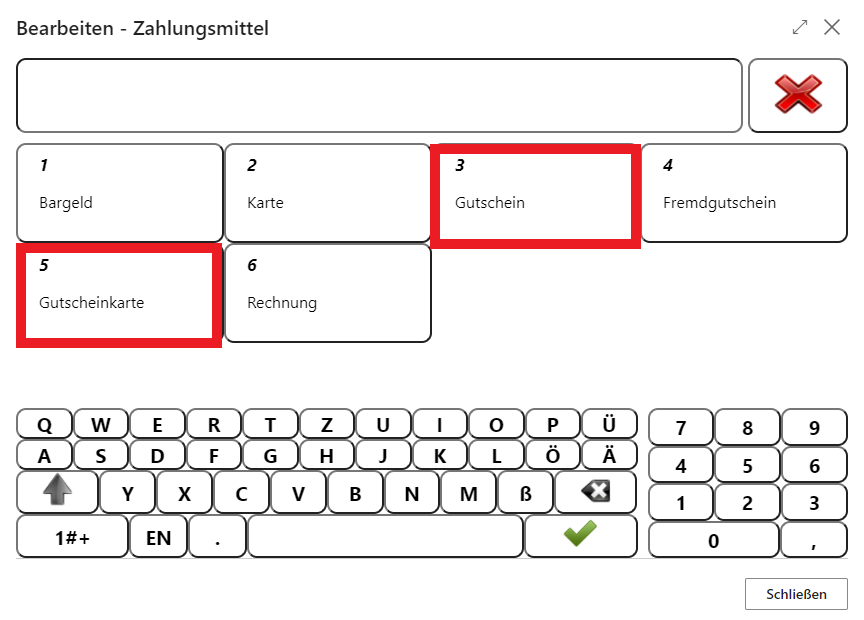
To enter the payment, first select the tender. In this example, “Cash”.
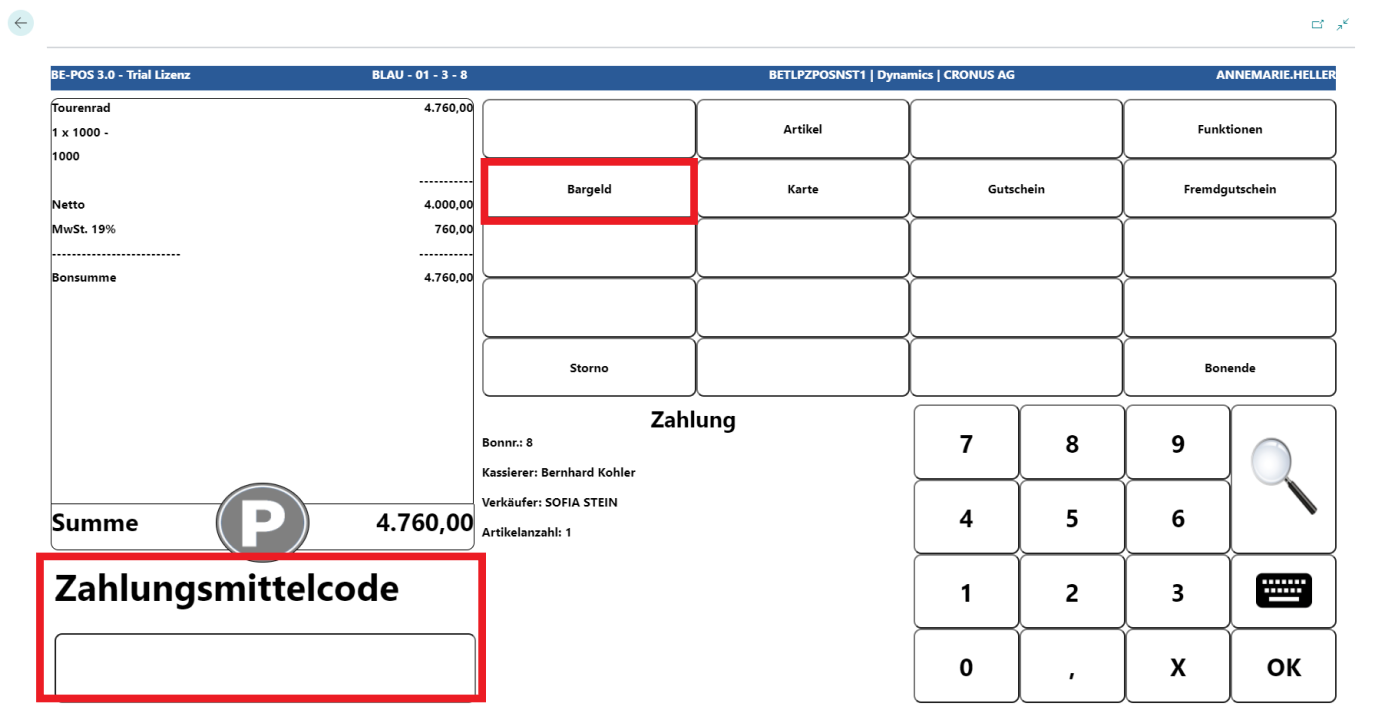
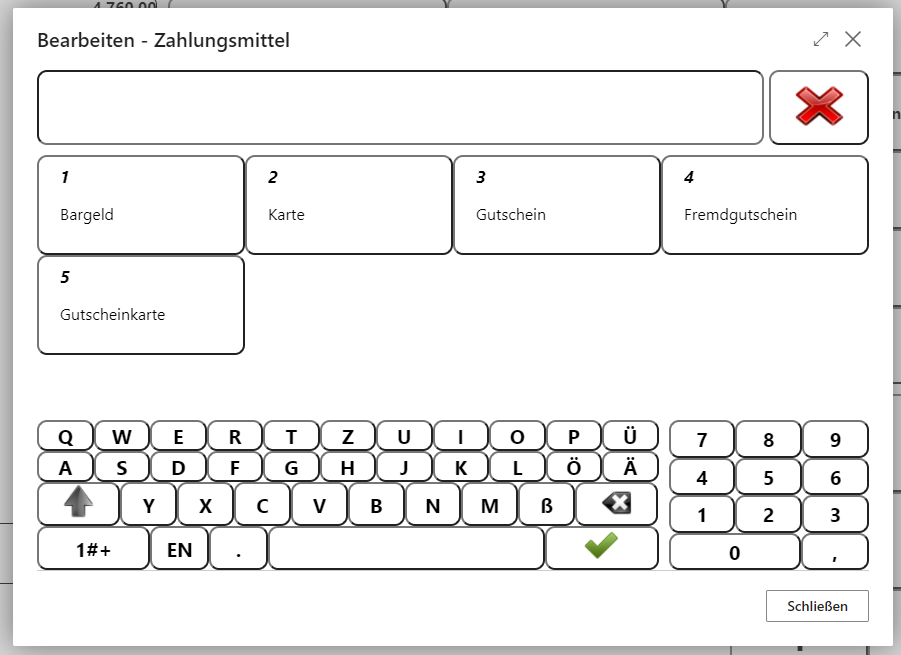
If no quick buttons are set up for tenders, they can be opened using the magnifying glass function.
Note: All tenders can be combined with each other. The exception is the Invoice tender.
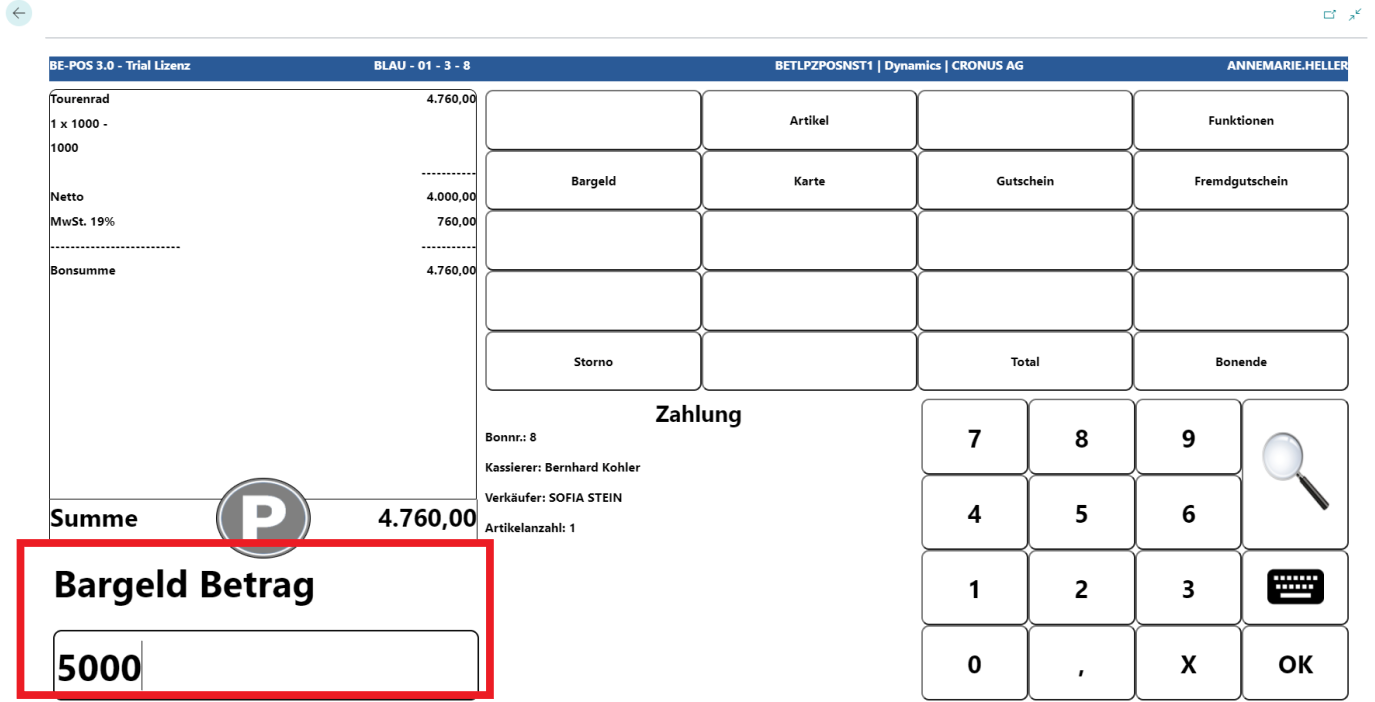
Now enter the amount given by the customer.
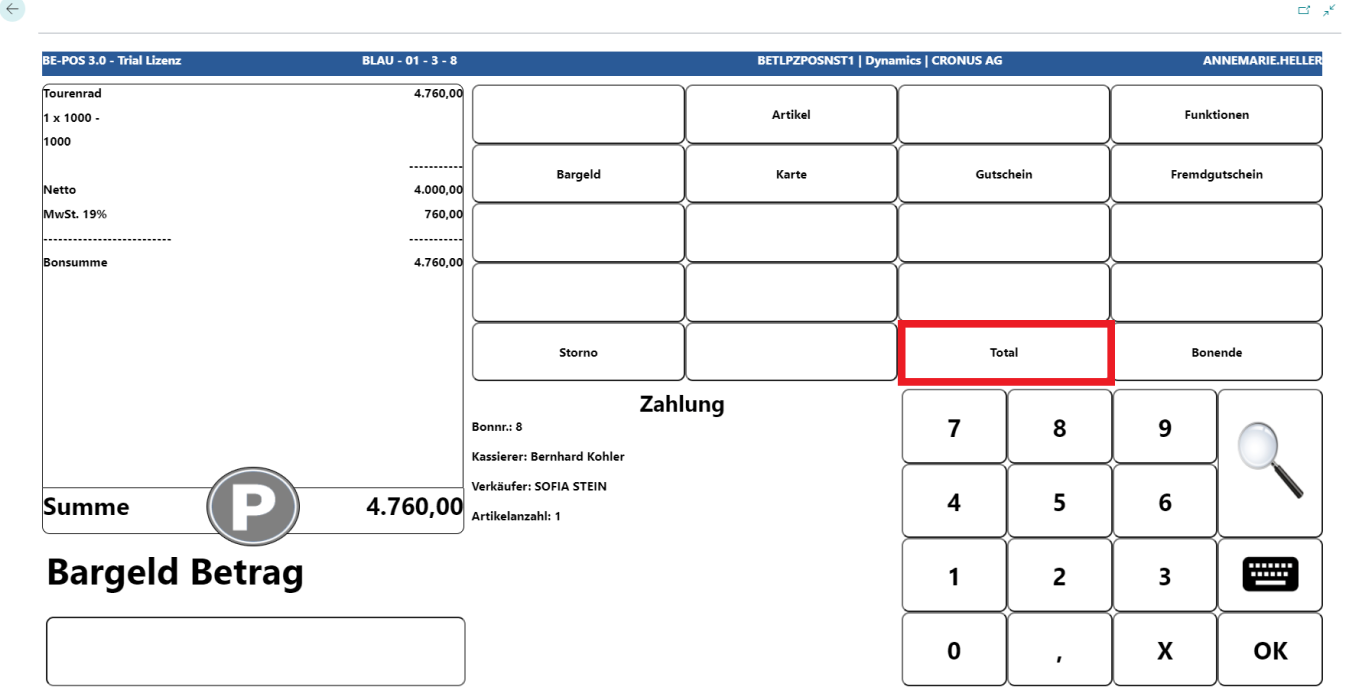
If the customer pays the exact amount, for example by card payment, the Total button can be used.
After the amount has been entered, the amount received is displayed on the receipt roll and, if applicable, the change amount the customer receives back.
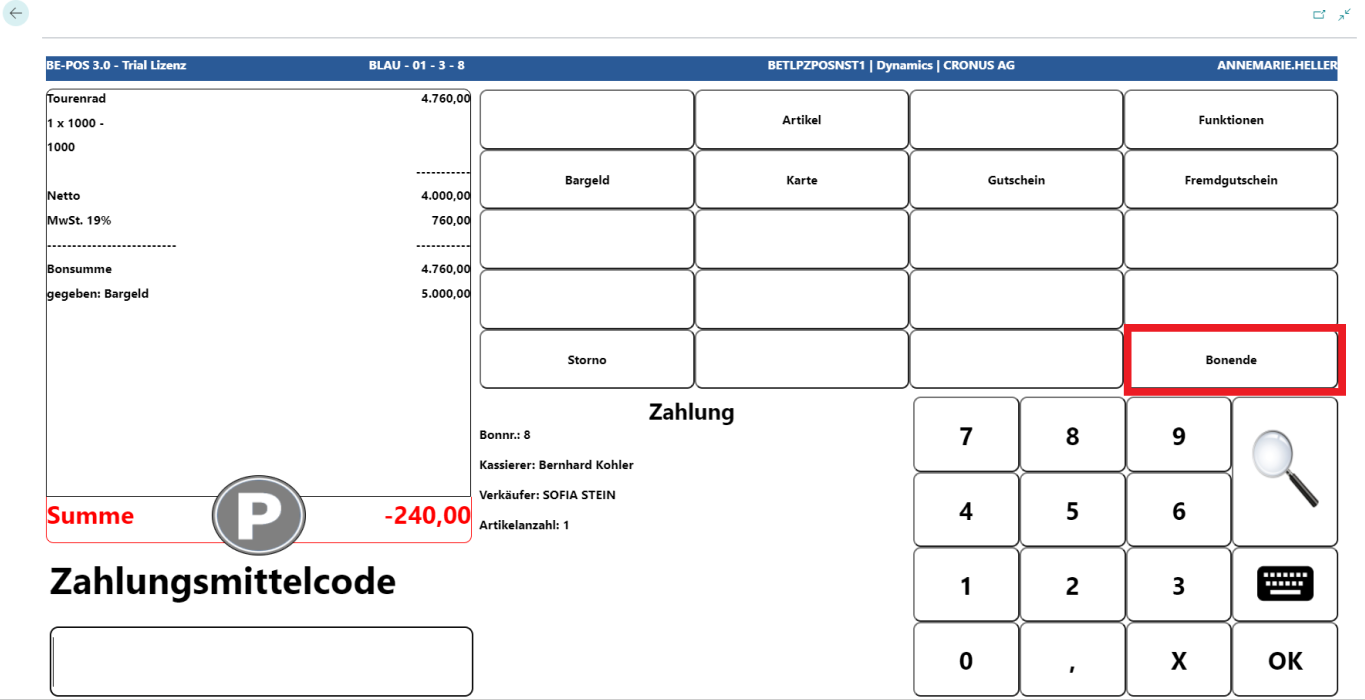
With End Receipt, the receipt is completed, printed, and the cash drawer opens.
Note: Once the receipt has been completed, no corrections or cancellations can be made.
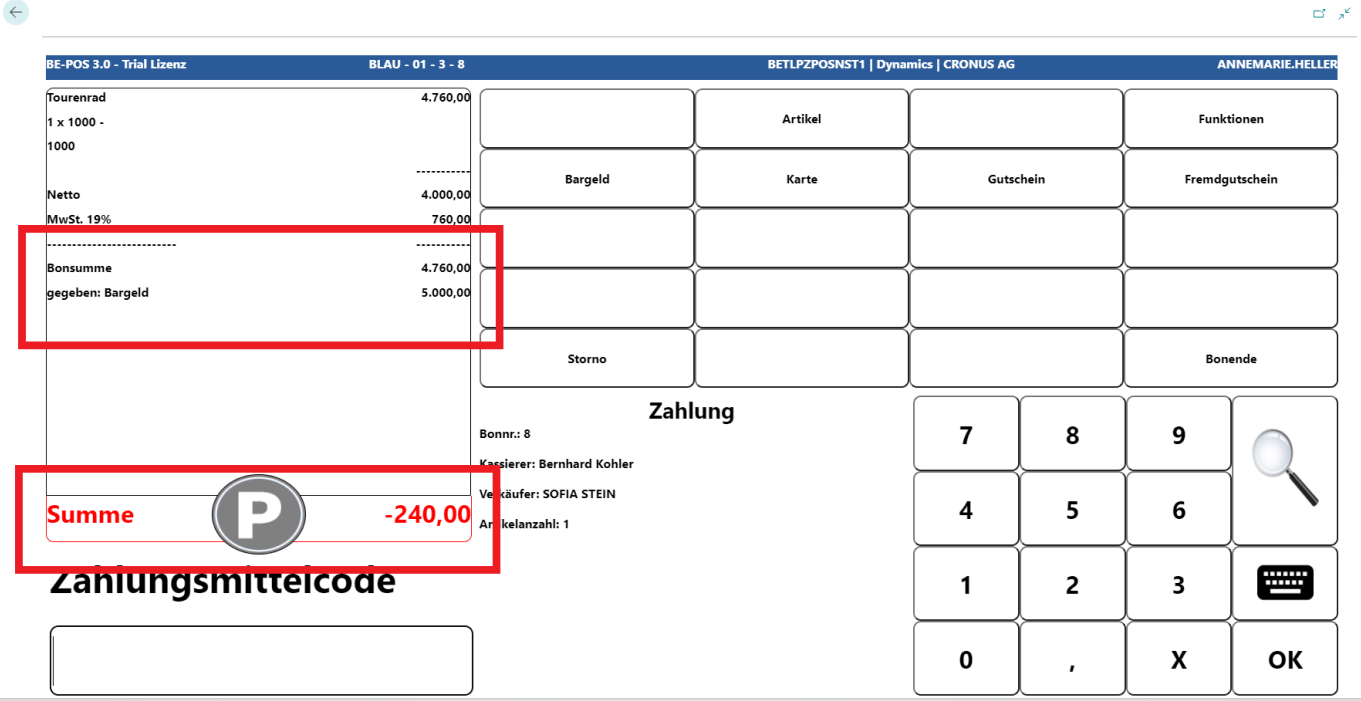
Invoice Tender
If the Invoice tender is enabled in the cash register setup, it requires the customer number to be entered. The customer type must be Customer.
If no customer has been registered by the time payment is made, the following error message appears.
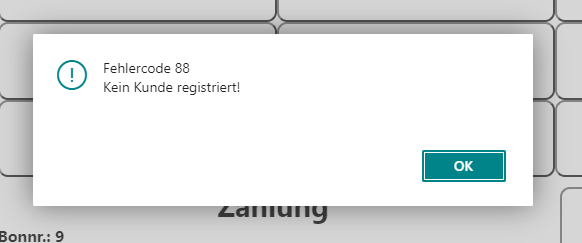
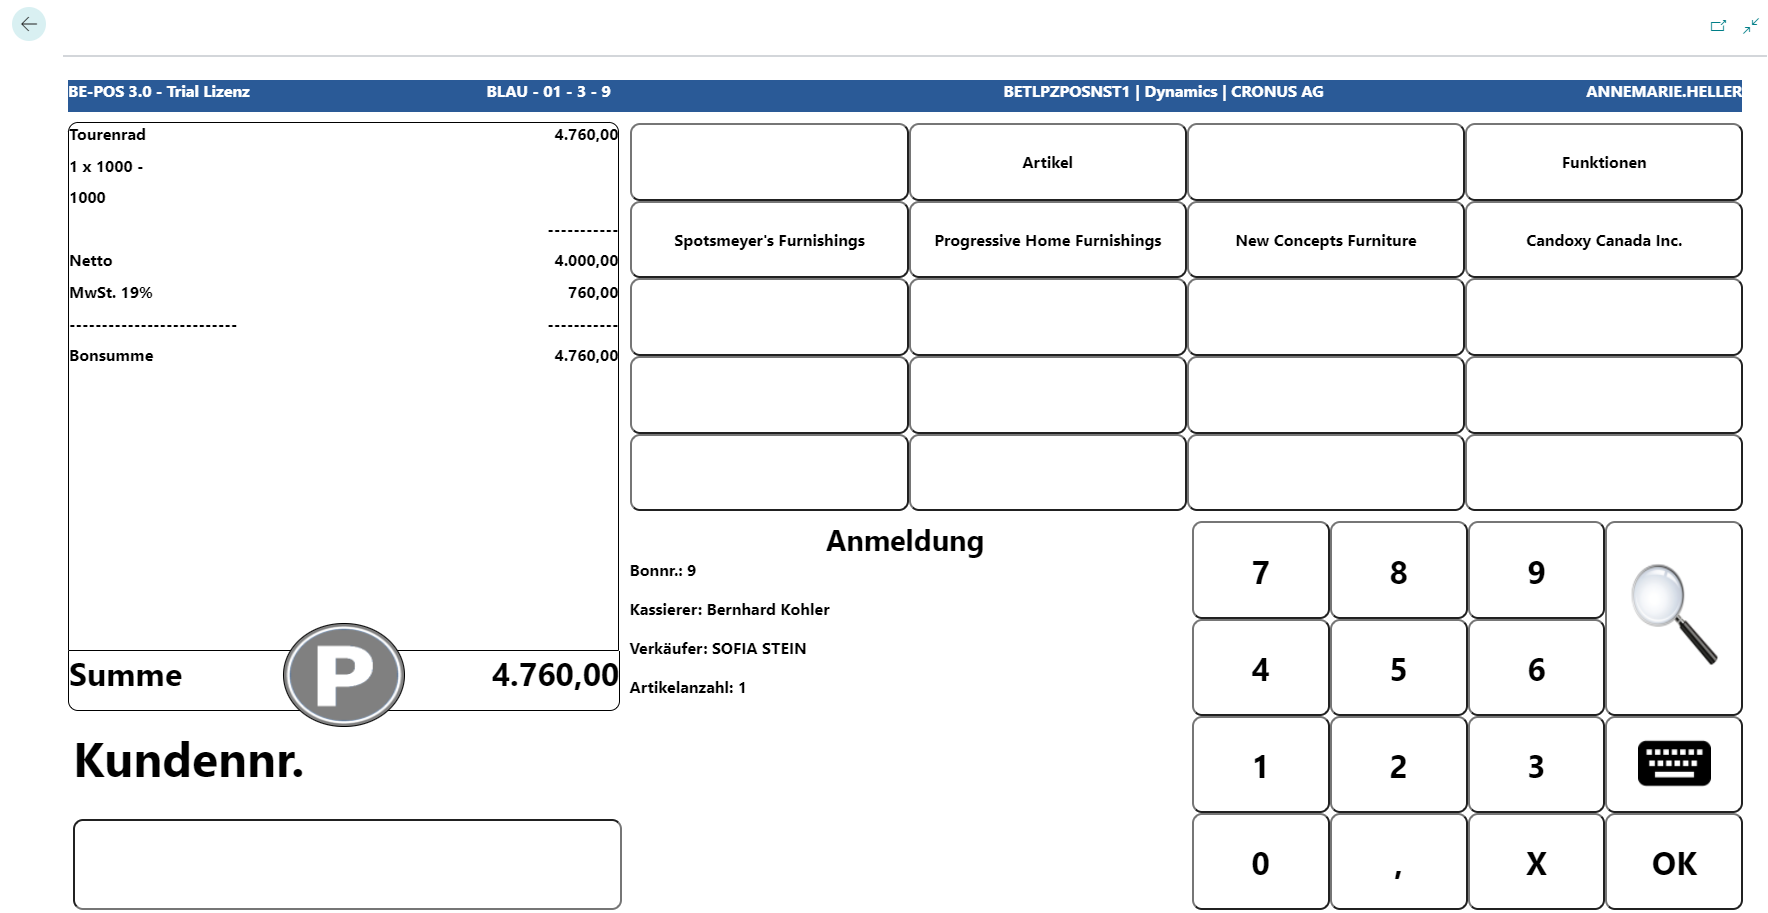
At this point, the customer can be selected and registered afterward by calling the Functions key and Customer.
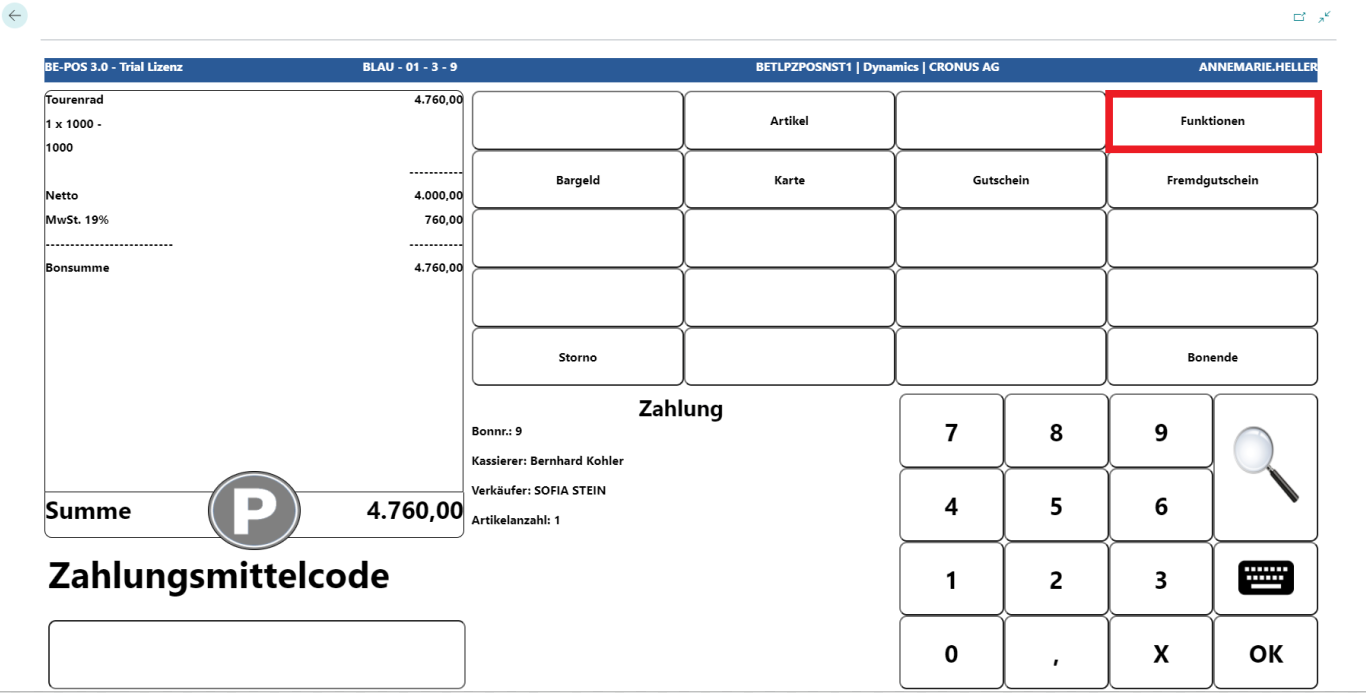
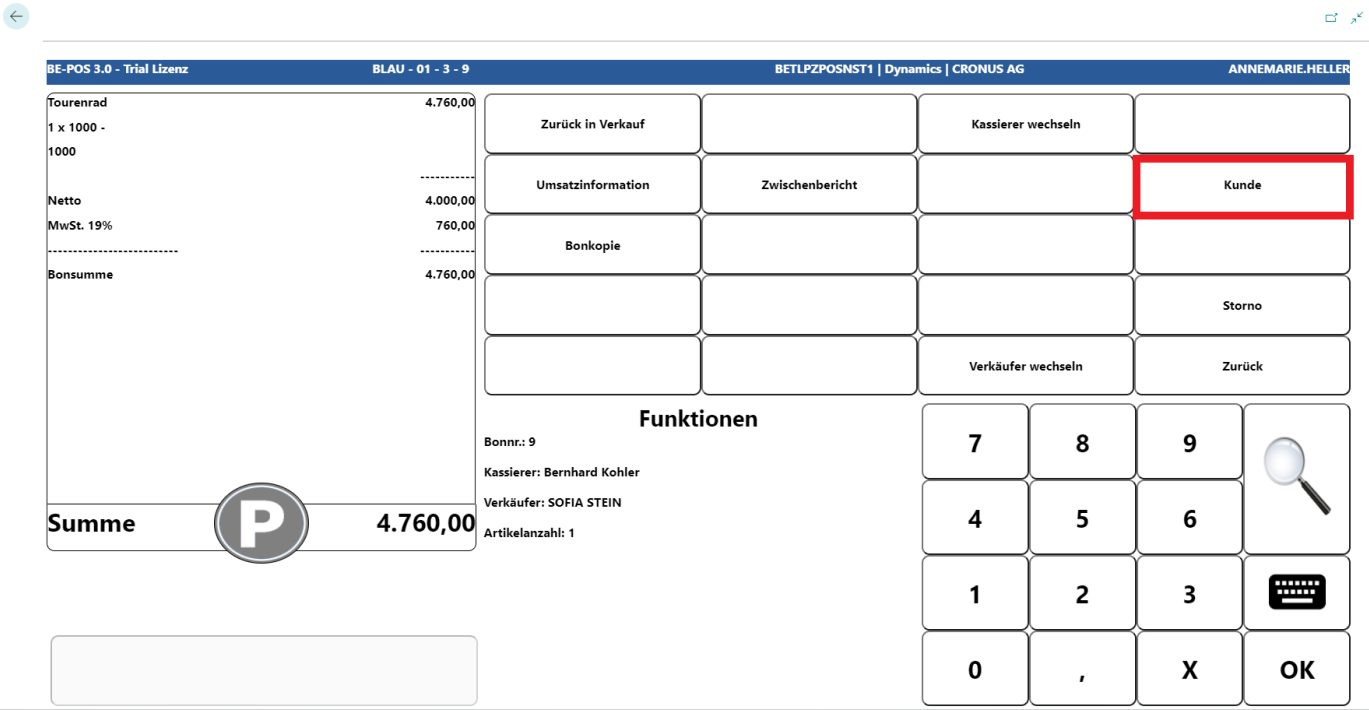
The customer can be searched for and selected using the customer number, a quick button, or the magnifying glass function.
Once the customer has been entered, this is visible in the information field.

When the receipt is completed, an open item is created for the customer.
Voucher and Voucher Card Tender
Vouchers are a normal tender. If payment is to be made with a voucher during the payment process, Voucher must be selected as the tender.
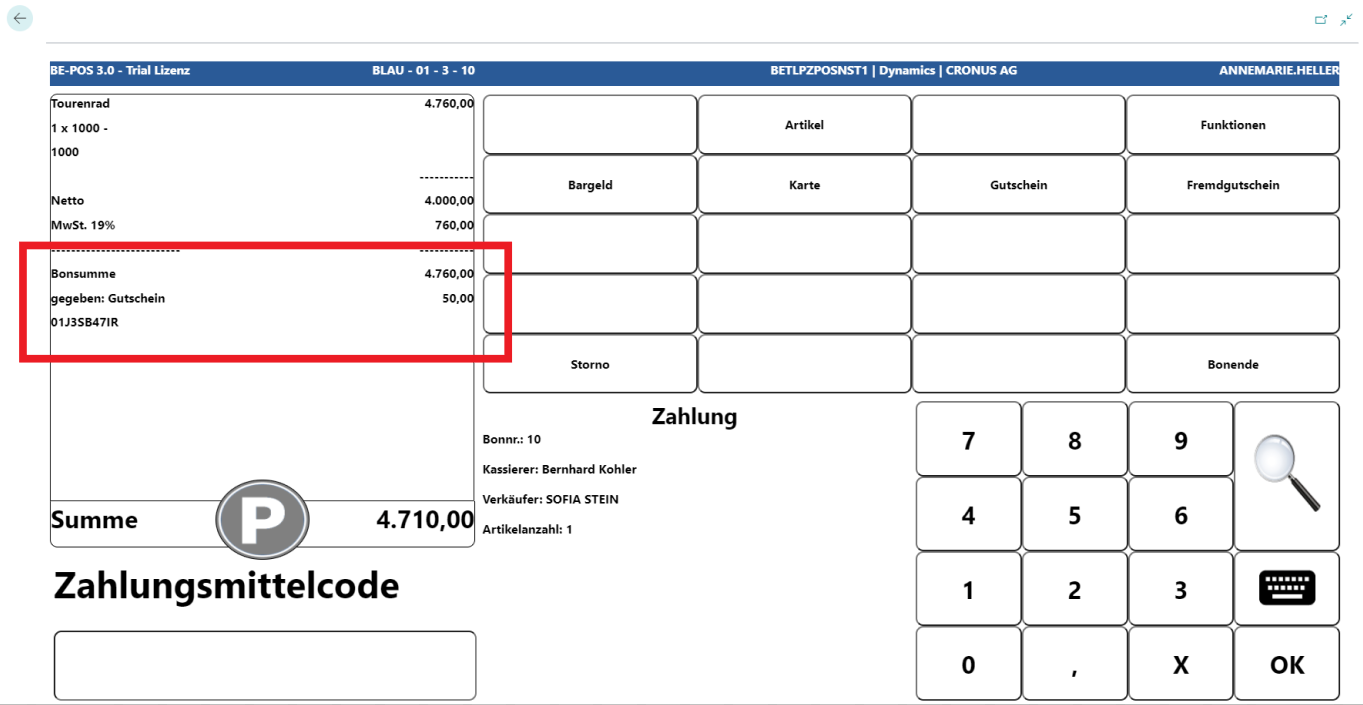
The voucher number is then entered in the input field.
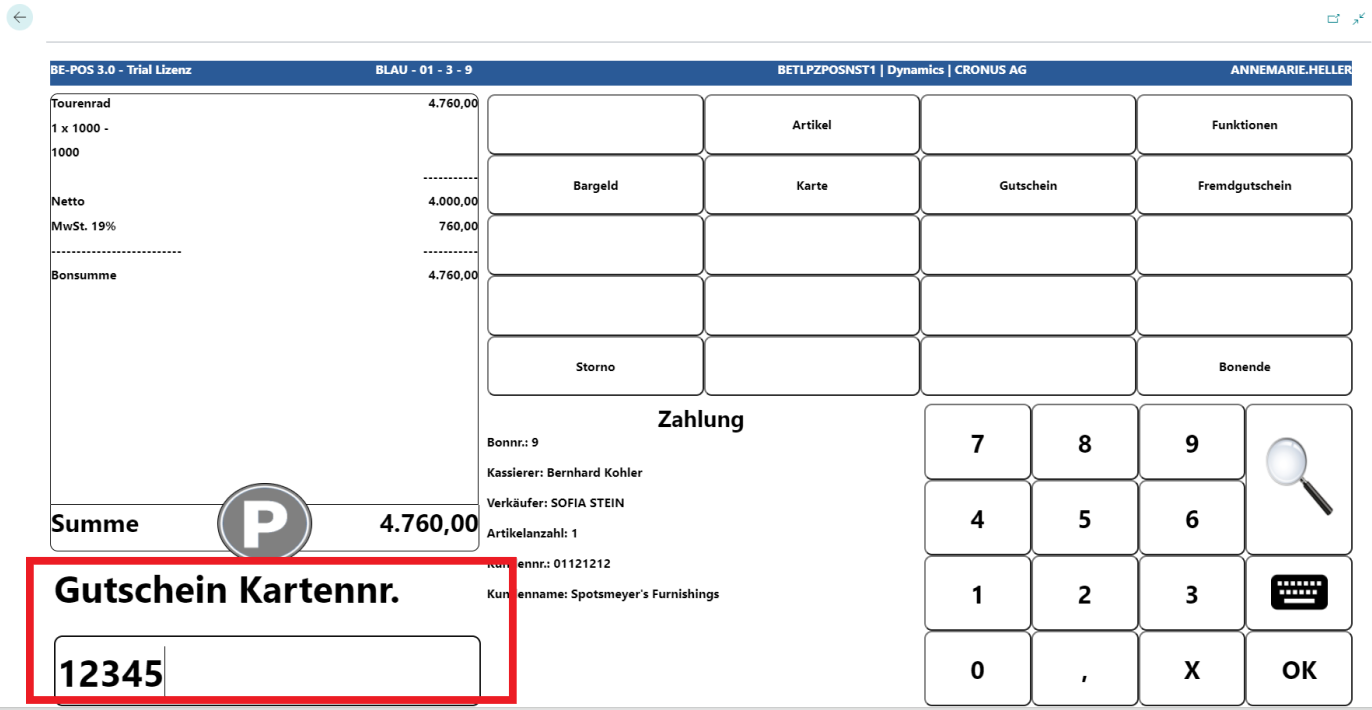
If voucher overview allowed has been enabled in the cash register setup, vouchers can be opened using the magnifying glass function.

After the voucher is selected, it is transferred to the receipt roll.
Cancel
The Cancel function is available throughout the entire sale until the receipt is completed and can be applied to all lines entered on the receipt or to the entire receipt. It is also possible to cancel payments.
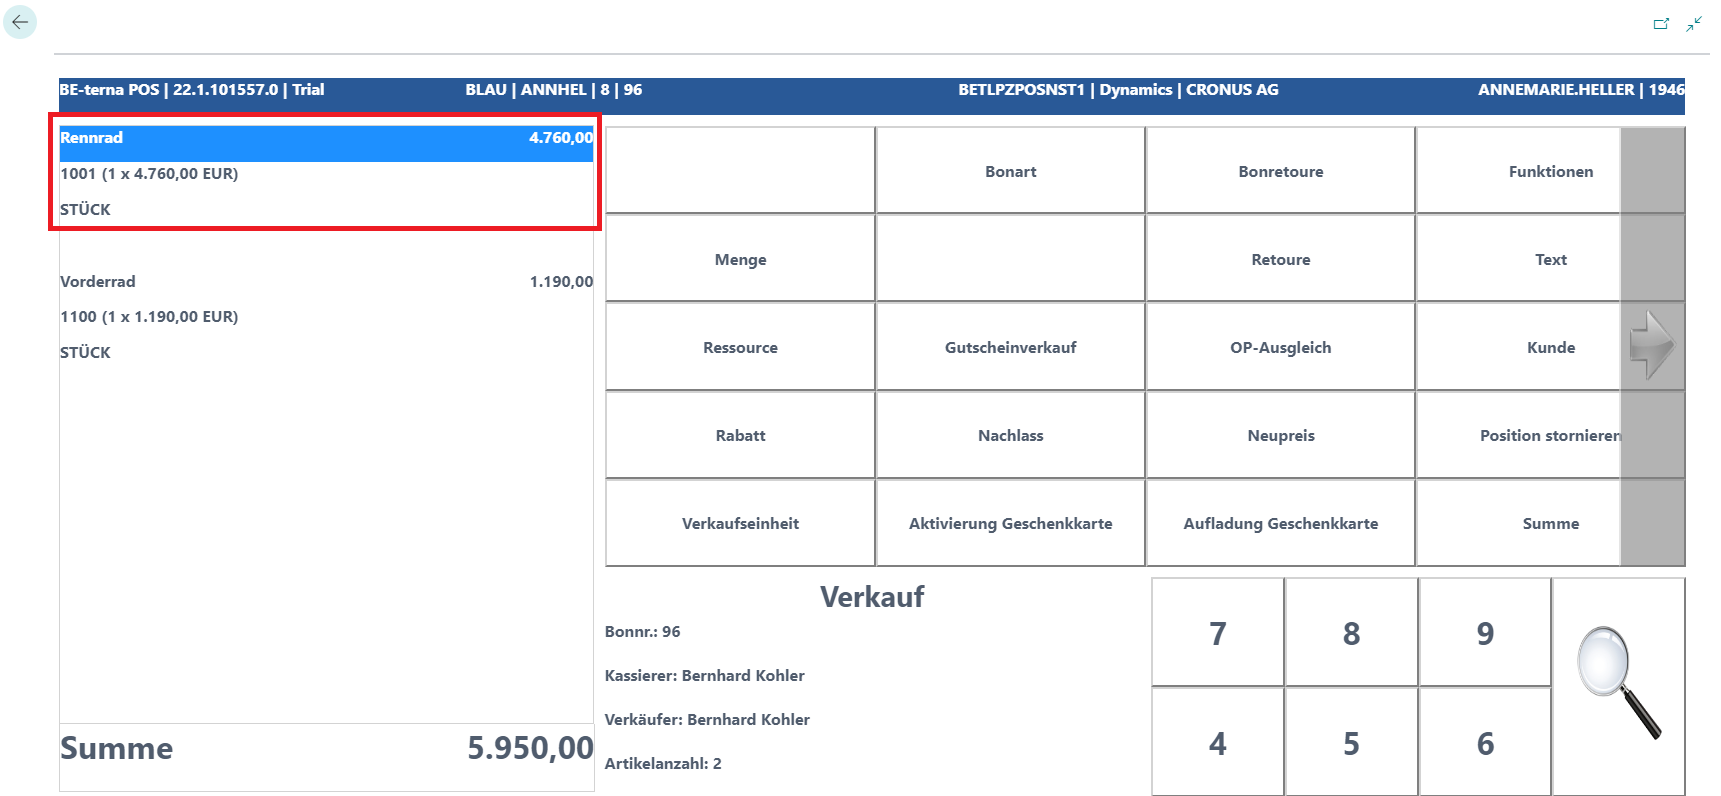
Cancel Line Item
To cancel a receipt line, it must be highlighted.
Once the correct line has been selected, it can be removed from the receipt roll using the Cancel Line Item button.
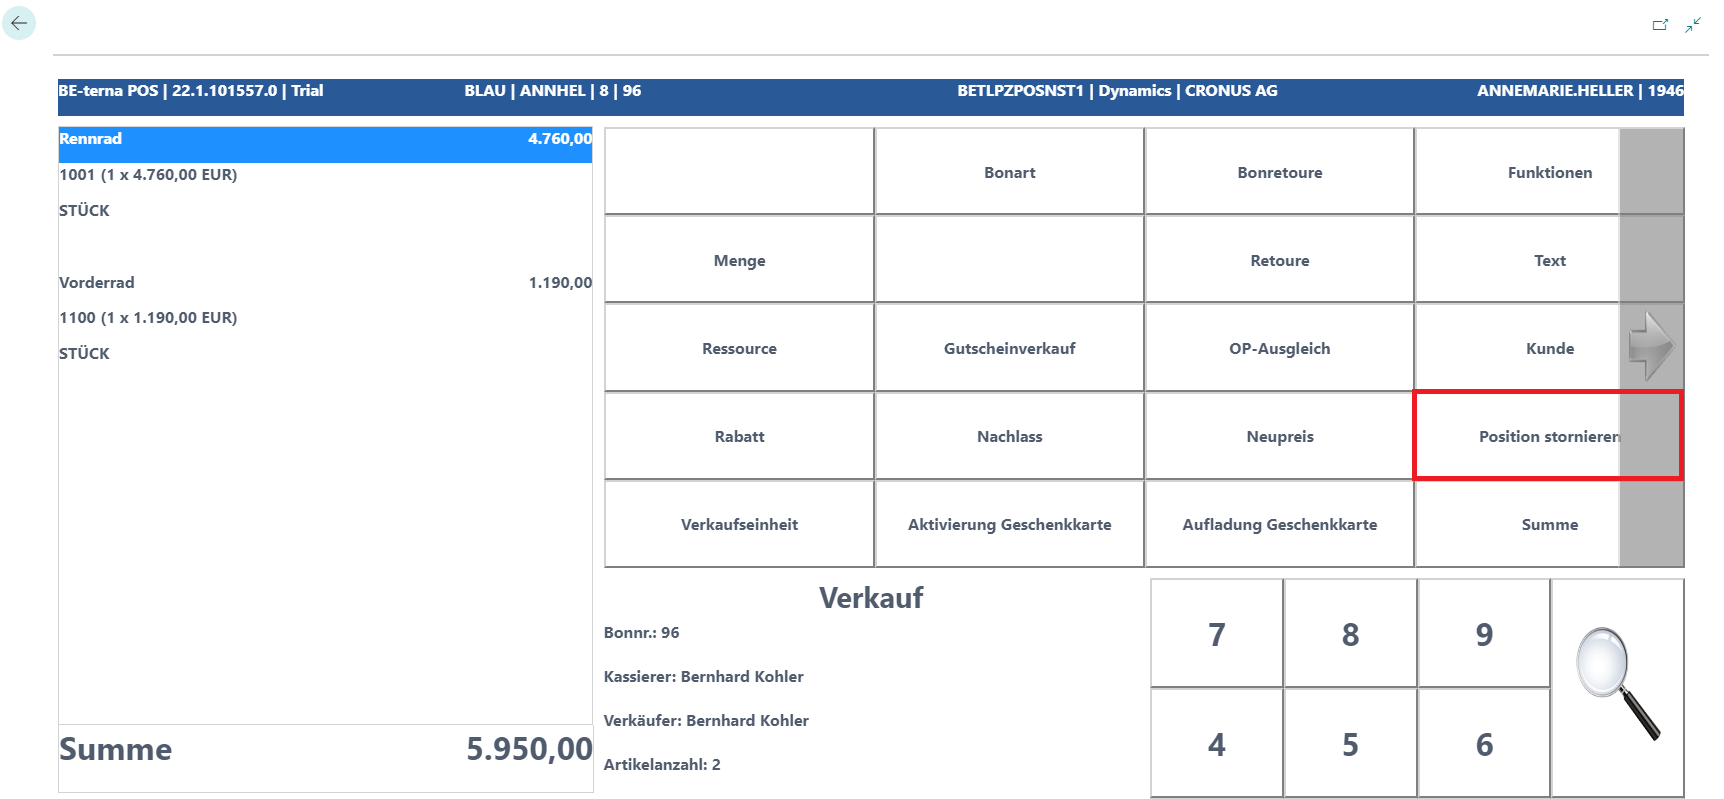
The line is deleted from the receipt roll.
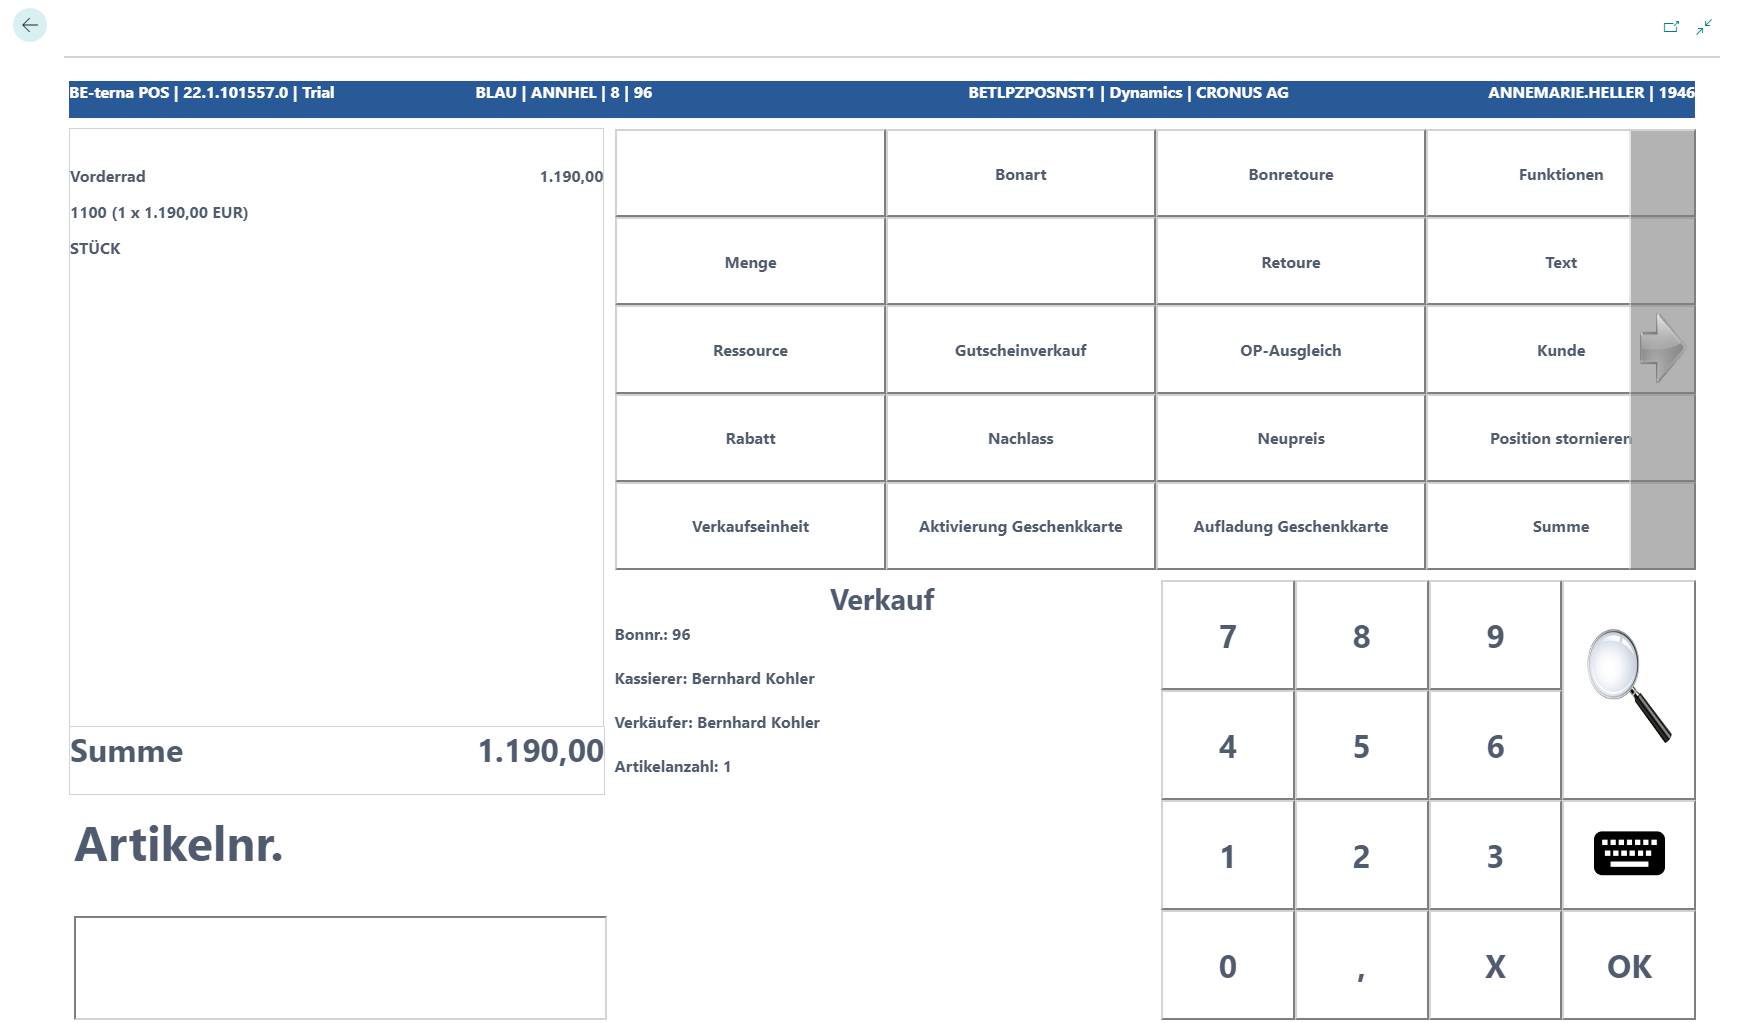
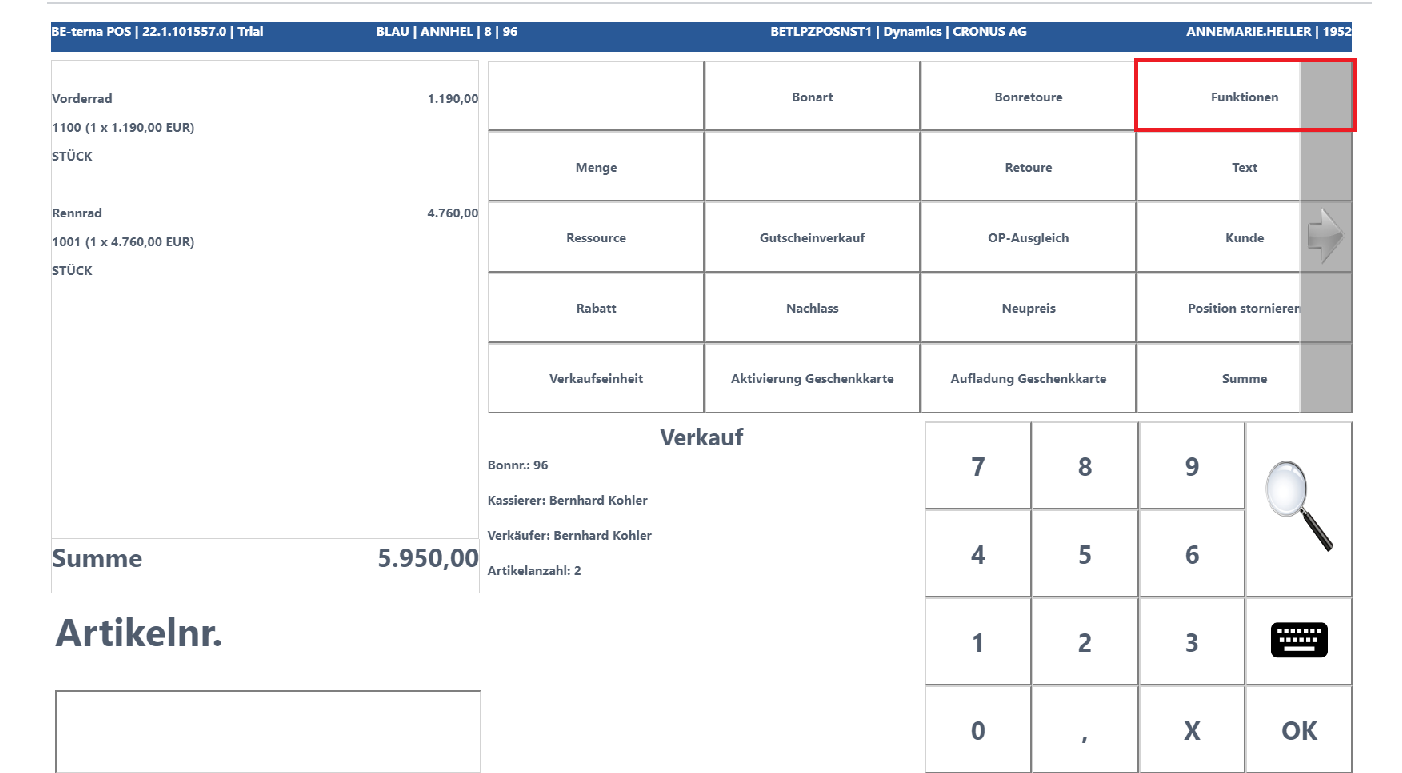
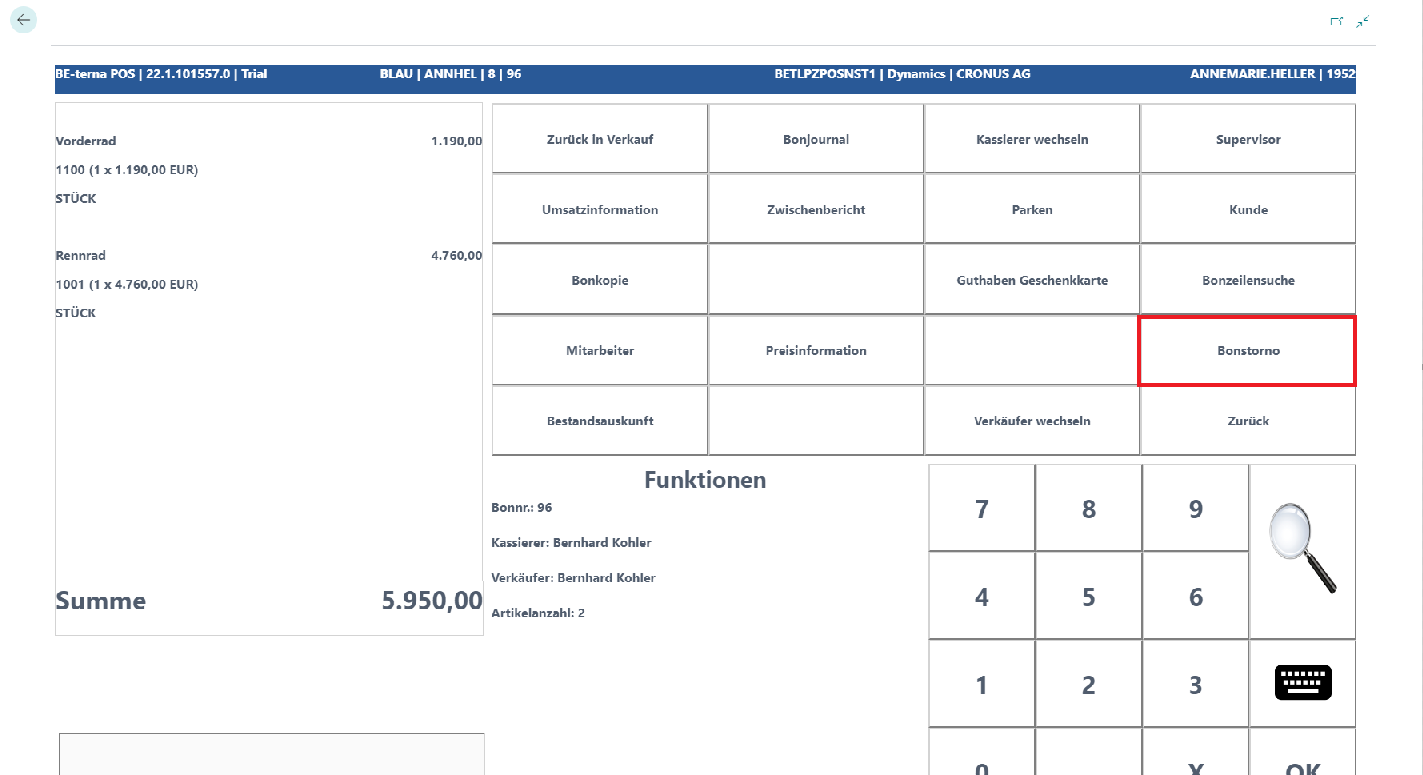
Cancel Receipt
The entire receipt can be canceled at any time until End Receipt. Once the receipt has been completed, it is no longer possible to cancel the receipt afterward.
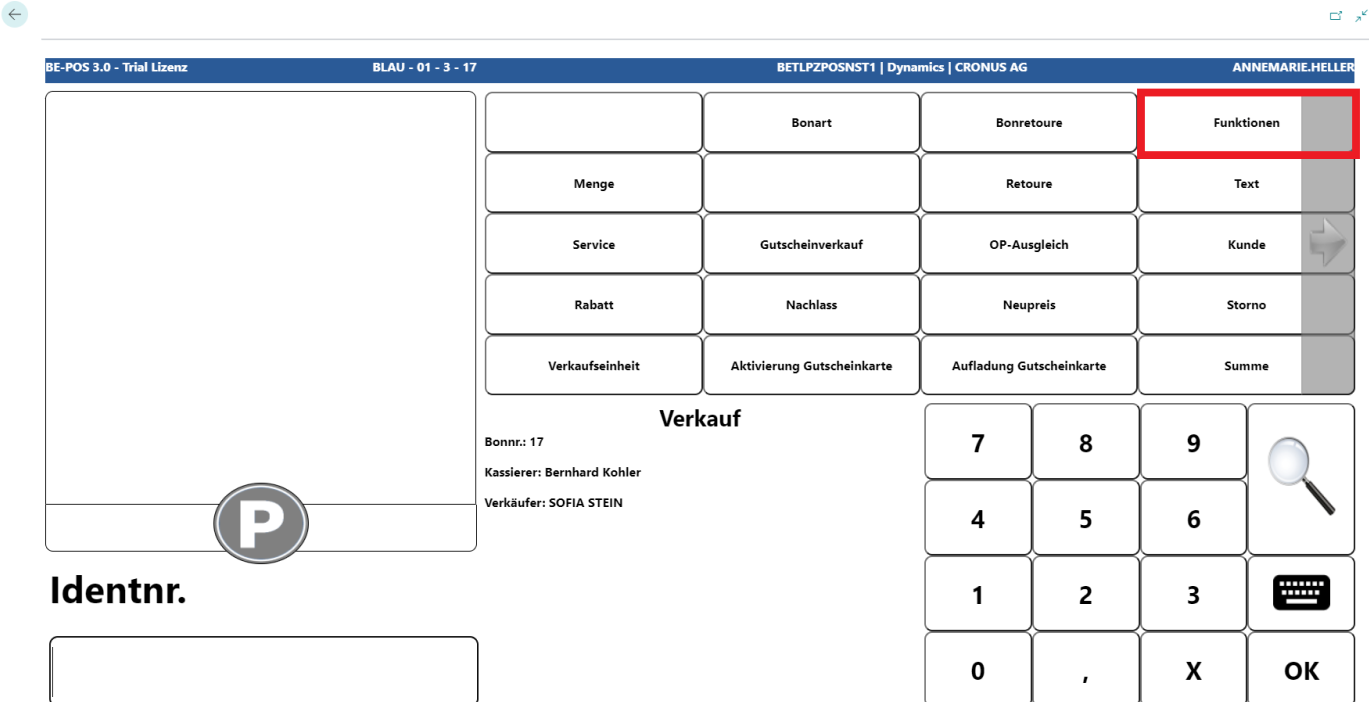
By calling the Functions key, the Cancel button can be selected.
 Click to enlarge
The following prompt appears and is confirmed with Yes.
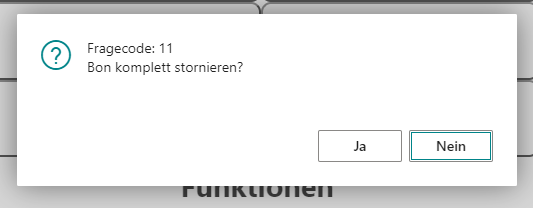
The receipt is canceled completely, a cancellation receipt is printed, and a new sales transaction can be started.
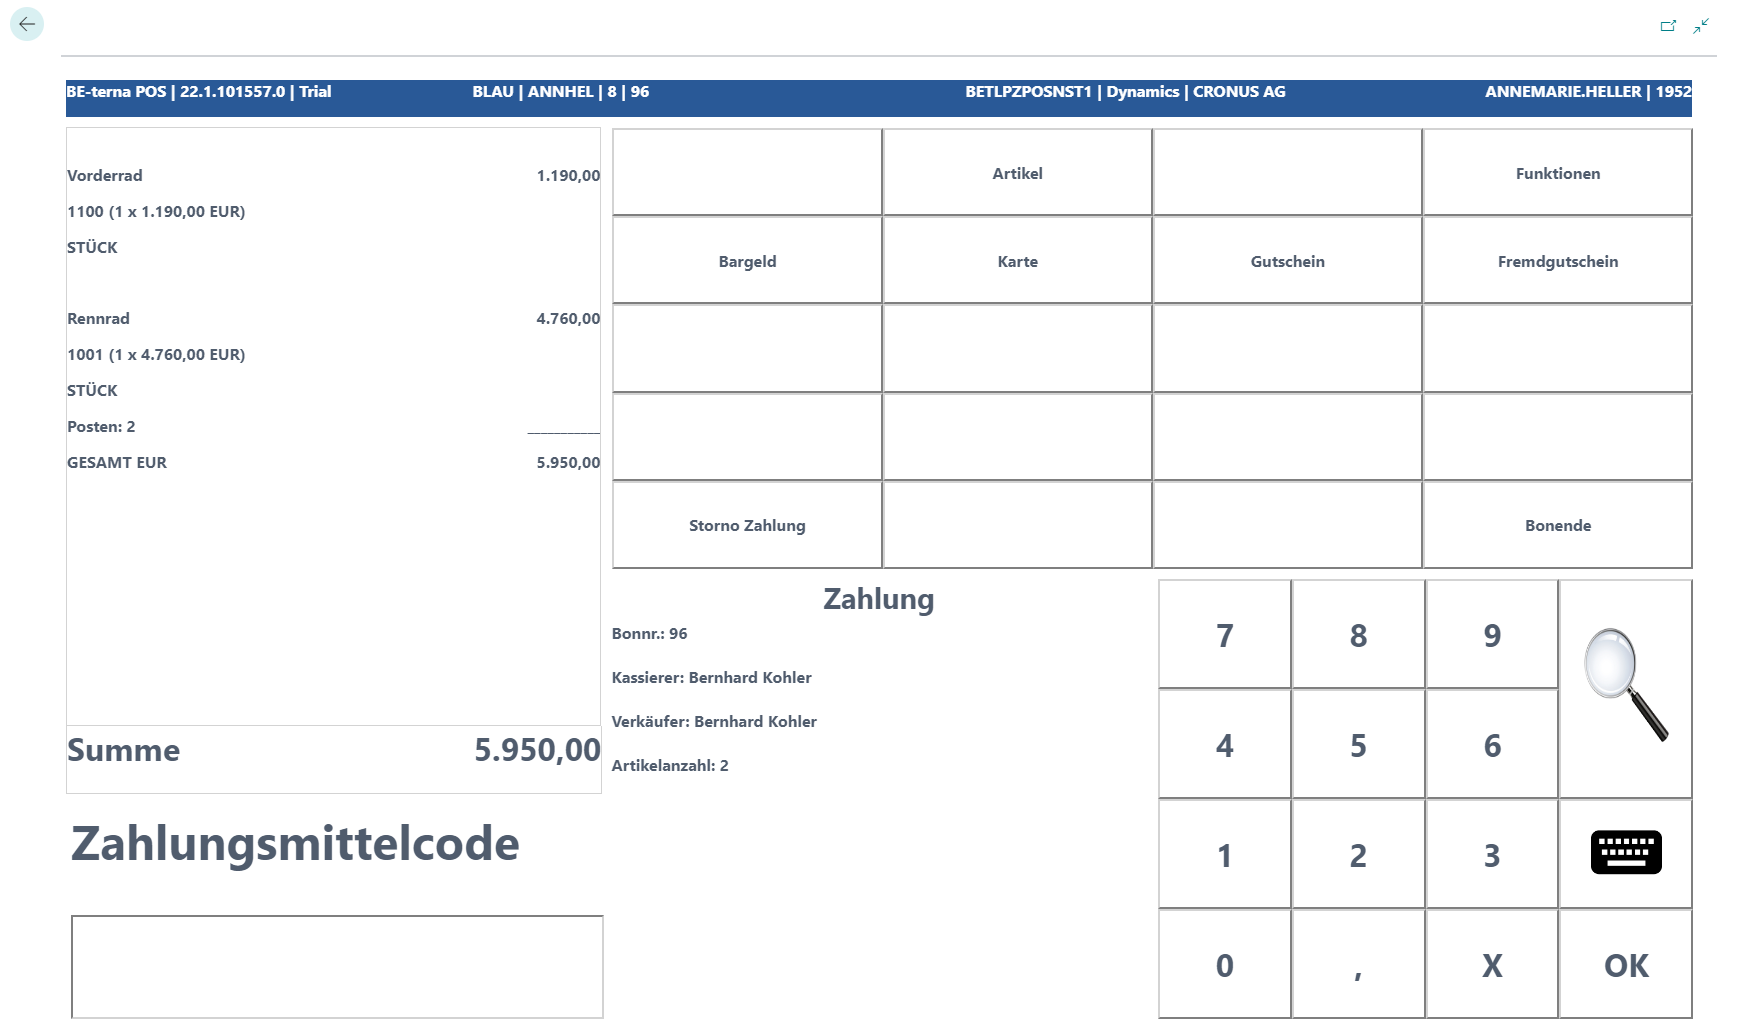
Cancel Payment
The cash register is in payment mode and a payment has already been transferred to the receipt, or the receipt has already been balanced.

The settlement already posted to the receipt can be canceled again using Cancel.
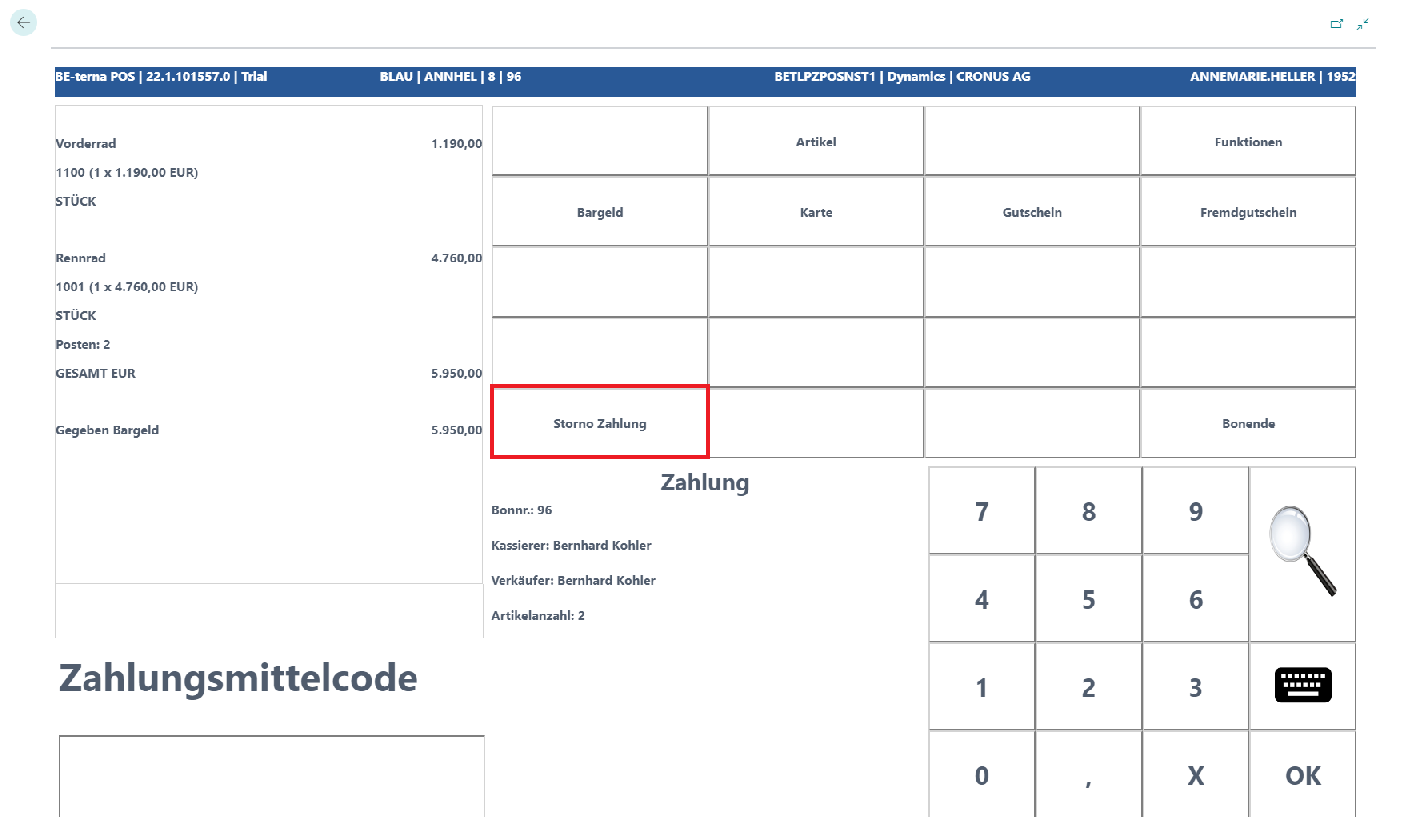
The new payment process can then continue.
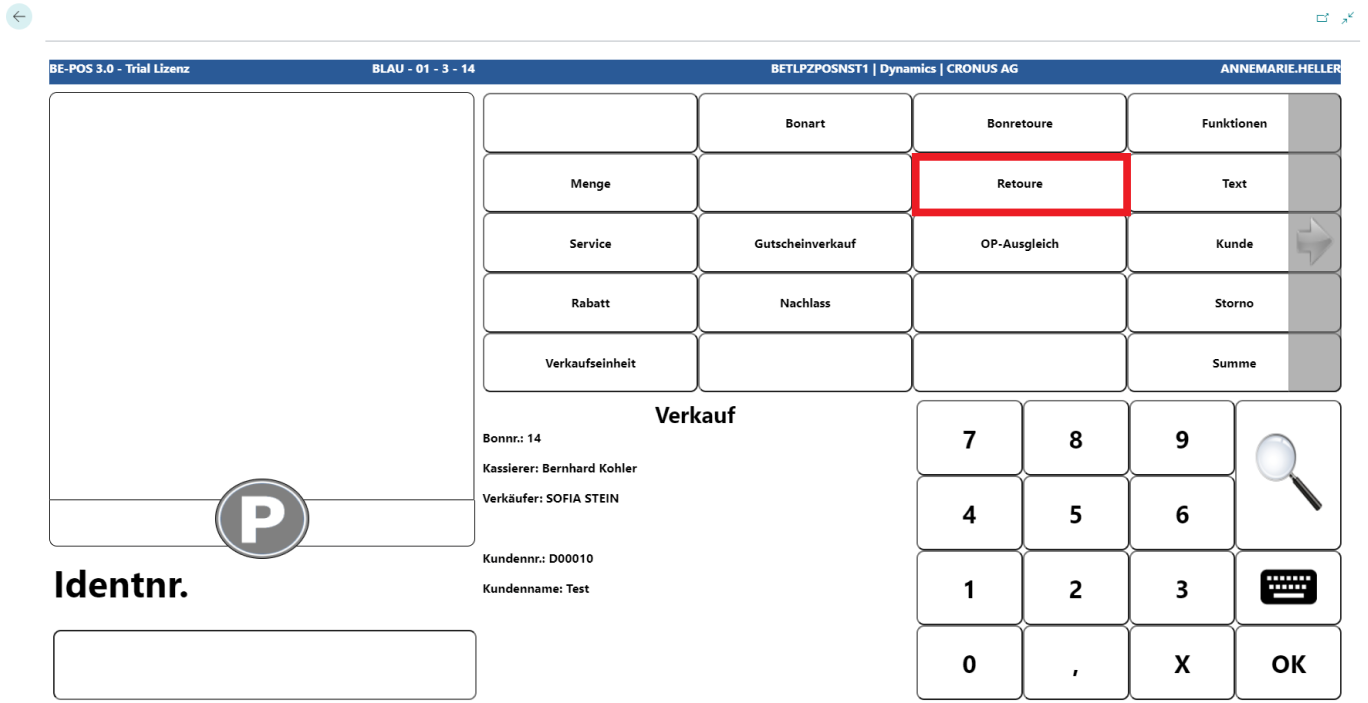
Return
Return Without Receipt
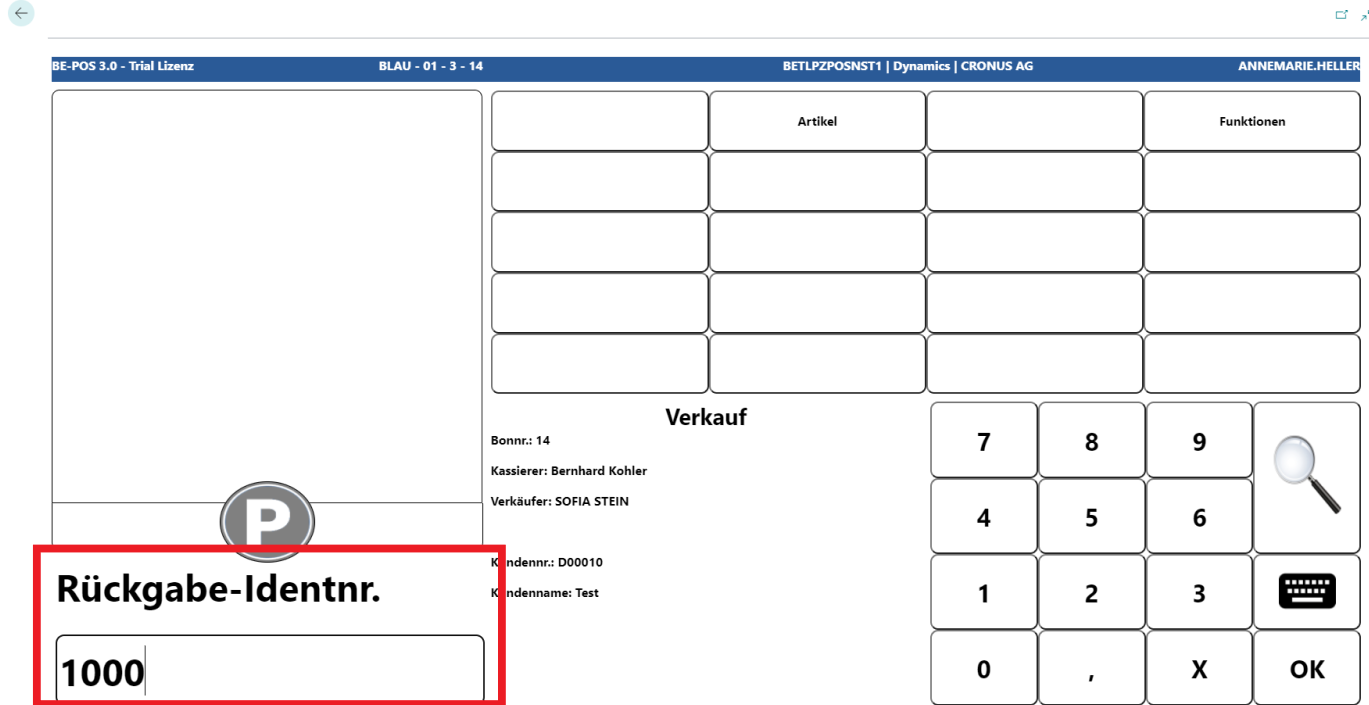
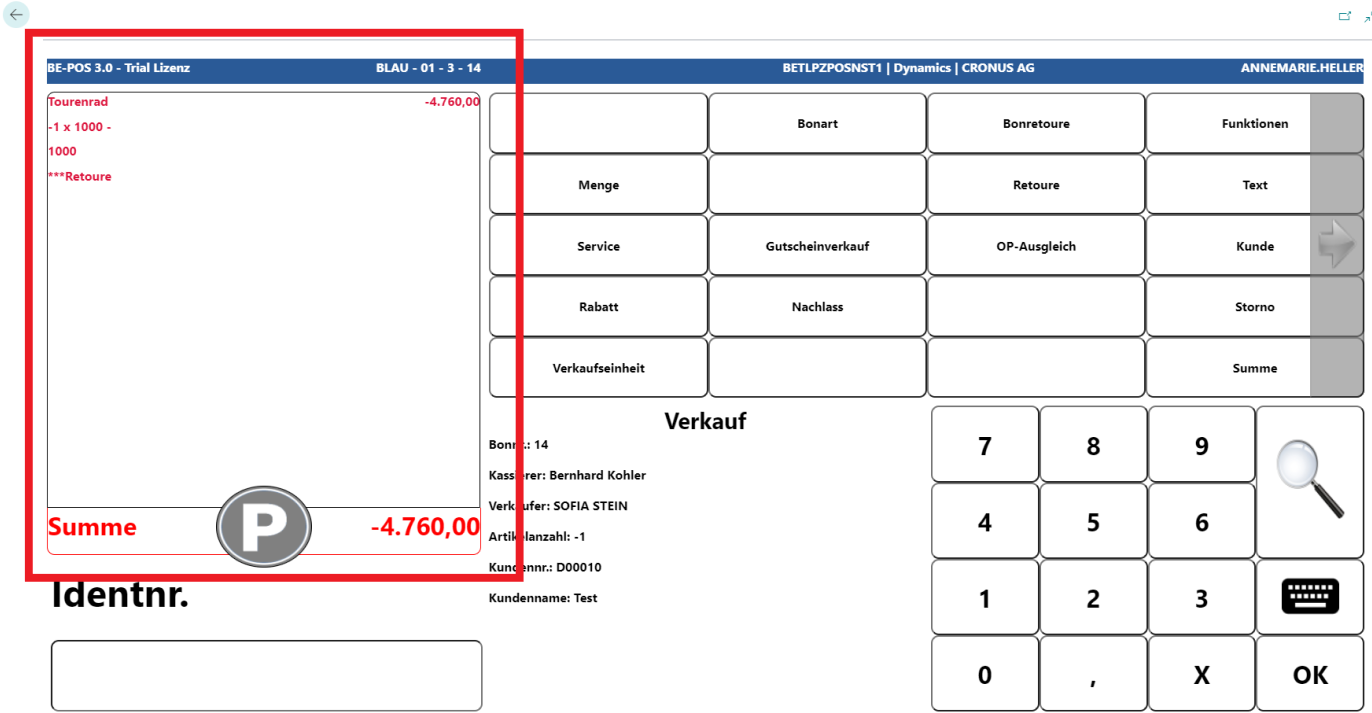
For returning an item without the original receipt, the Return function is available.
 Click to enlarge
The item to be returned is scanned or selected using the magnifying glass function.
The item appears in red and with a negative amount on the receipt roll.

Additional items can be entered or the receipt can be completed with Total.
Receipt Return
For a return with the original receipt, Receipt Return is available.
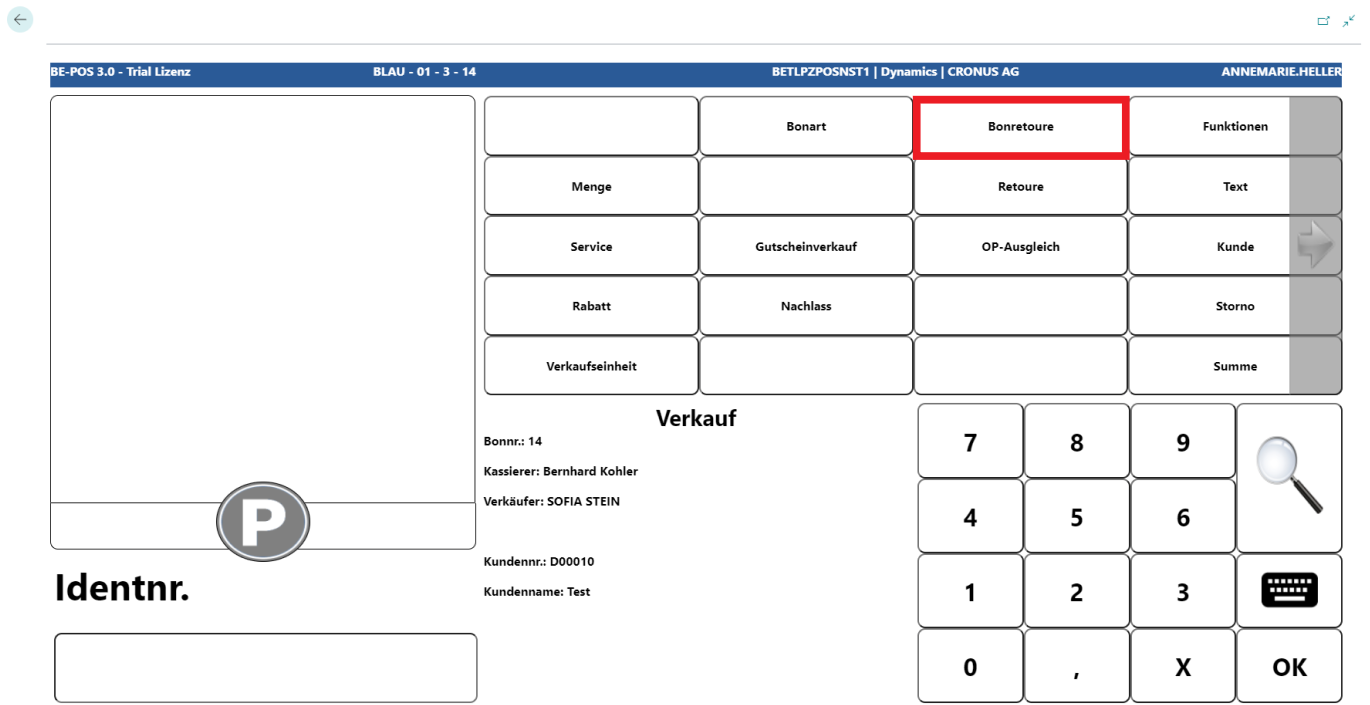
The receipt to be returned can be found using the search field.

The items from the original receipt are displayed in the overview.
The item to be returned must be selected.
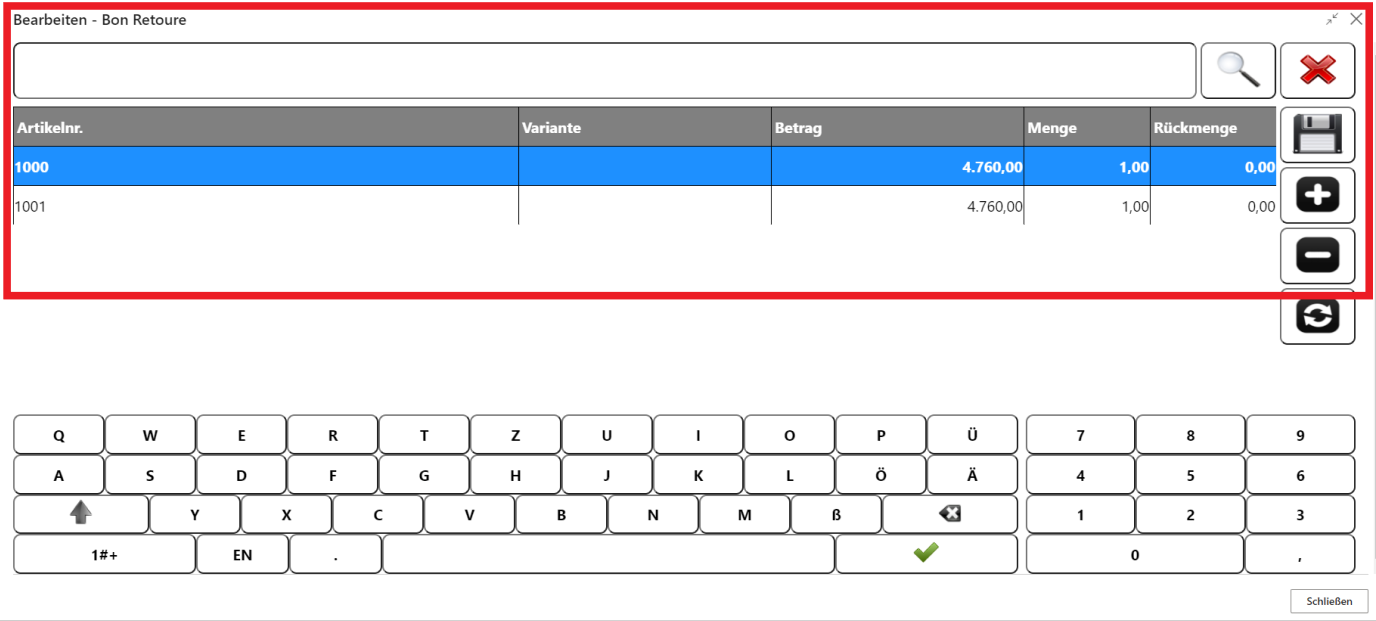
The following functions are possible:
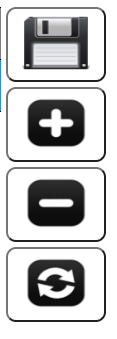
- Floppy disk = Save entry
- Plus = Increase quantity
- Minus = Decrease quantity
- Arrows = Return the entire receipt
With Save (floppy disk), the item is transferred to the receipt.
Additional items can be entered or the receipt can be completed with Total.
New Price, Discount, and Reduce
New Price
This function makes it possible to change the sales price of the current line.
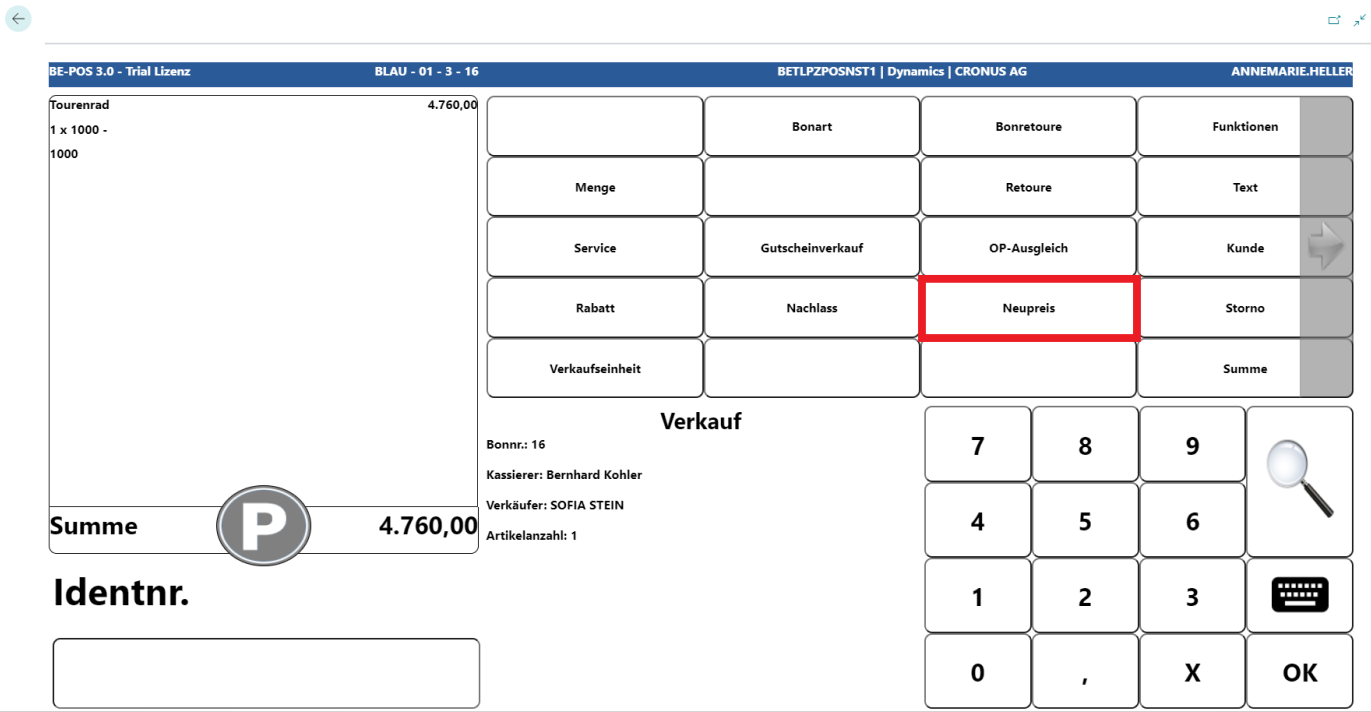
After selecting New Price, depending on the setup, the new sales price can either be assigned directly or a reason can be selected. In this example, the New Price reasons are used.

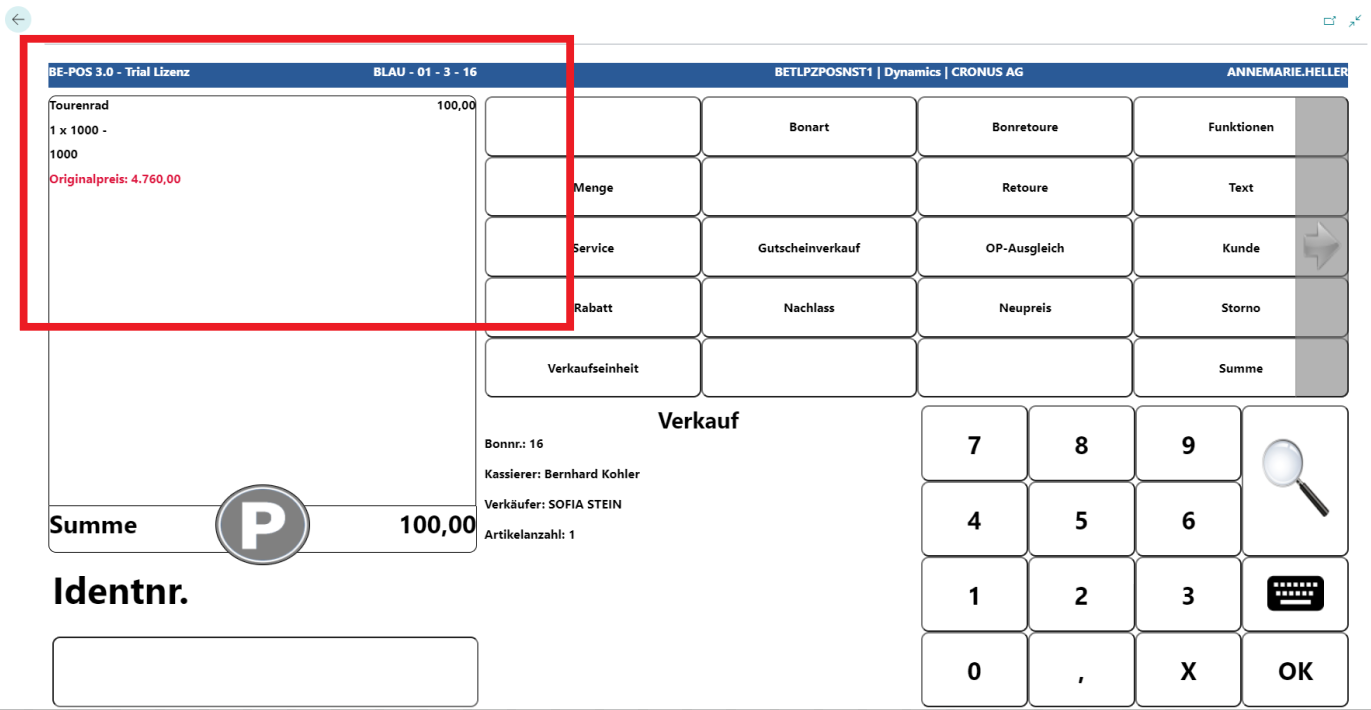
The sales price is overwritten and the original price is displayed.
Note: If no price has been stored in the system for a scanned item, the POS system automatically switches to the New Price function.
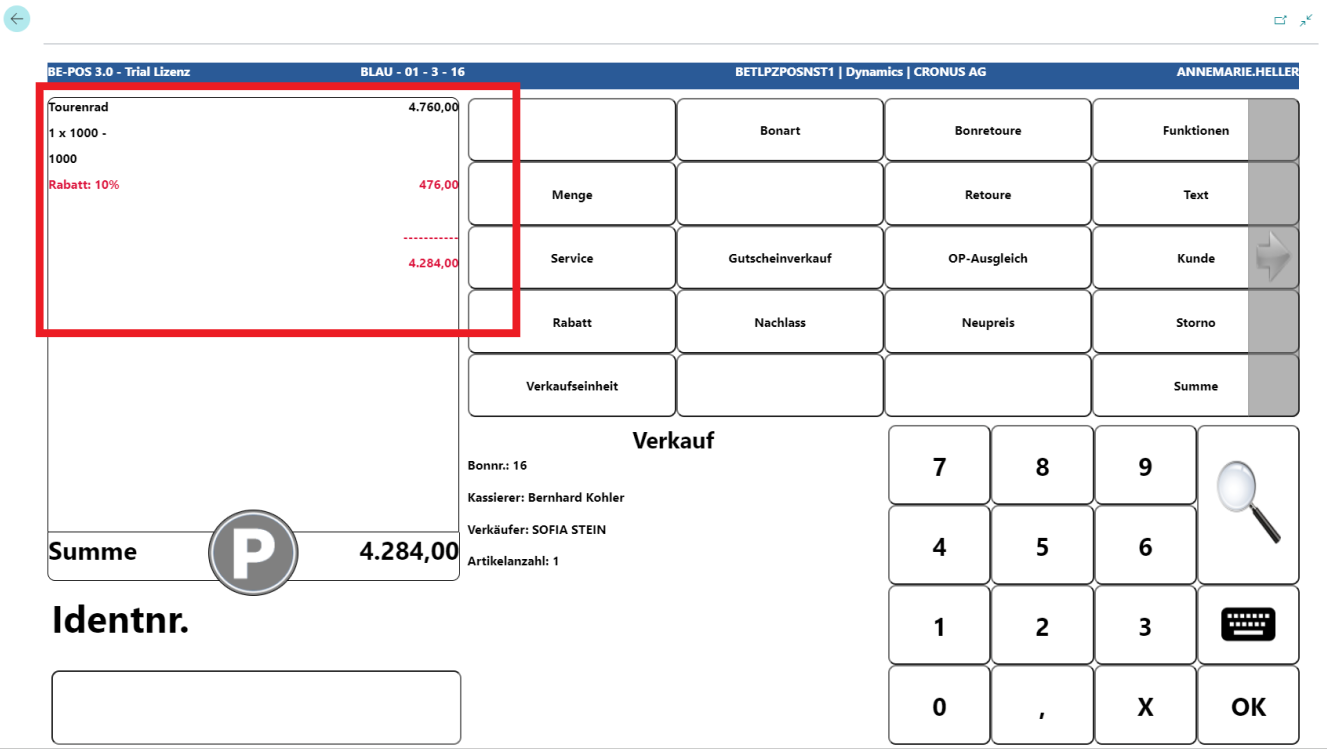
Line Discount
This function makes it possible to grant a discount in % for an item.
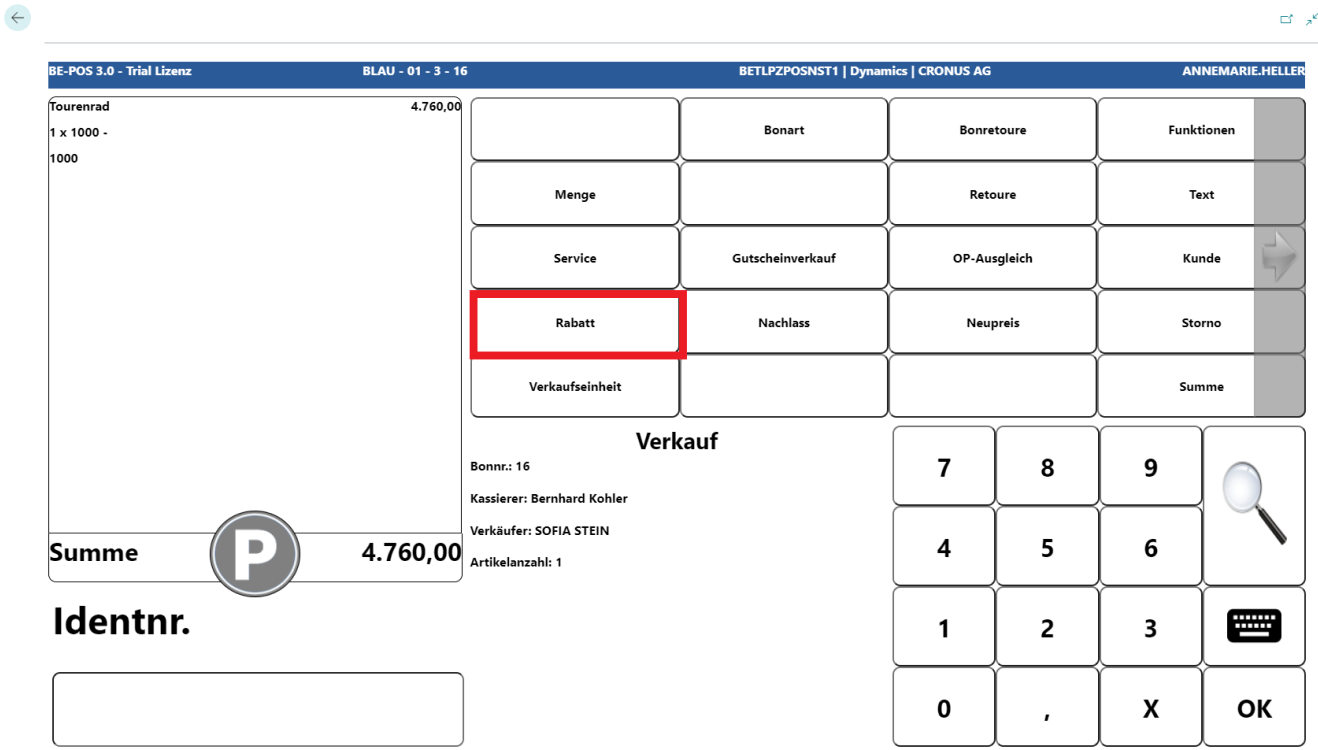
After selecting Discount, depending on the setup, a discount in % can either be assigned directly or a reason can be selected. In this example, the discount reasons are used.
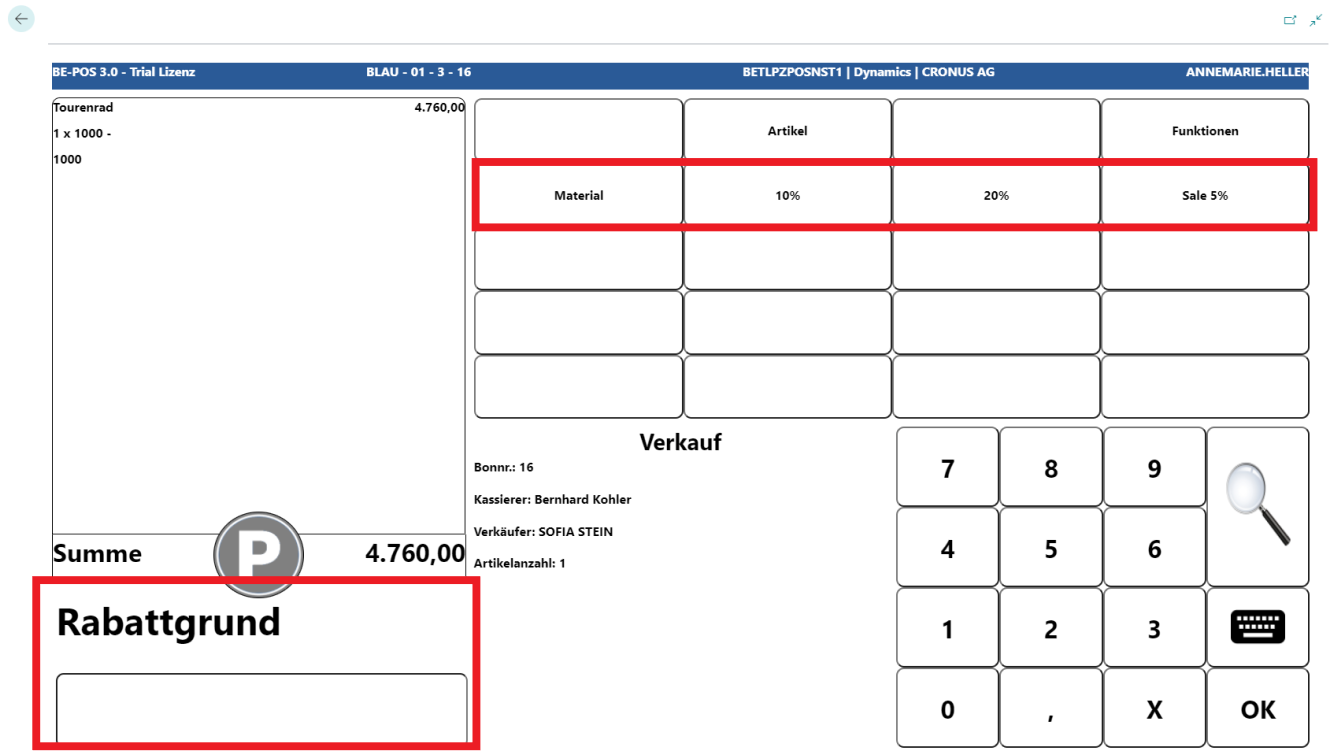
The sales price is overwritten and the assigned discount is displayed.
Line Reduce
This function makes it possible to grant a reduction in EUR for an item.
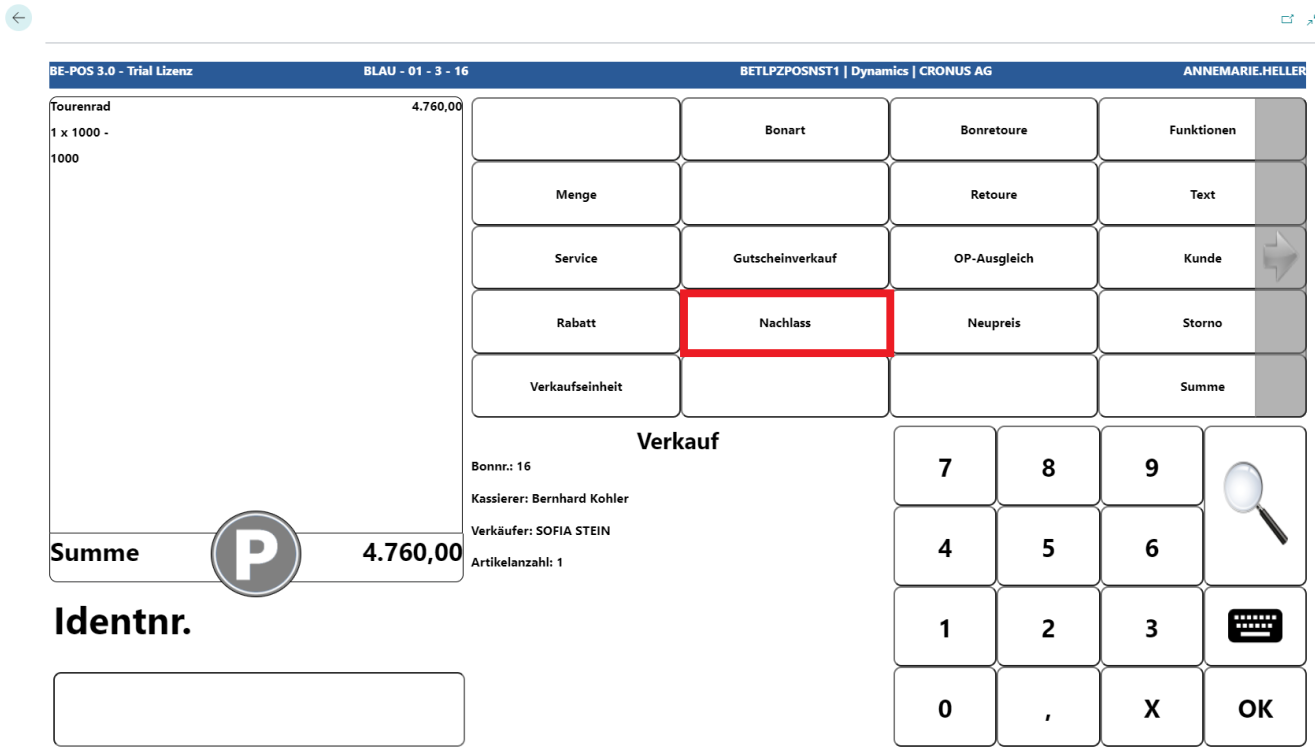
After selecting Reduce, depending on the setup, a reduction in EUR can either be assigned directly or a reason can be selected. In this example, the reduction is assigned directly, without a reason, and defined by the user.
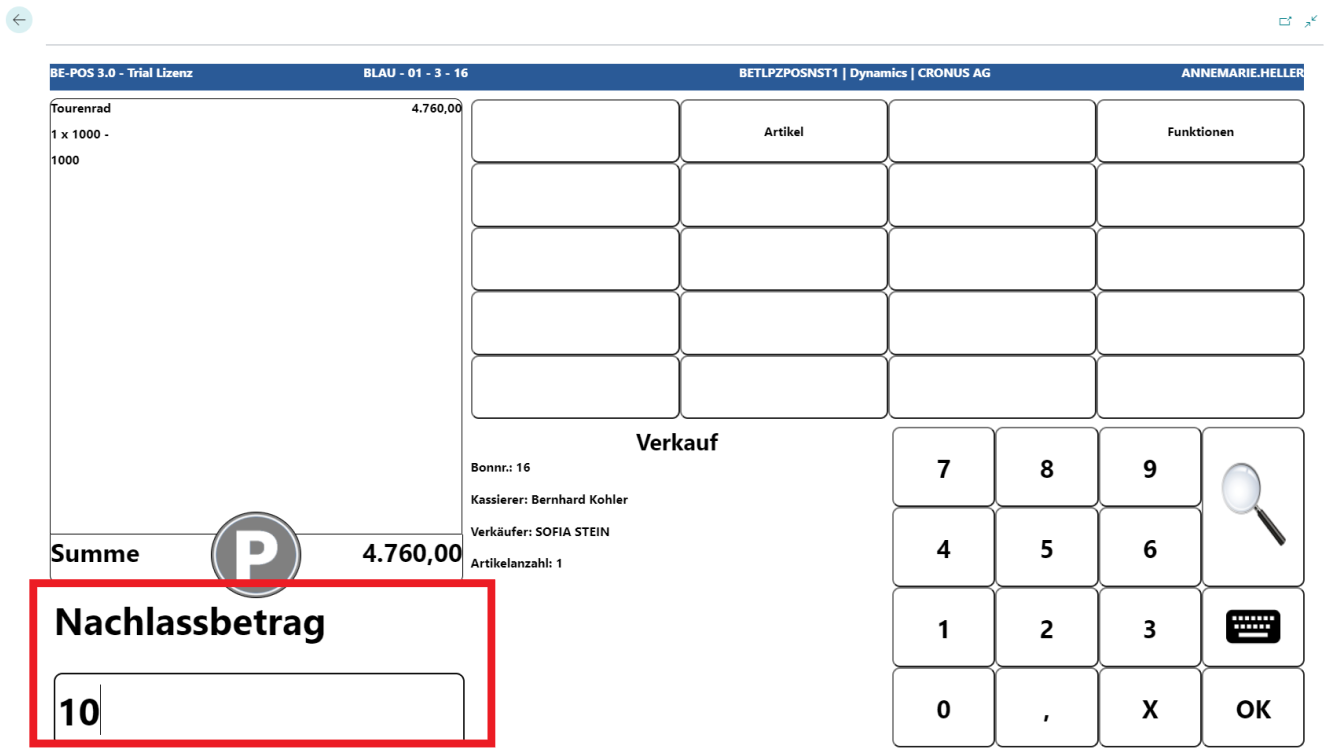
The sales price is overwritten and the assigned reduction.
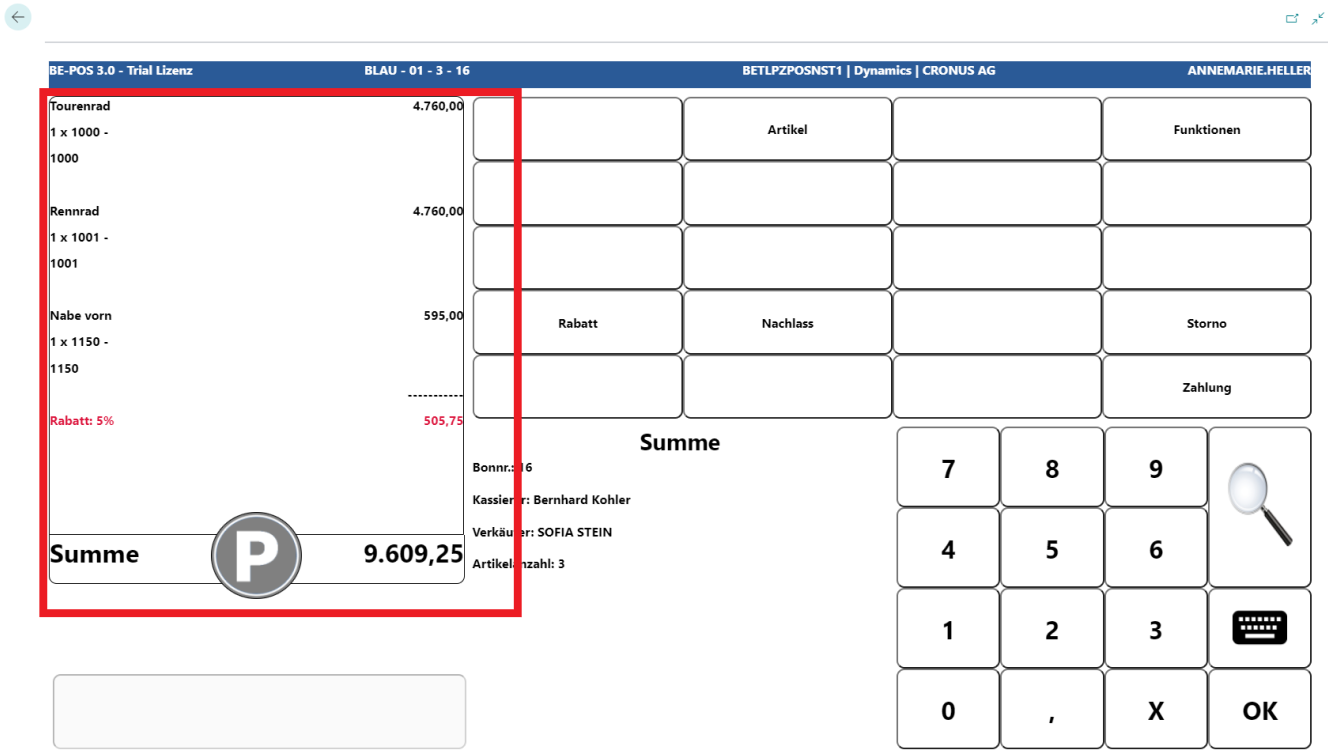
Receipt Discounts & Receipt Reductions
If a discount in % or a reduction in EUR is to be granted for the entire receipt, all items are entered first.
Using Total takes you to the functions for receipt discounts & receipt reductions
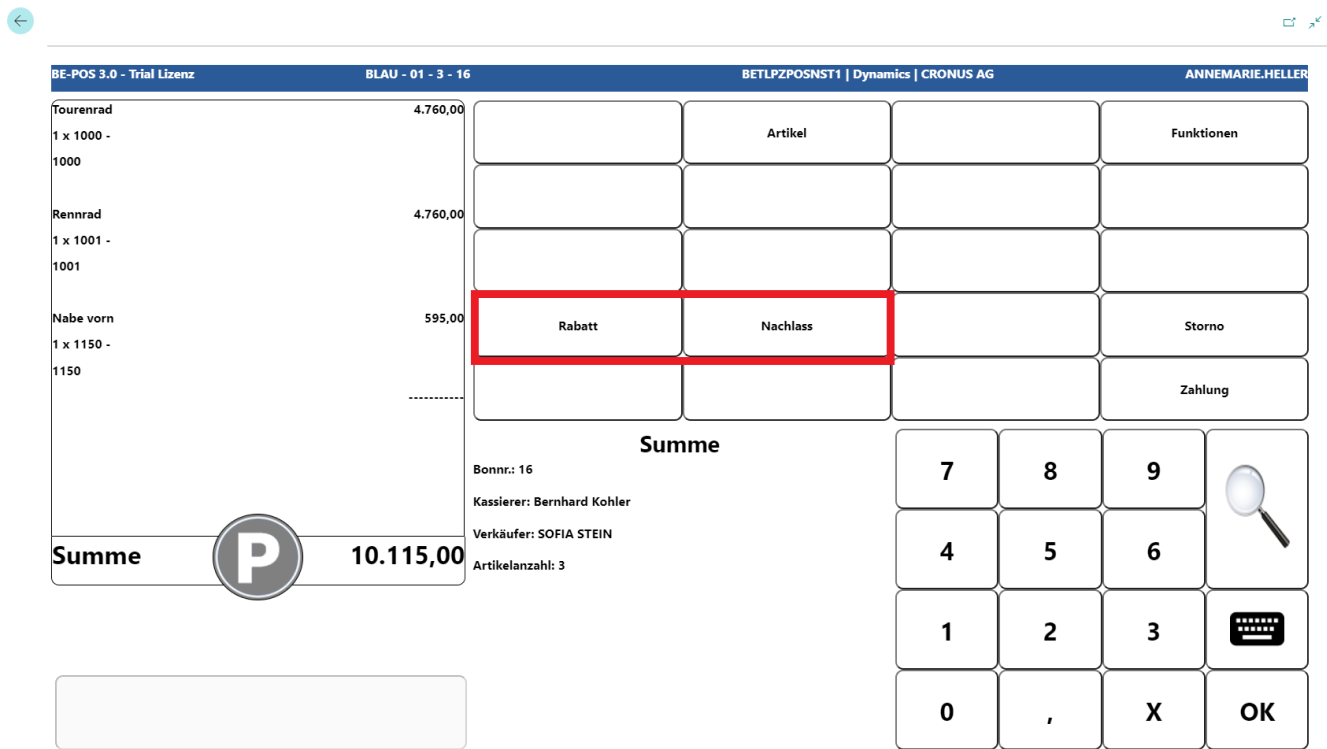
In this example, a receipt discount is granted. The receipt reduction function works in the same way.
After selecting Discount, depending on the setup, a receipt discount in % can either be assigned directly or a reason can be selected. In this example, the discount reasons are used.
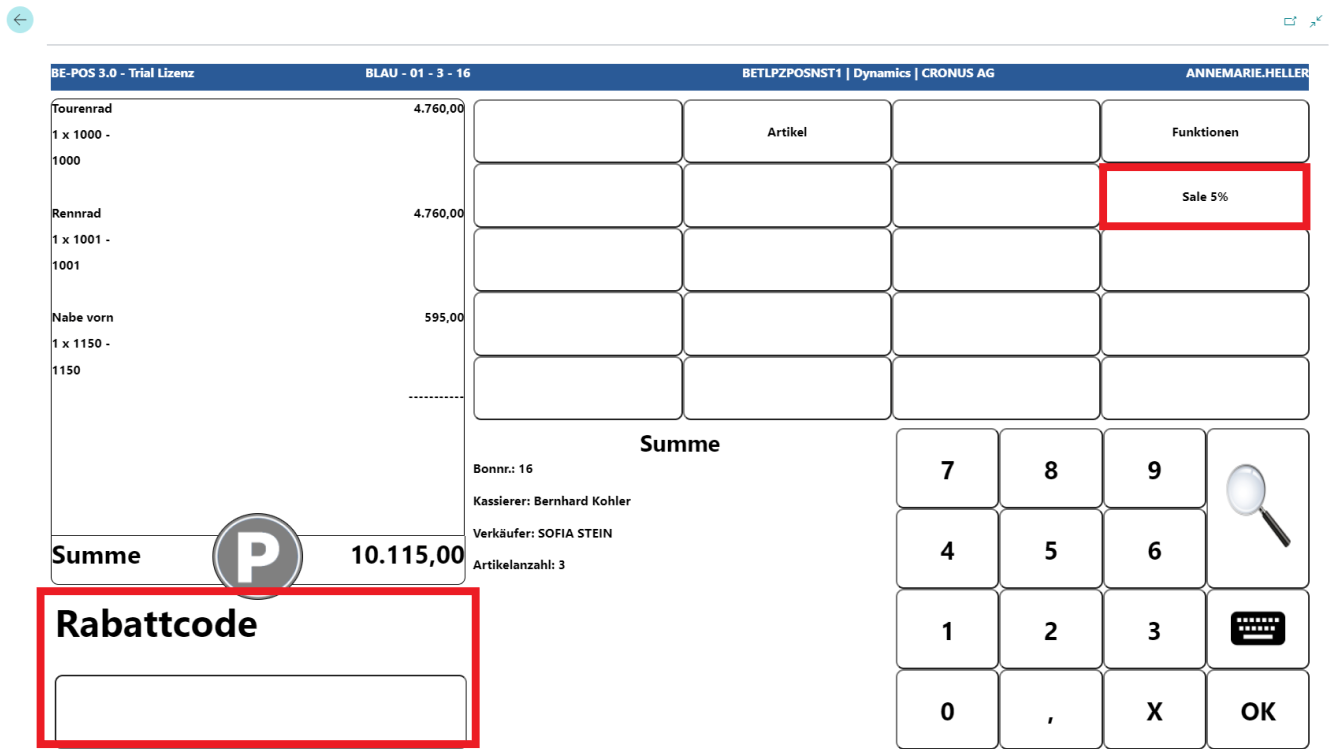
The discount is displayed and allocated across all items on the receipt.
Note for all discounts, reductions, and new prices: If no quick buttons are configured, the reasons can be opened using the magnifying glass button.
Employees
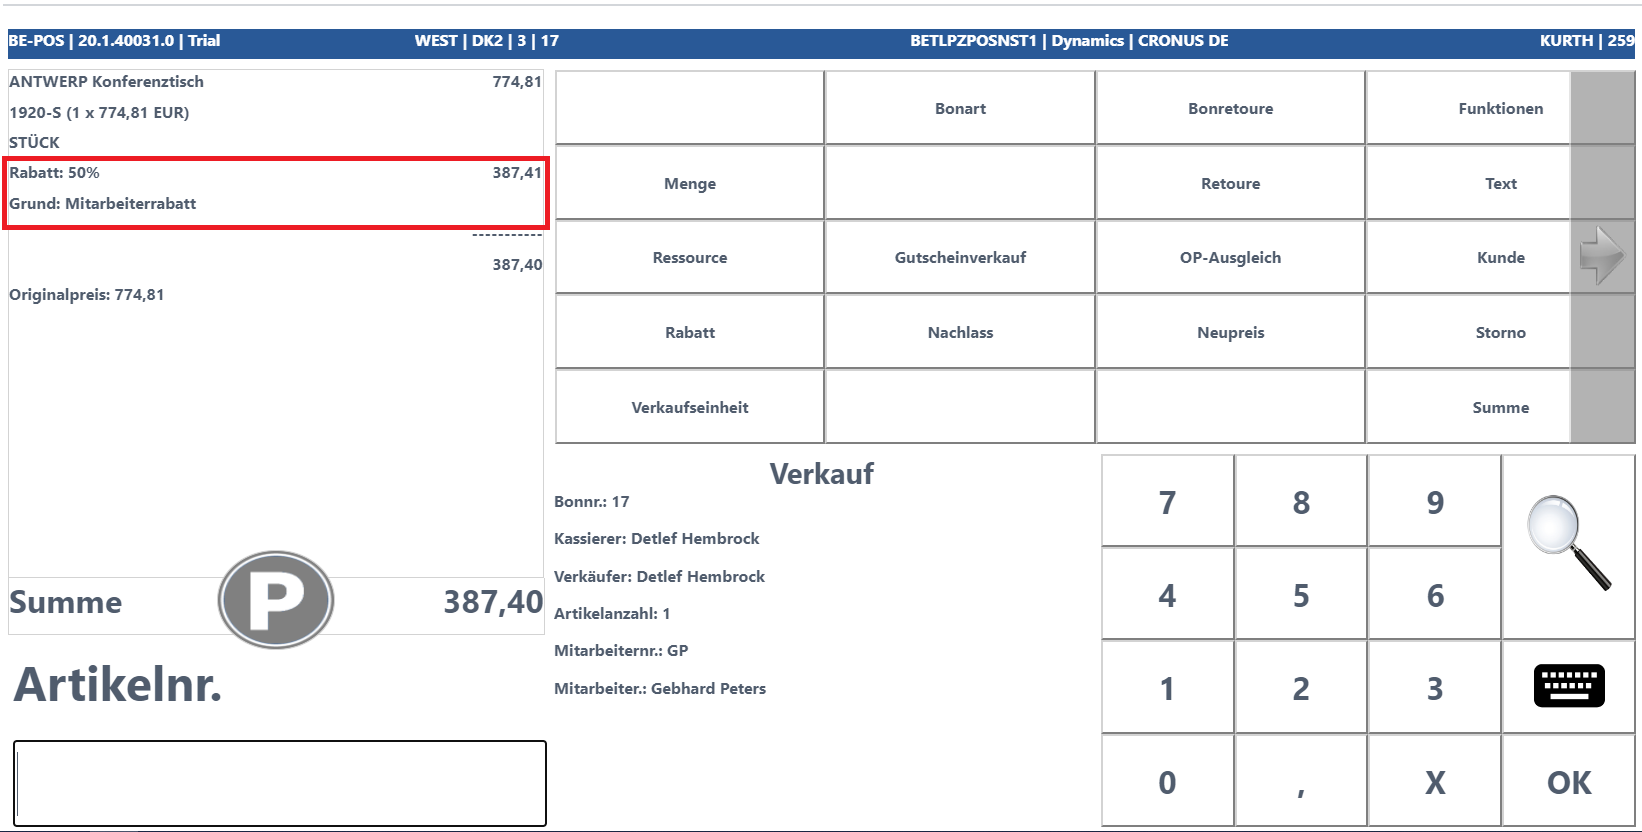
Employee Discounts/Reductions
This function makes it possible to grant a discount in % or a reduction in EUR for employees. First, as described under Employee Setup, a discount reason for employee discounts/reductions must be set up.
After selecting Discount or Reduce, a discount in % or a reduction in EUR can be assigned for employees.
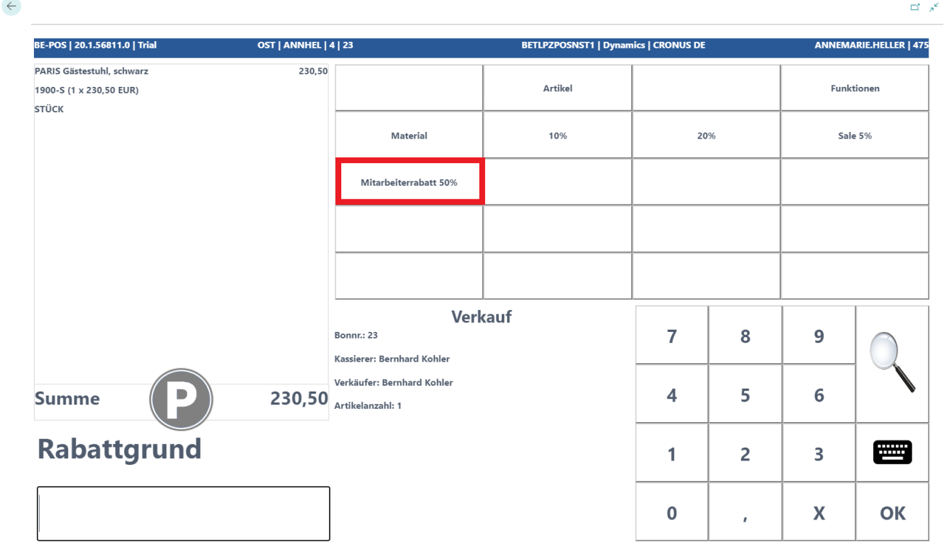
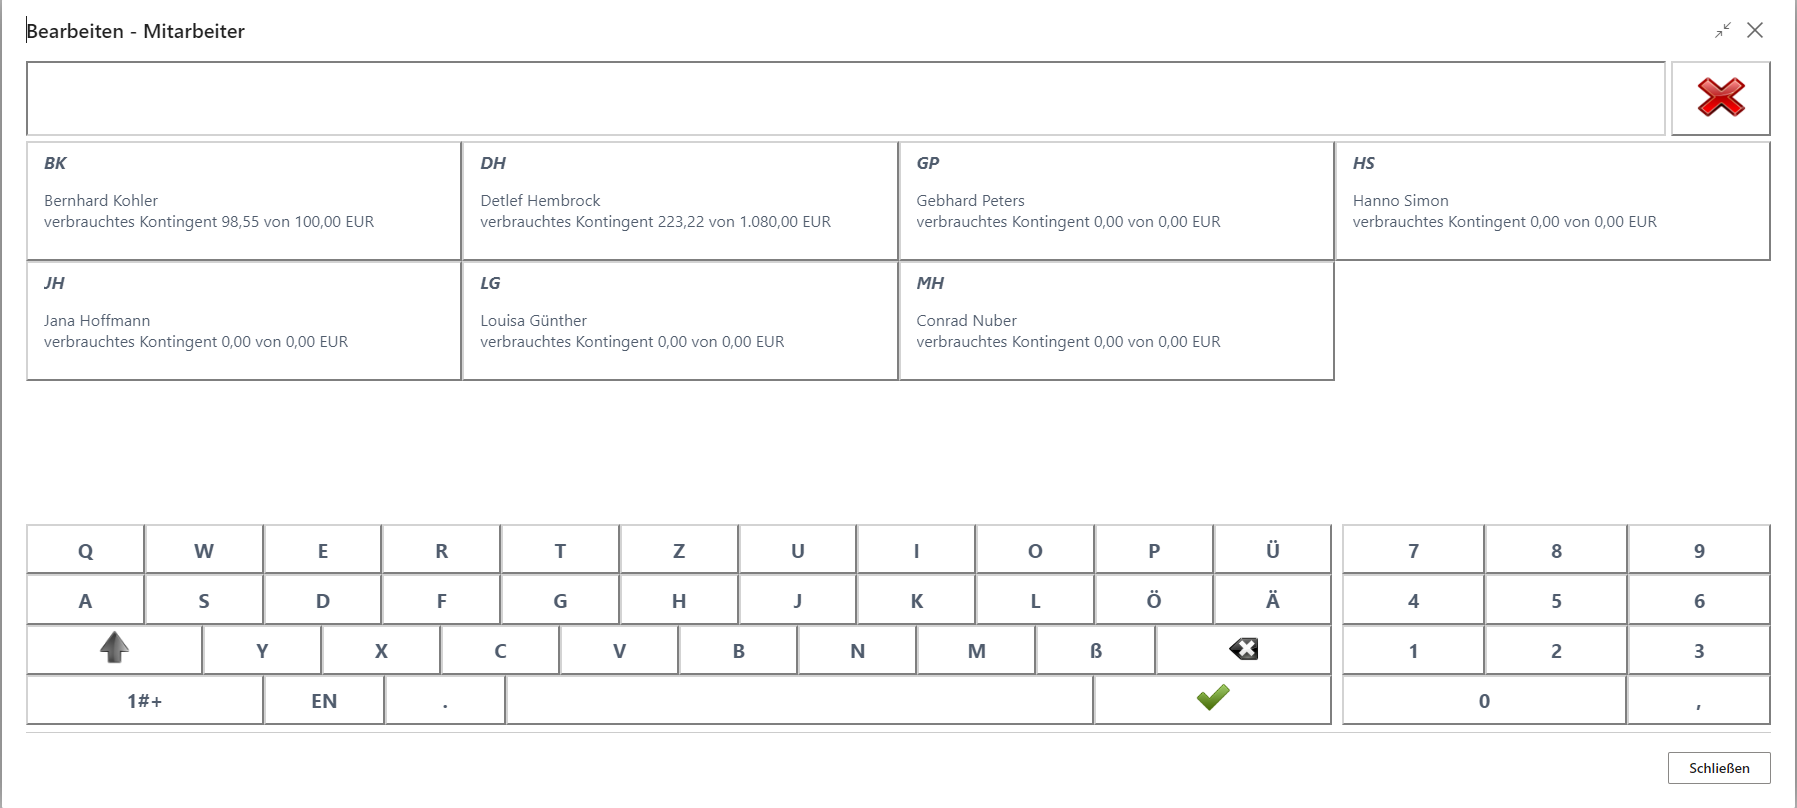
After selecting the corresponding discount reason, the screen for selecting the relevant employee opens.
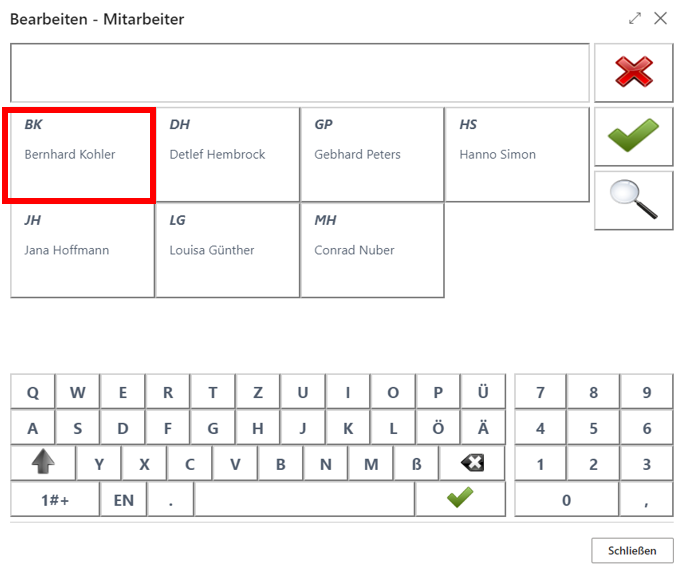
After selecting the employee, the sales price on the receipt roll is overwritten, the discount/reduction is displayed on the receipt roll, and the corresponding employee is shown in the information field.
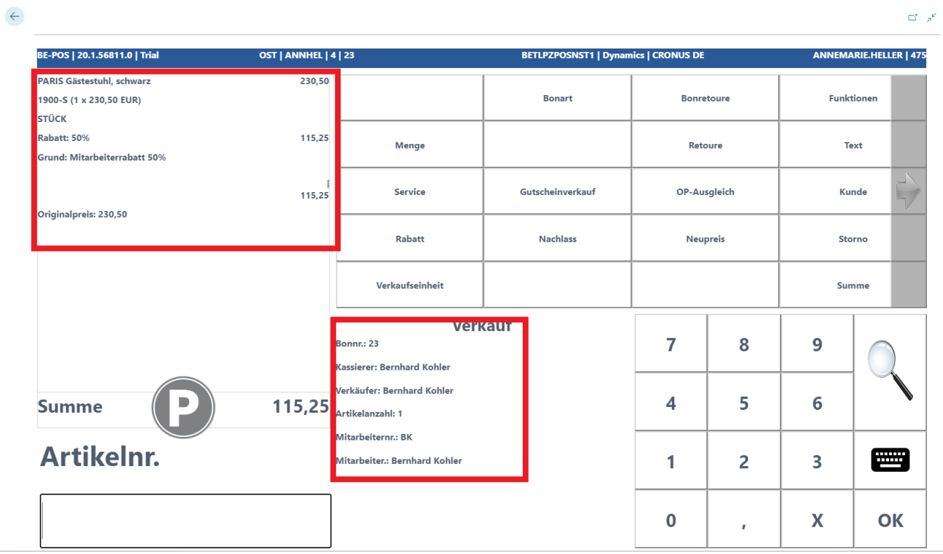
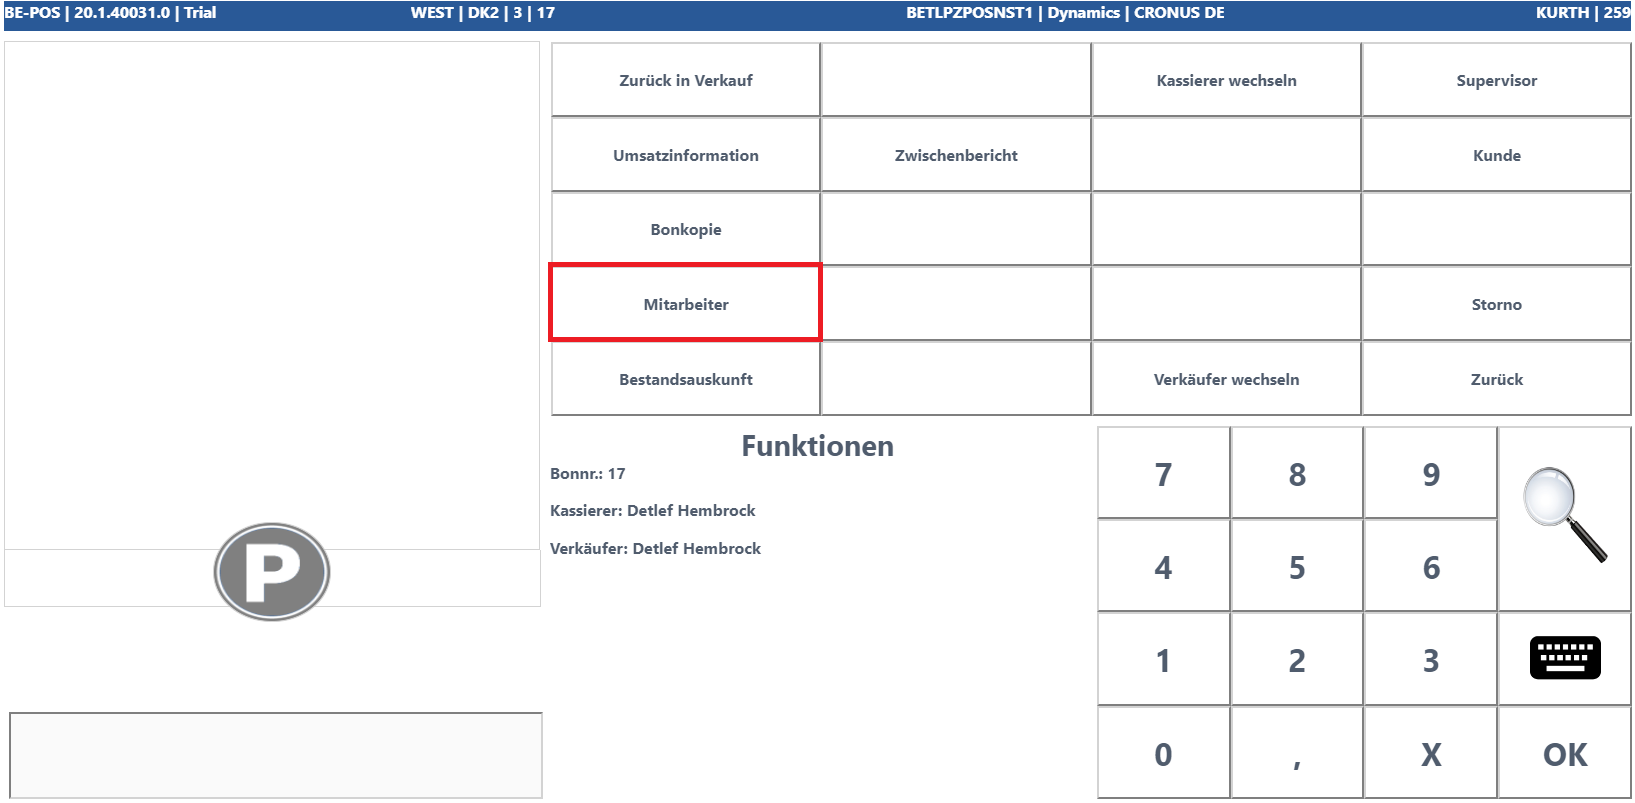
At the cash register, an employee must be registered, especially for price group discounts. The employee can be registered on the receipt via the Functions button and the Employee button.
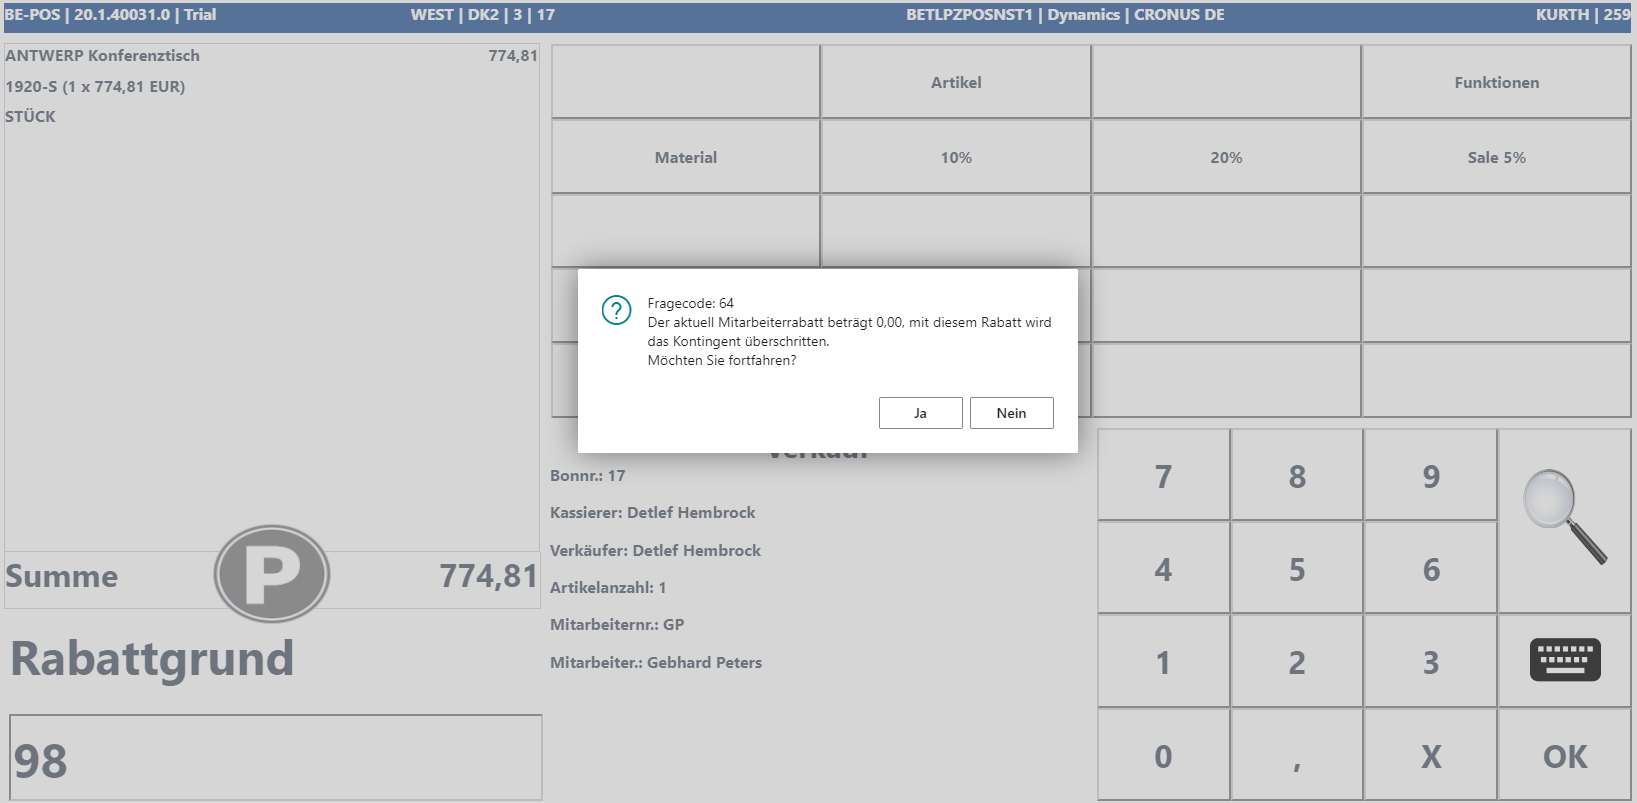
If the stored quota is exceeded and exceeding it is permitted, the cashier is shown a corresponding prompt. The cashier can decide whether the reduction is granted.
The applied employee discount is visible in the receipt roll preview.
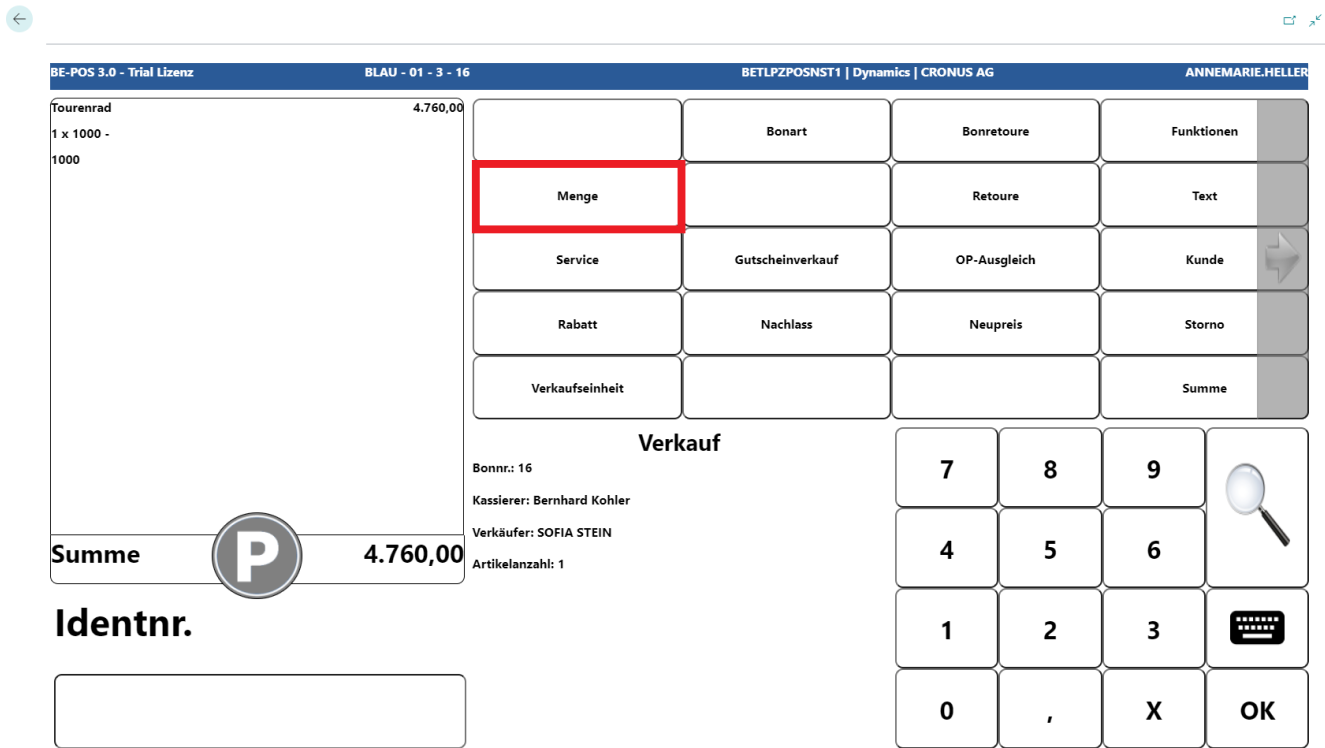
Quantity and Unit of Measure
Quantity
If an item is to be sold multiple times, it must first be entered once on the receipt.
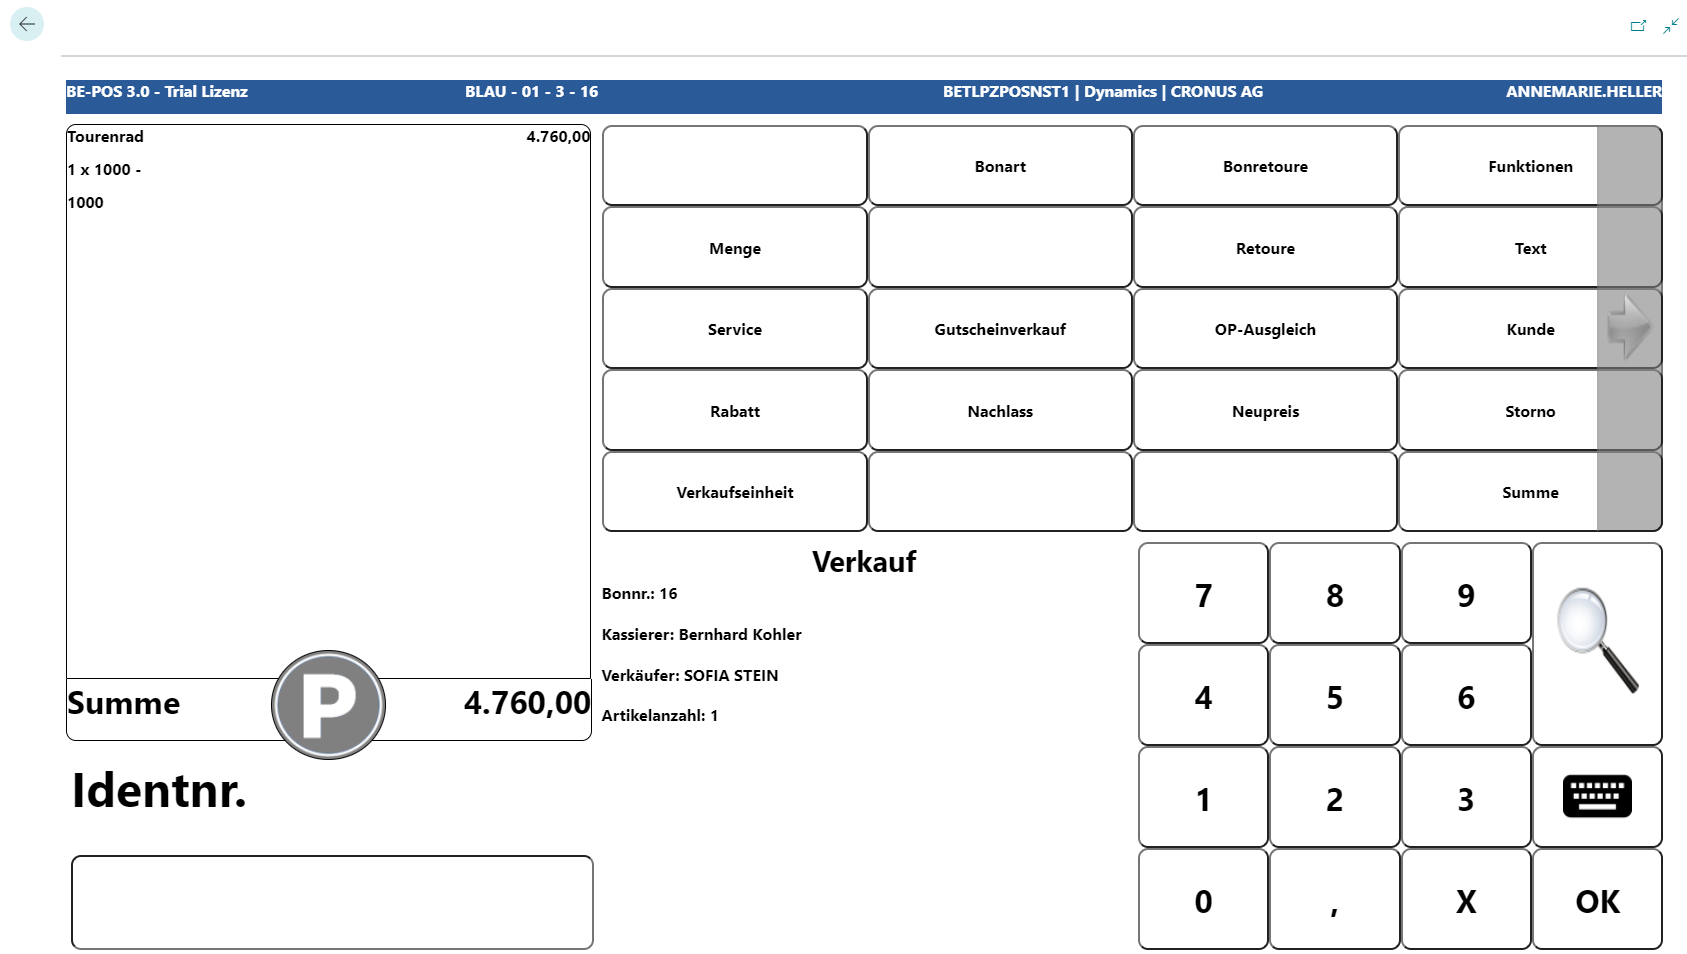
The Quantity button can then be used to adjust the quantity/number of the item.
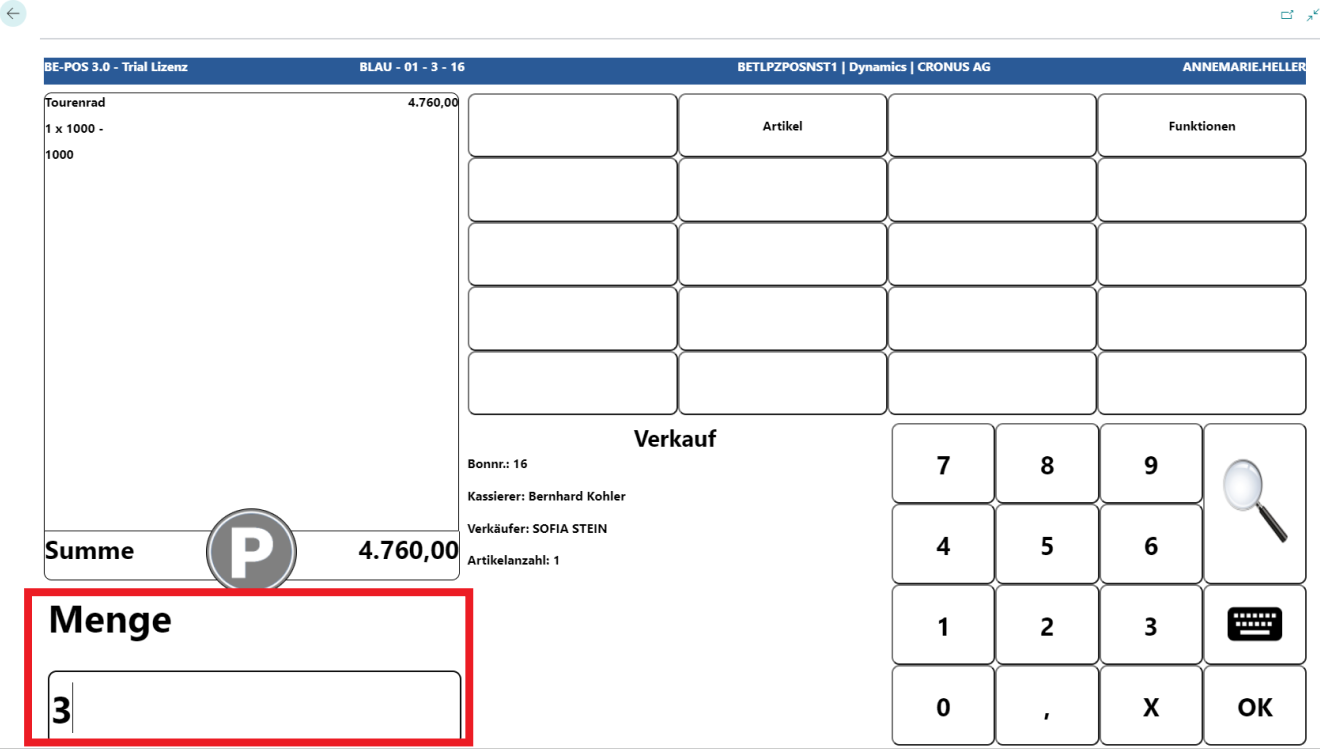
The quantity of the item on the receipt is increased.
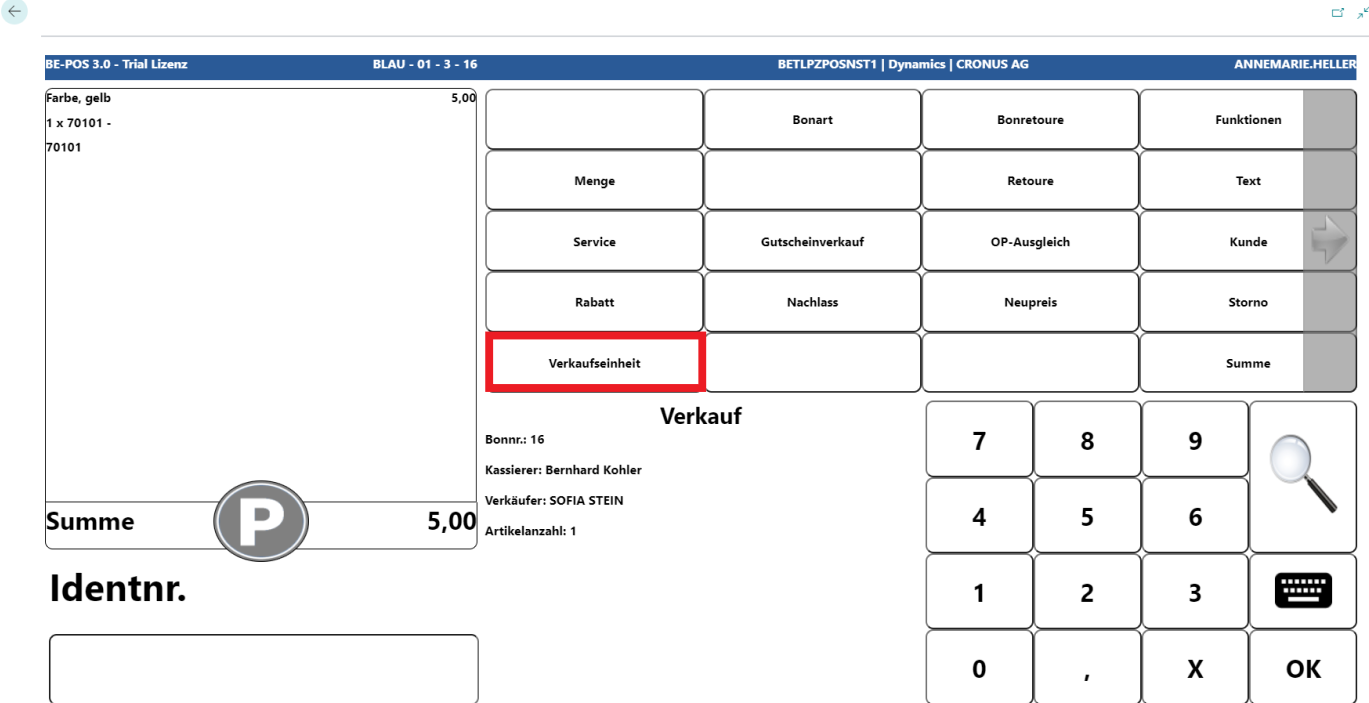
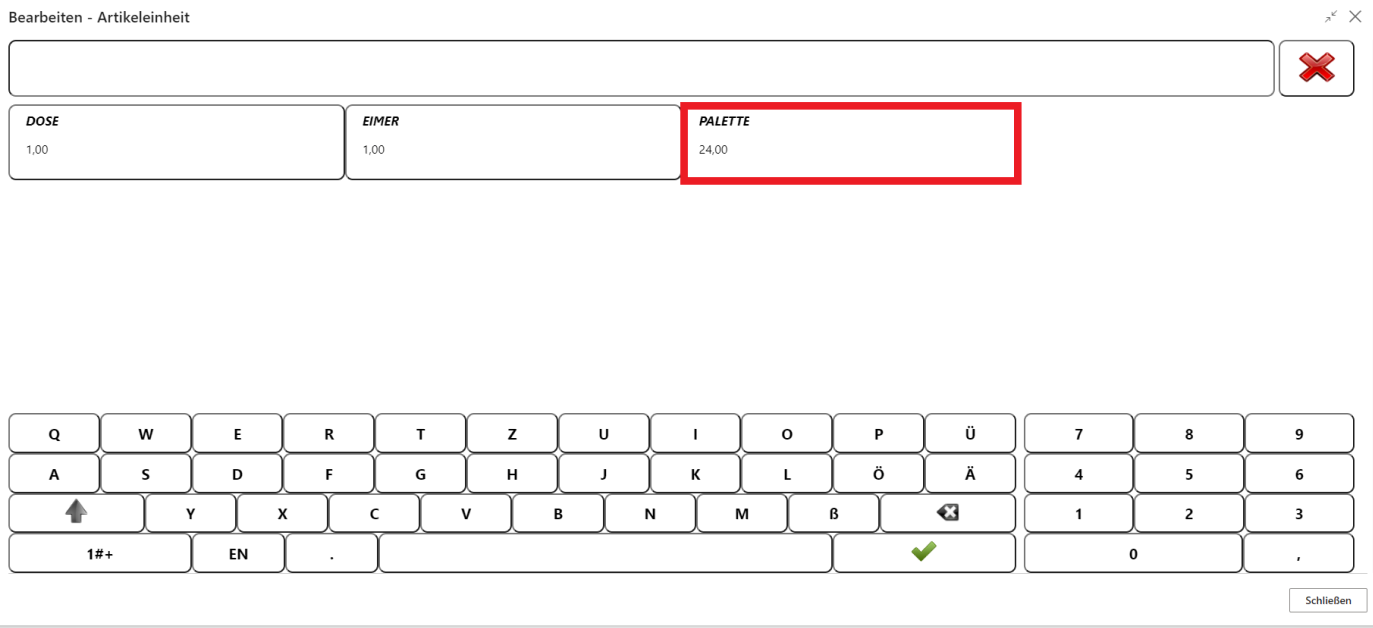
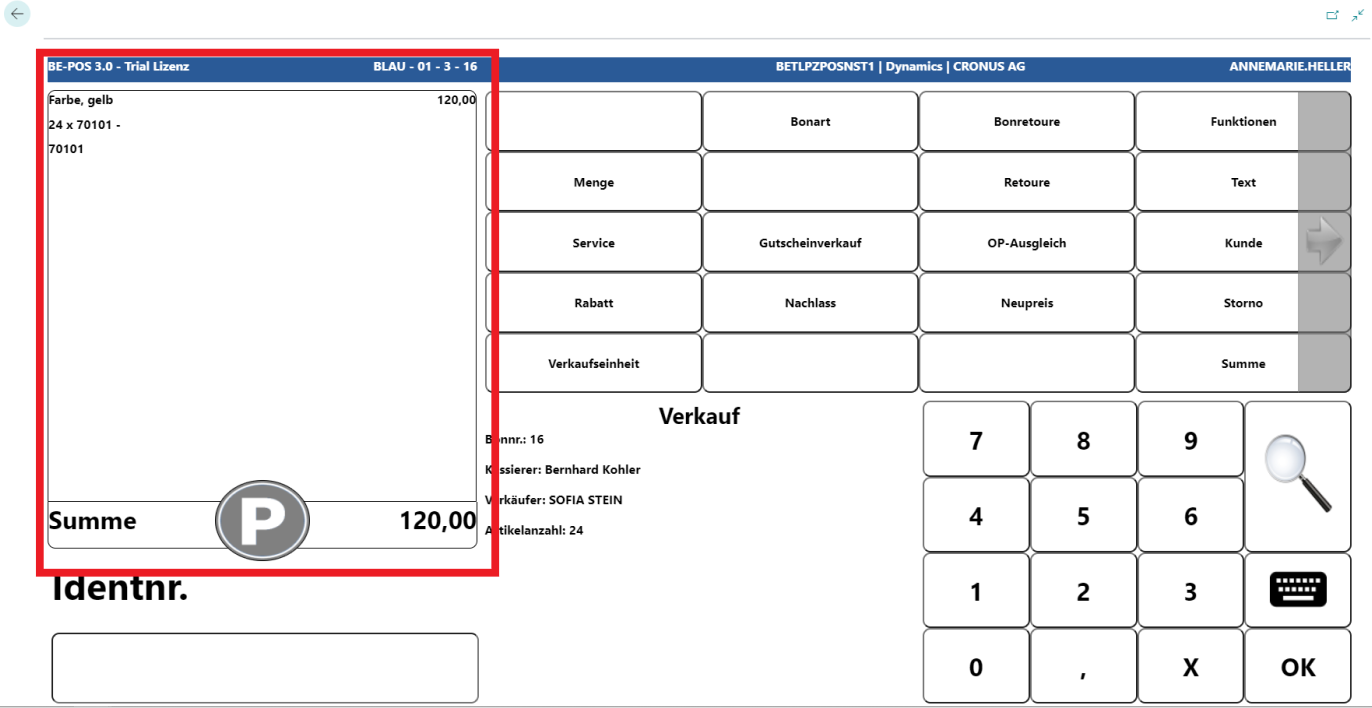
Unit of Measure
If units of measure are assigned to an item, one of them can be selected when the item is scanned or entered.
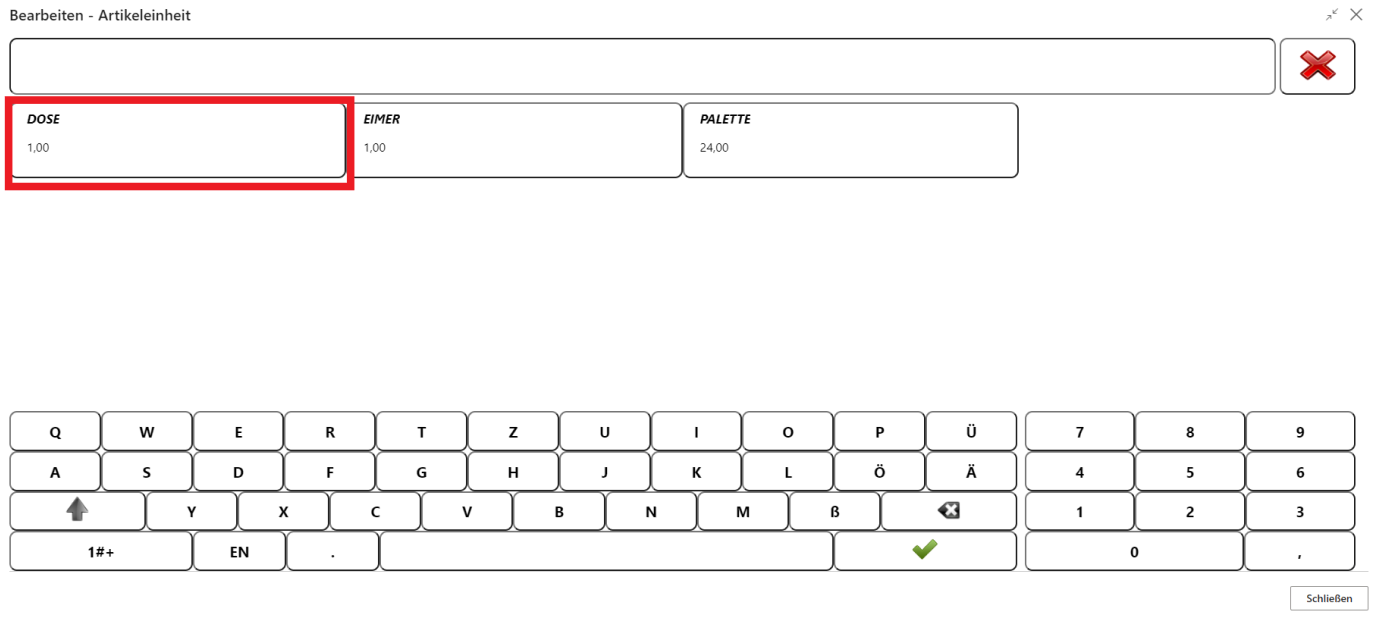
For any correction, the Unit of Measure button is available. The price increases by the quantity stored in the selected unit of measure.
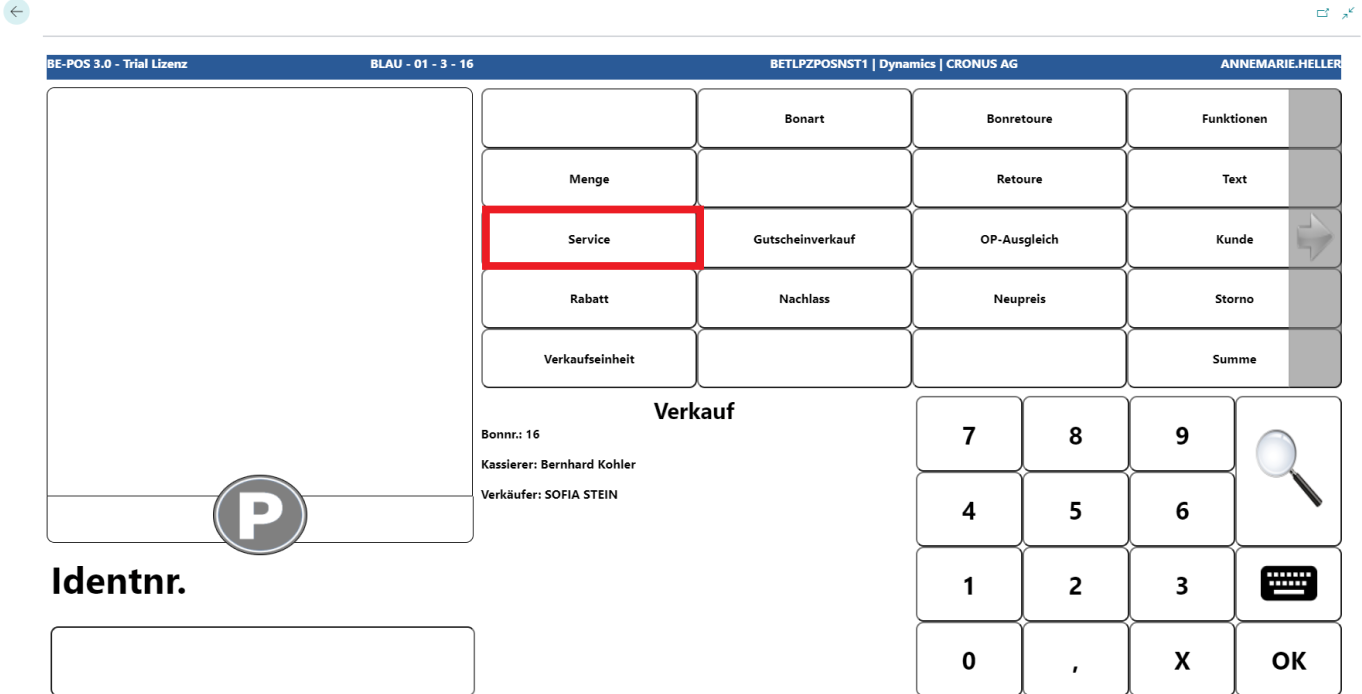
Services/Resources
The cash register offers the option to sell services and resources stored in the system.
The Service button takes you to the quick buttons for services. If these are not stored, the service can be searched for and selected using the magnifying glass function.
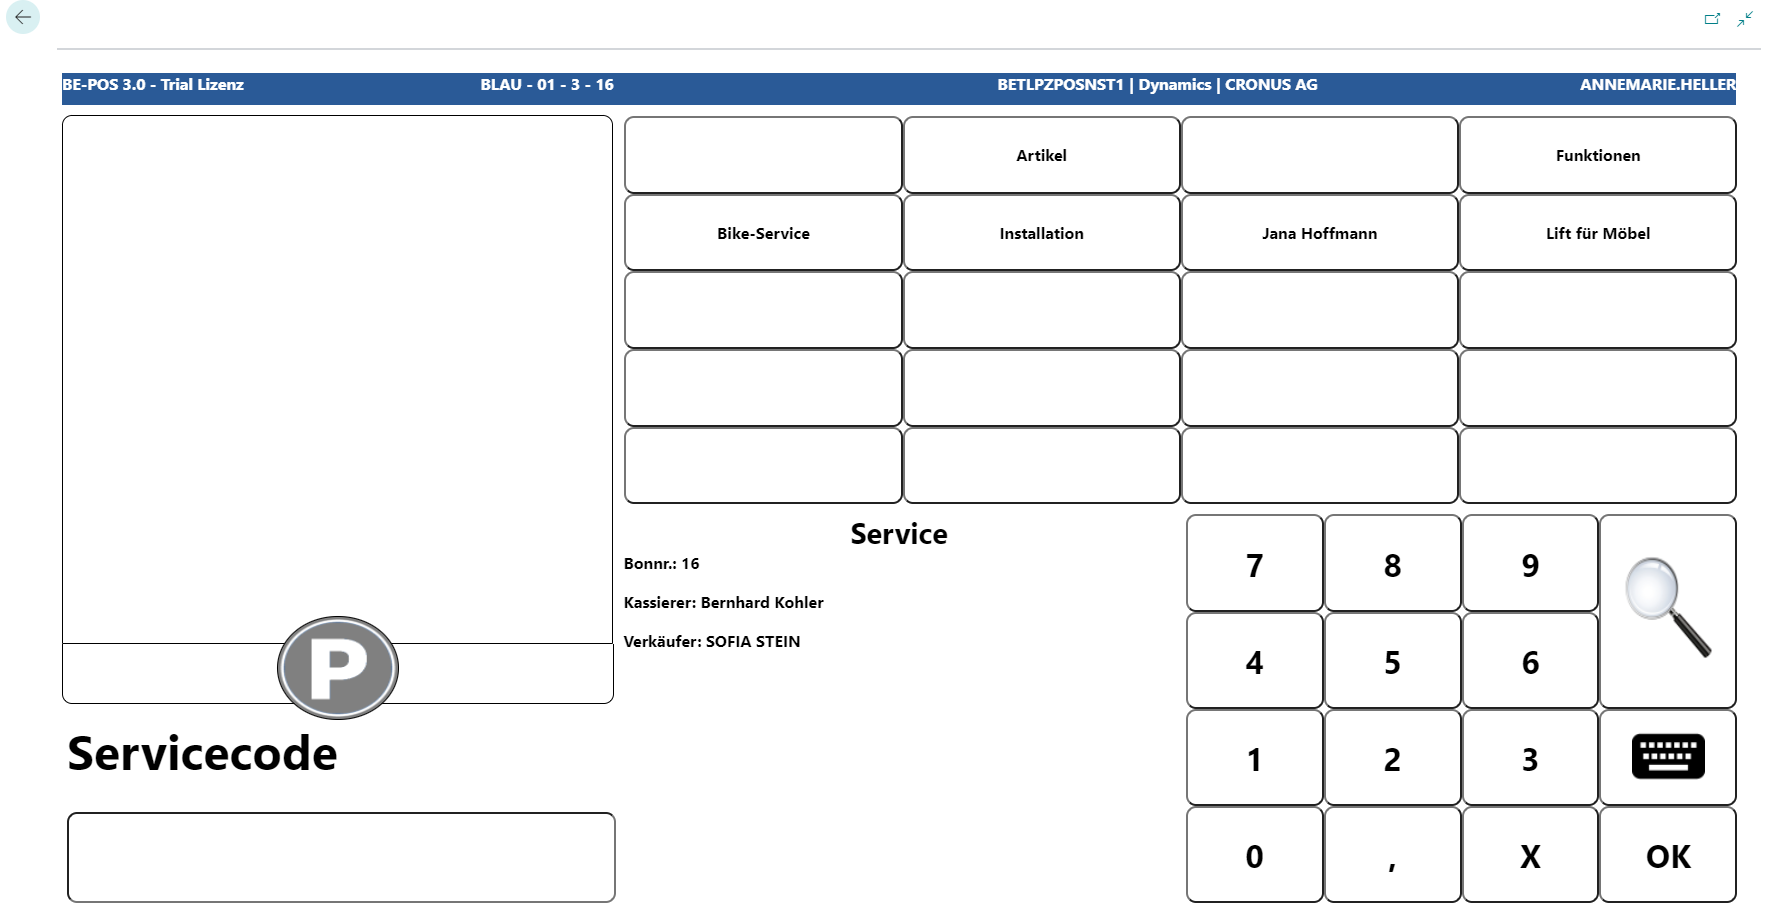
After selection, the service appears in blue on the receipt roll.
Note: If no fixed price is stored for the service/resource, it can be entered manually after selection.
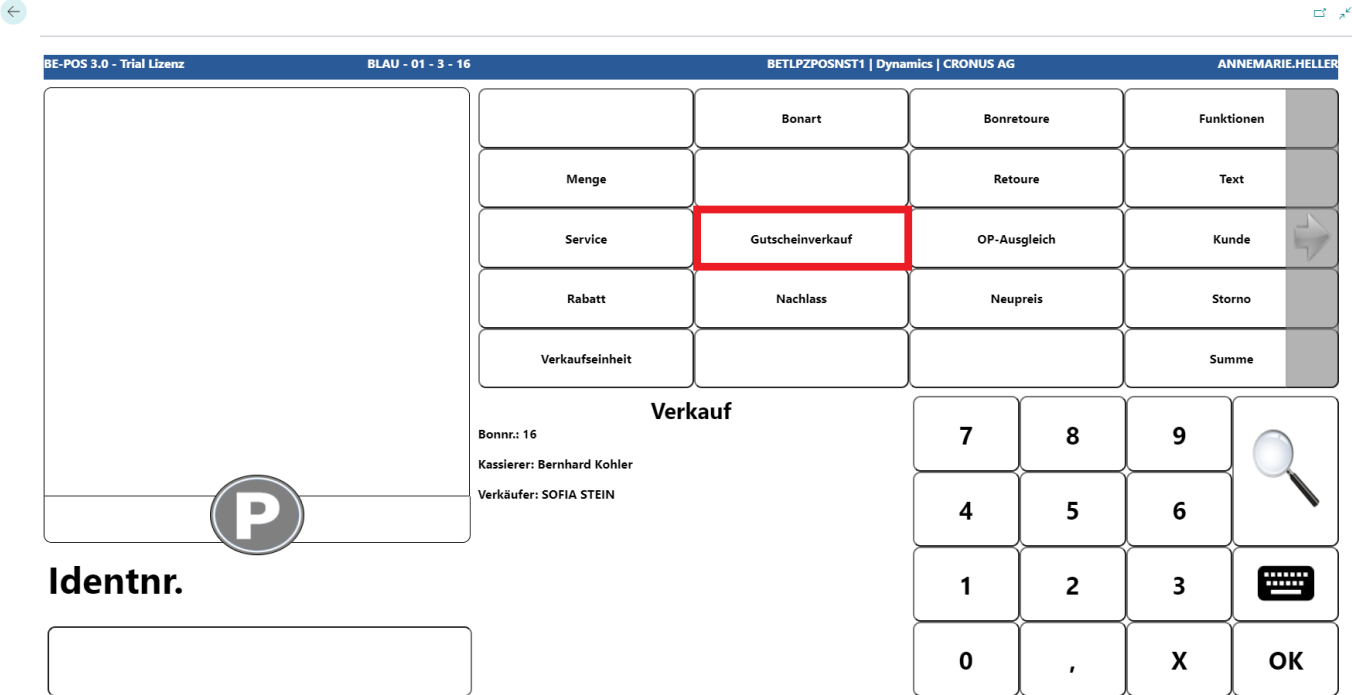
Vouchers and Voucher Cards
Voucher Sale
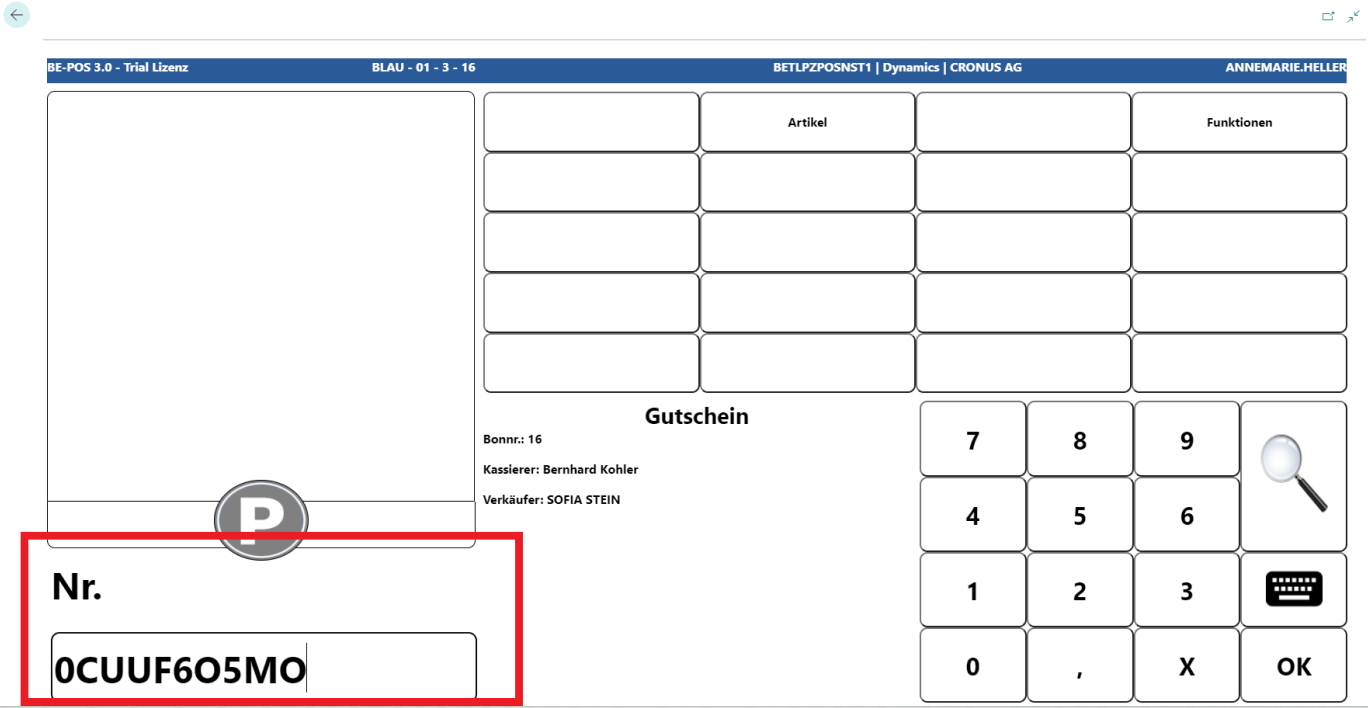
The Voucher Sale button can be used to sell vouchers generated in the system.
Depending on the setup, the voucher number is entered first and then the amount, or the amount is entered directly. In that case, the voucher number is assigned automatically.
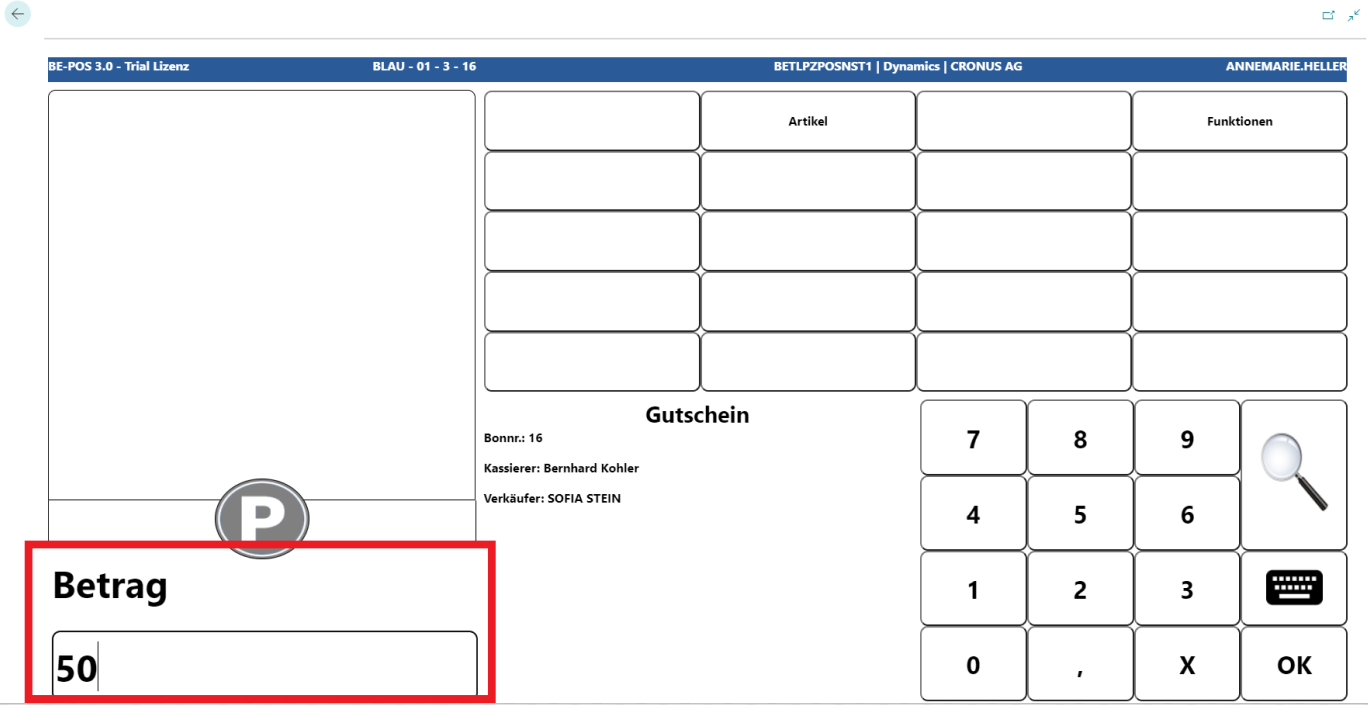
The voucher is transferred to the receipt roll with the entered amount.
Note: If the voucher number is unknown and the setup is configured accordingly, the voucher can also be selected using the magnifying glass function.
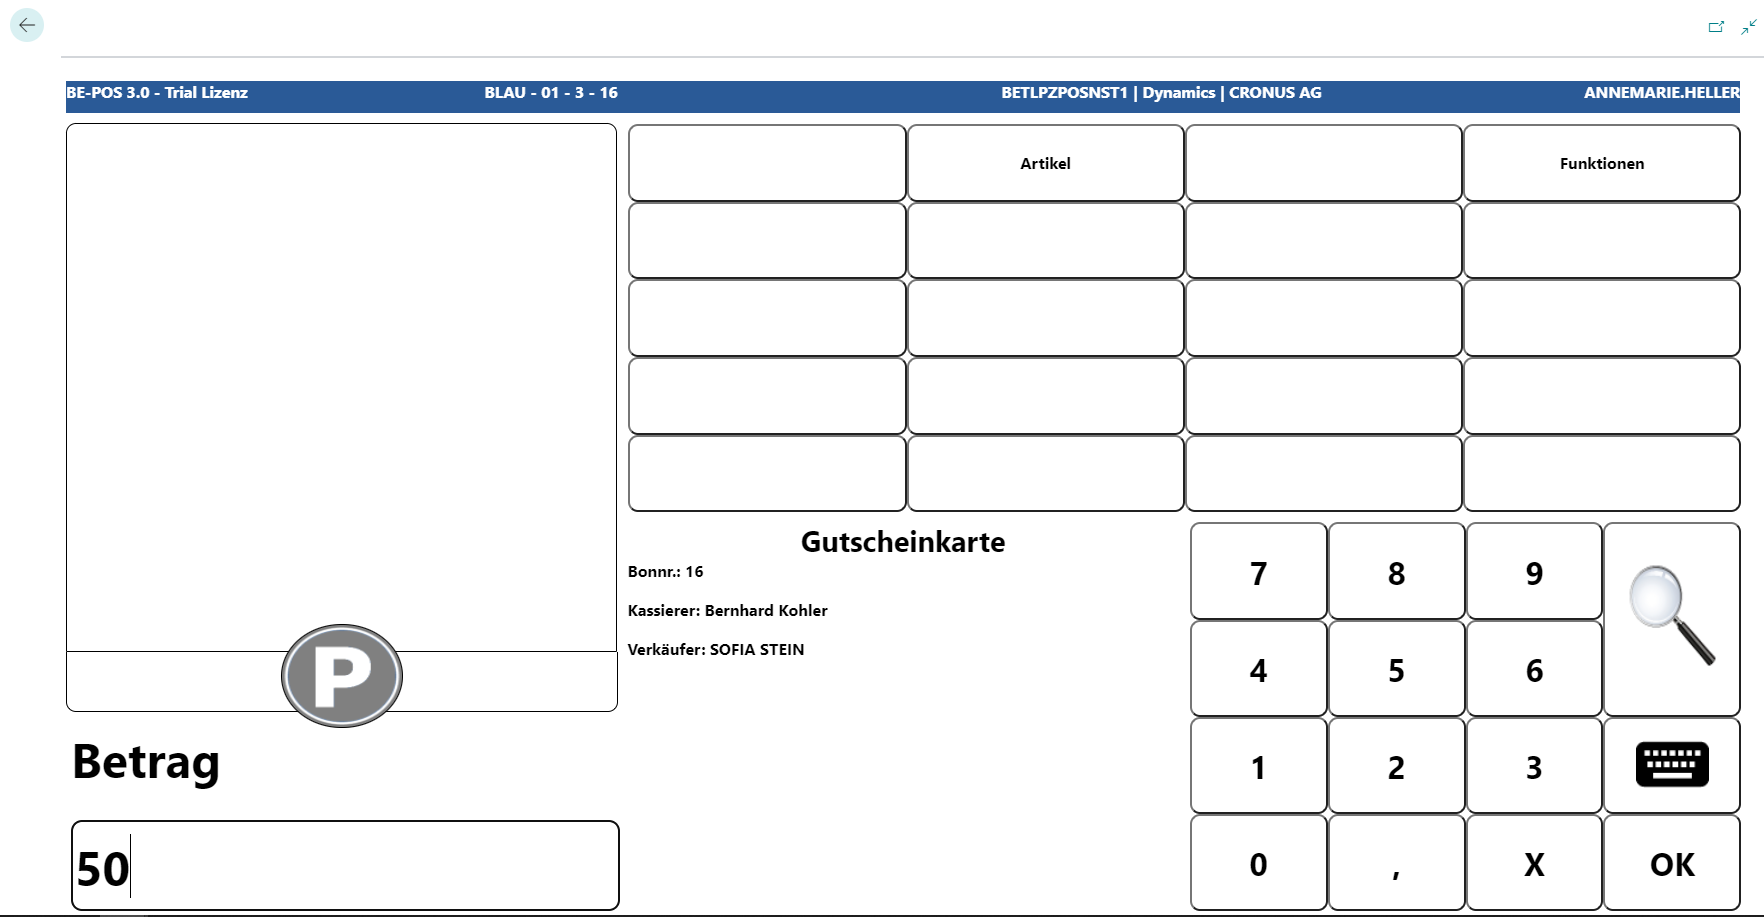
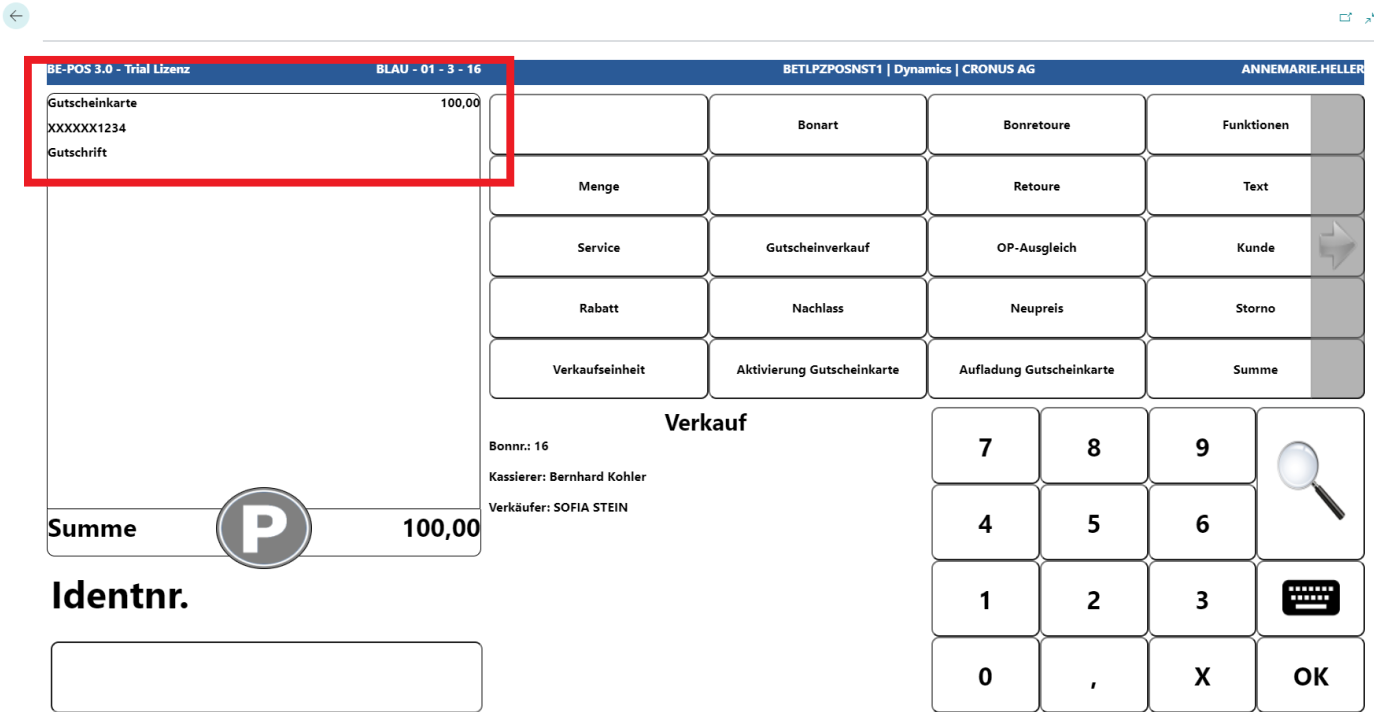
Voucher Card
If voucher cards or stored-value cards are used, they can be activated and loaded at the cash register.
Note: The designation depends on the card setup. In this example, voucher cards are used.
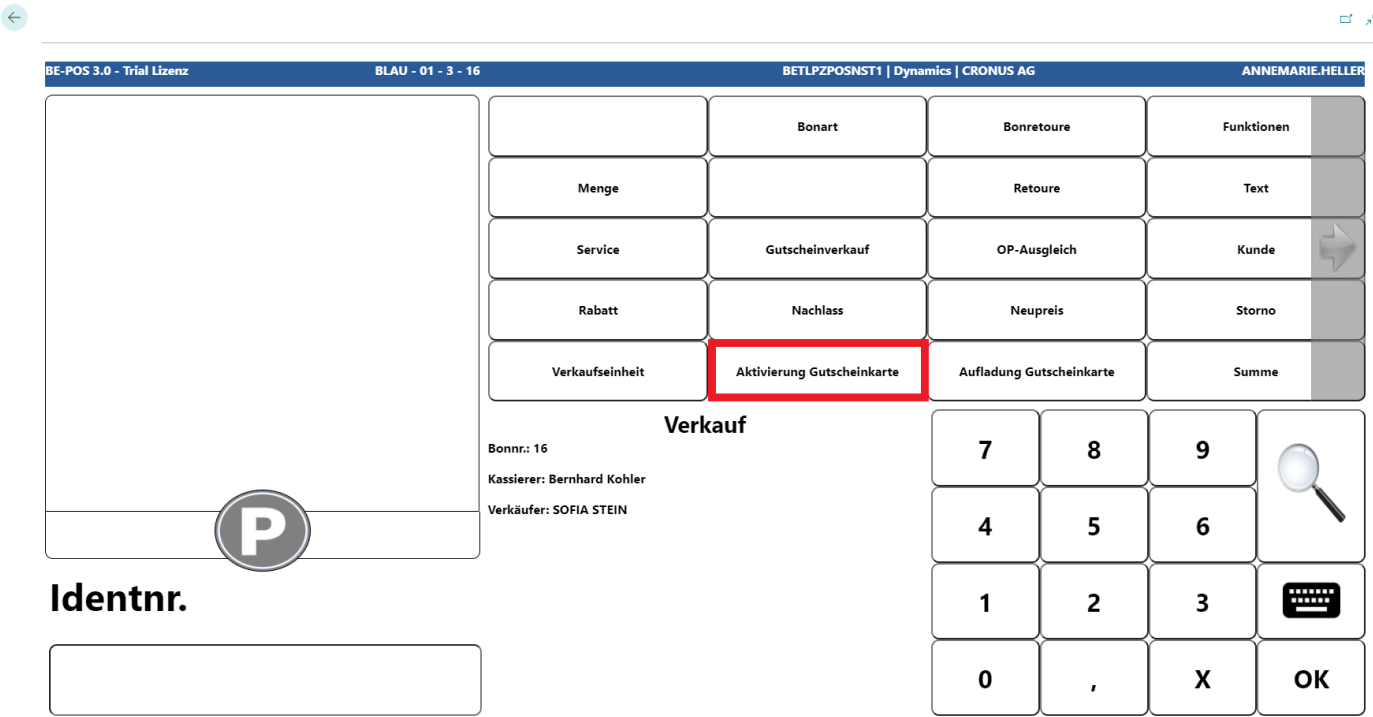
Activate Voucher Card
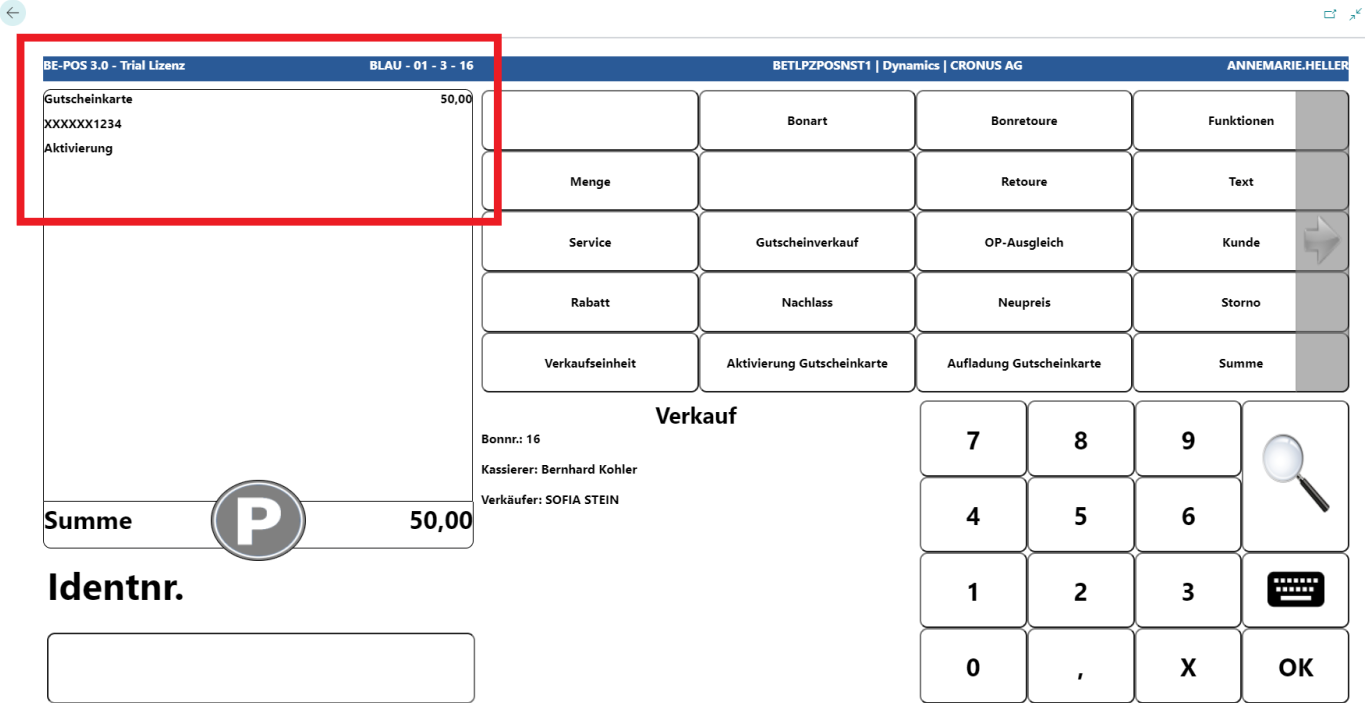
To activate a voucher card, press the Activate Voucher Card button.
Then scan the card or enter the card number manually and confirm.
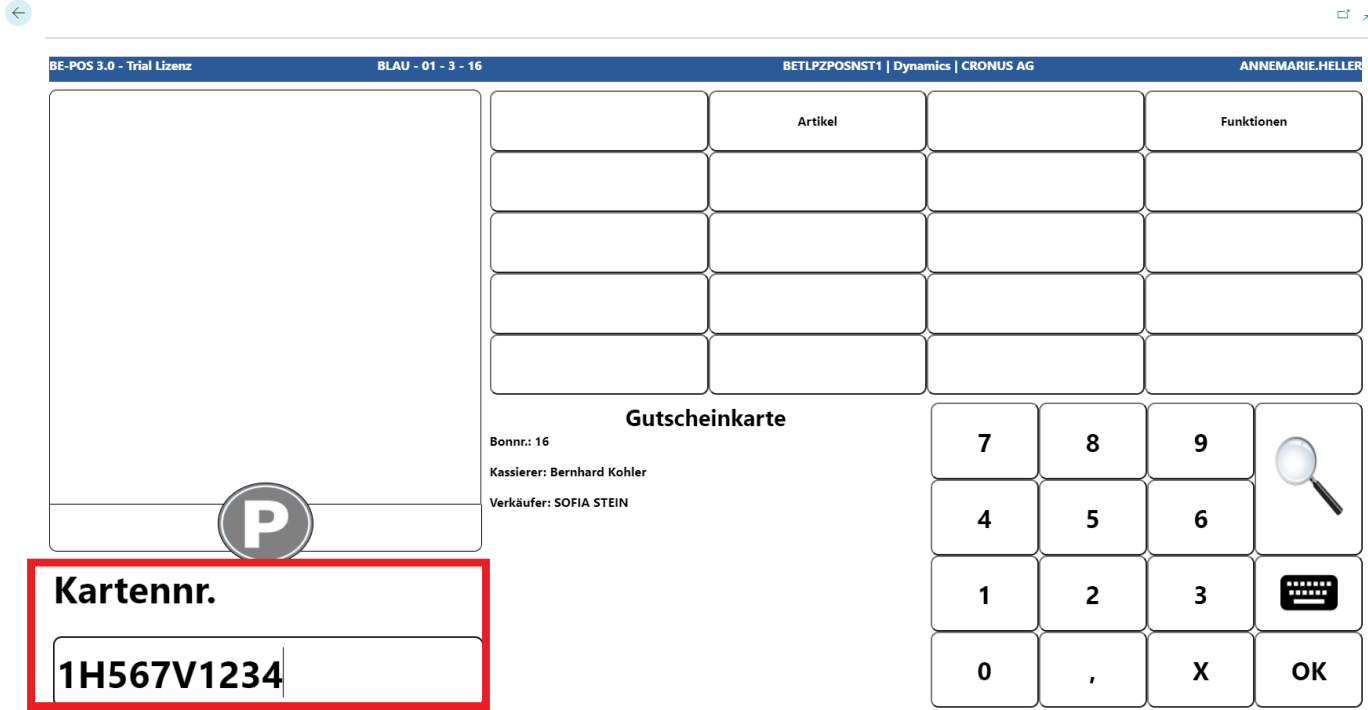
Now enter the amount with which the card should be loaded.
The card has been activated and loaded with the corresponding amount.
Reload Voucher Card
Activated voucher cards can be reloaded. The Reload Voucher Card function is available for this.
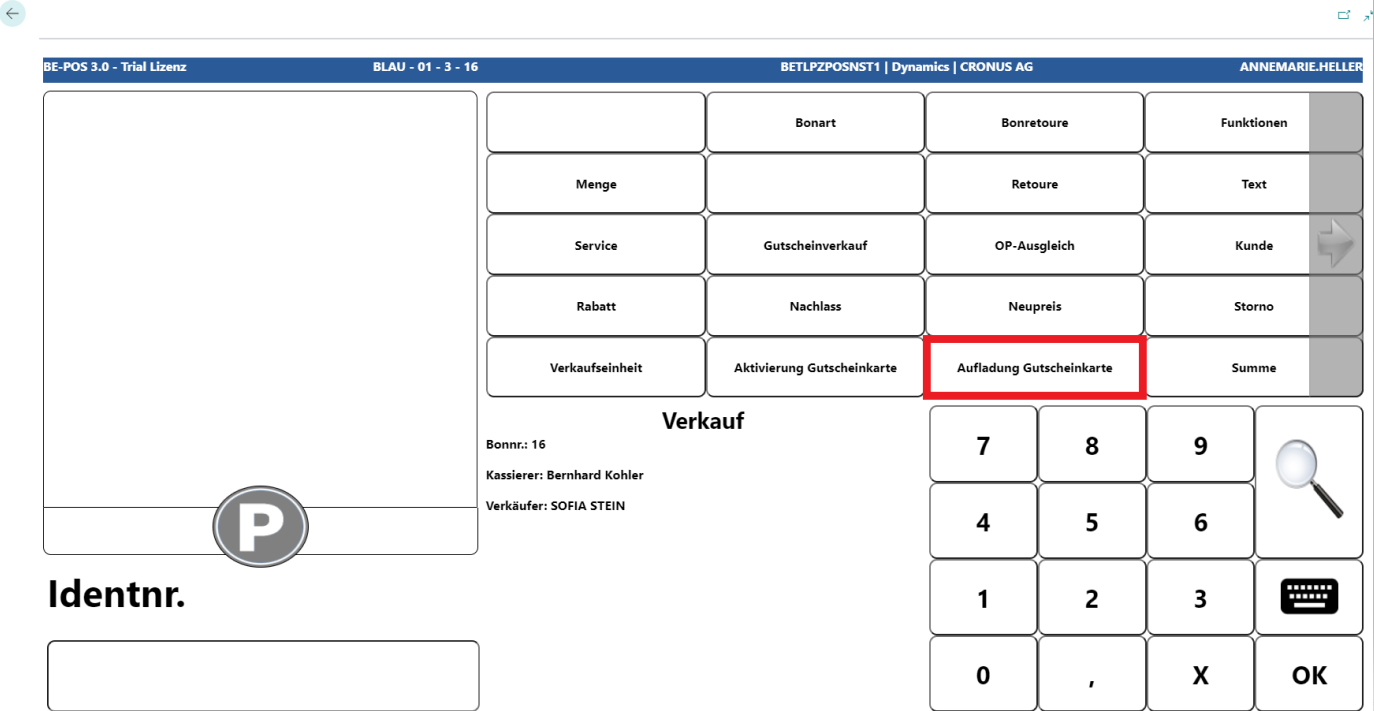
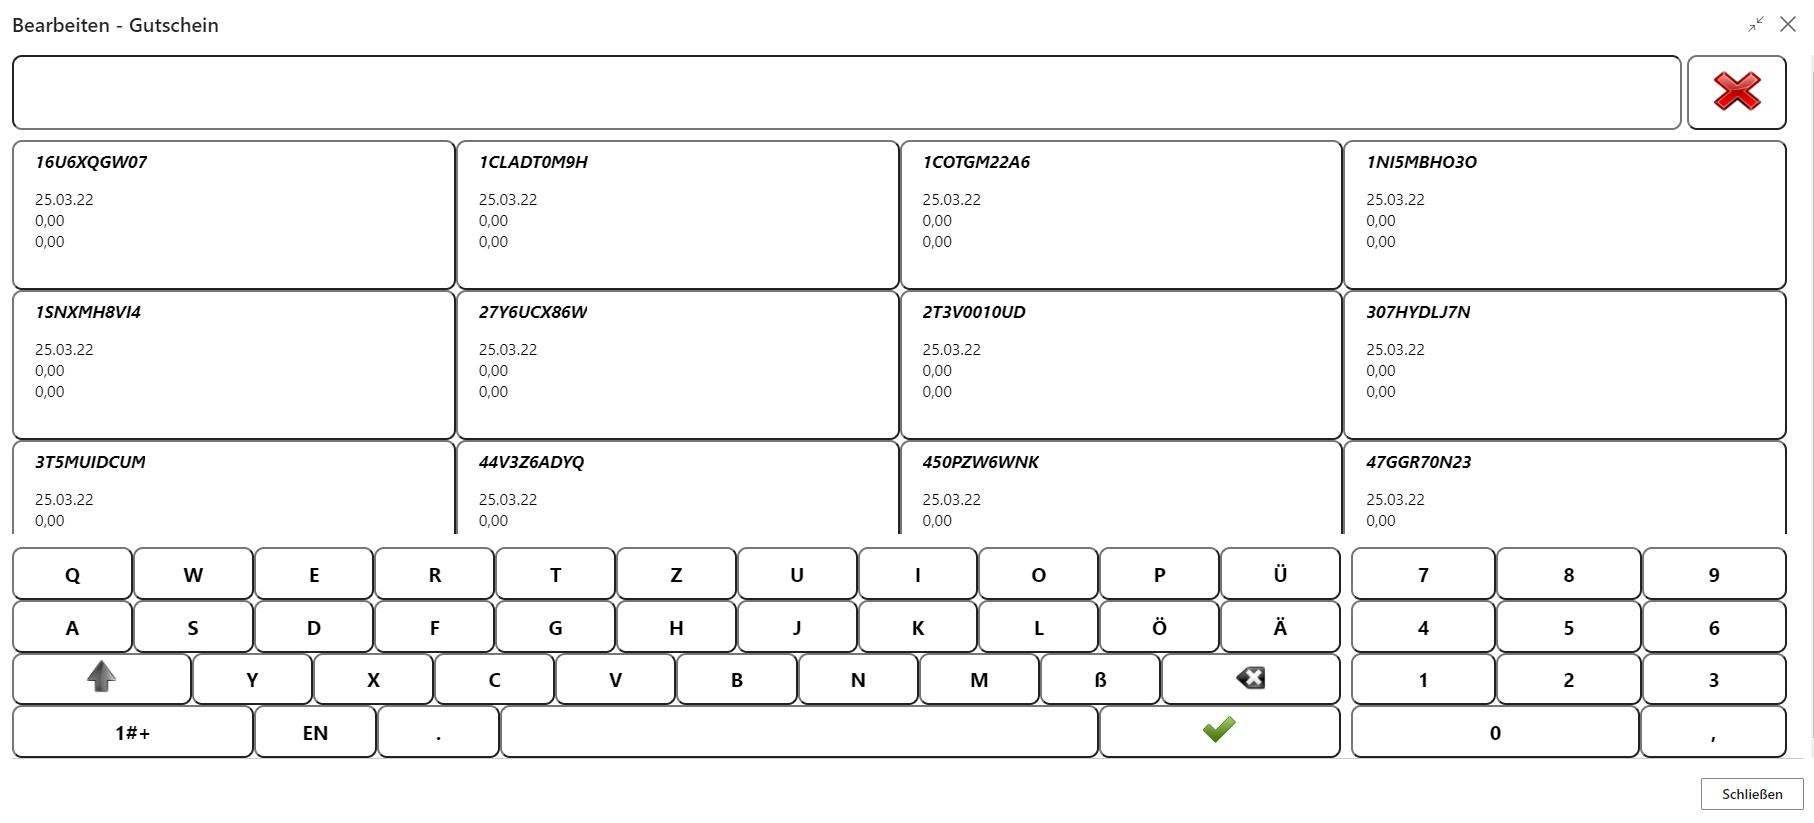
First, enter the card number.
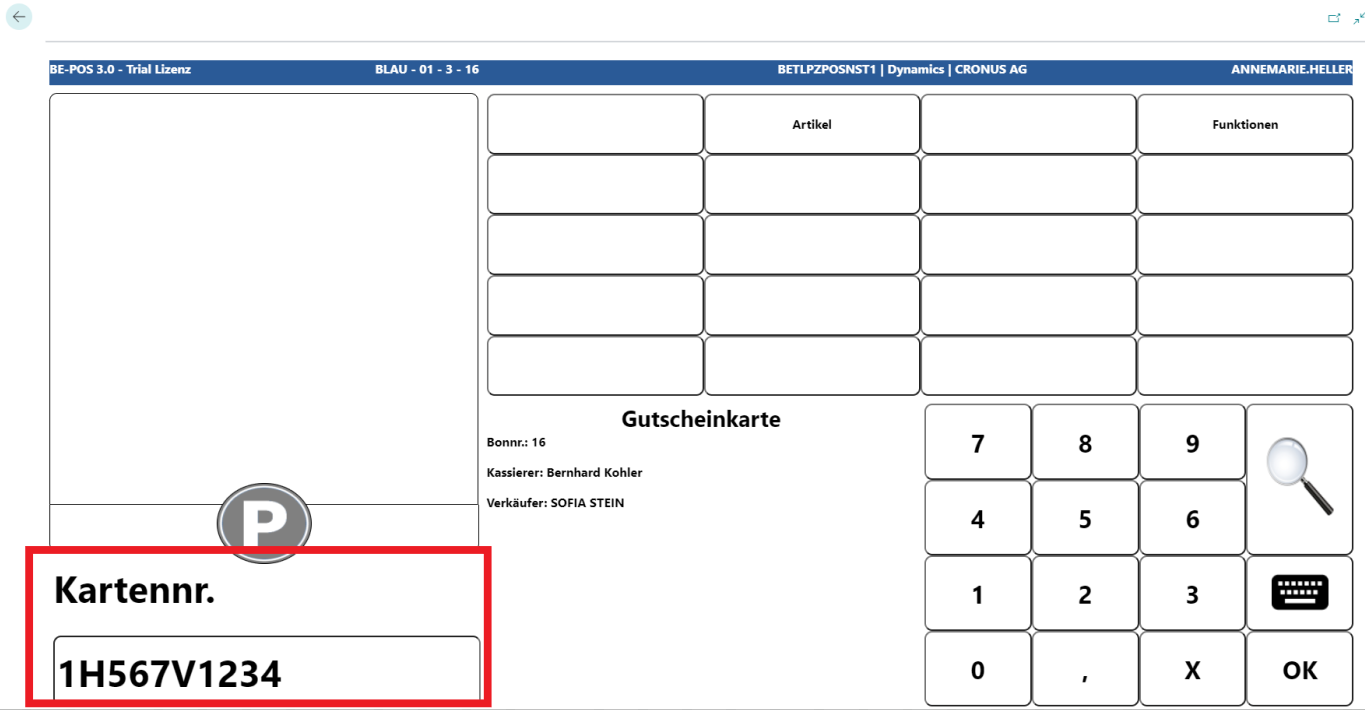
Then define the amount with which the card should be loaded.
A credit is posted to the card and is displayed on the receipt roll.
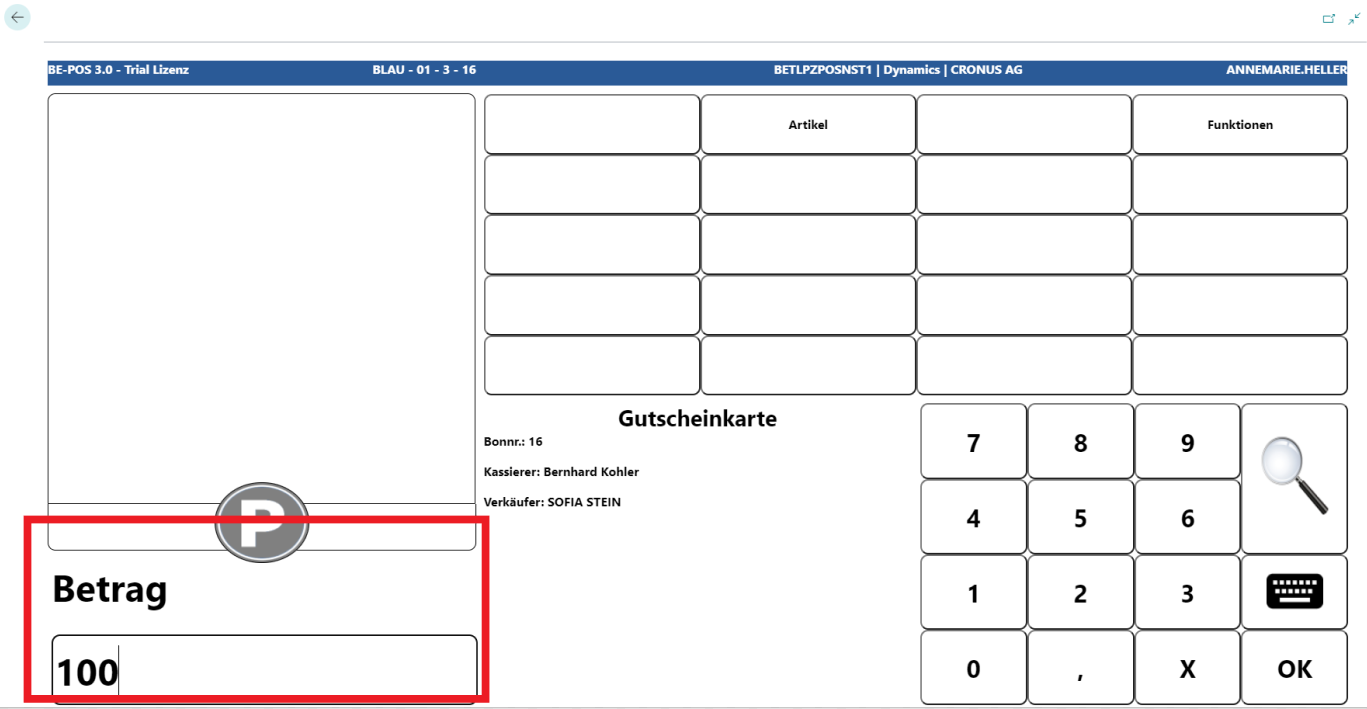
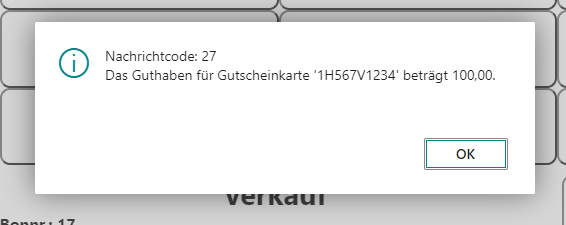
Voucher Card Balance
The inquiry for the balance of a voucher card can be found under Functions.
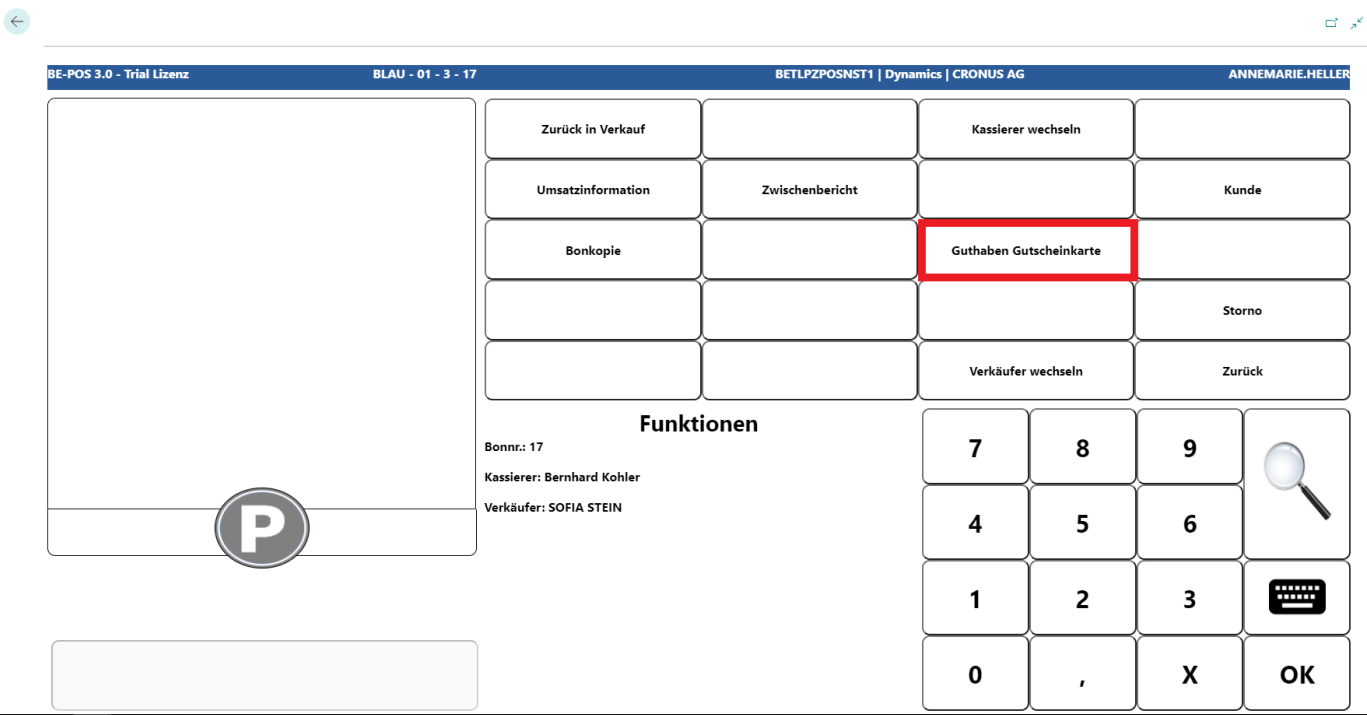
The voucher card is scanned or the card number is entered manually.
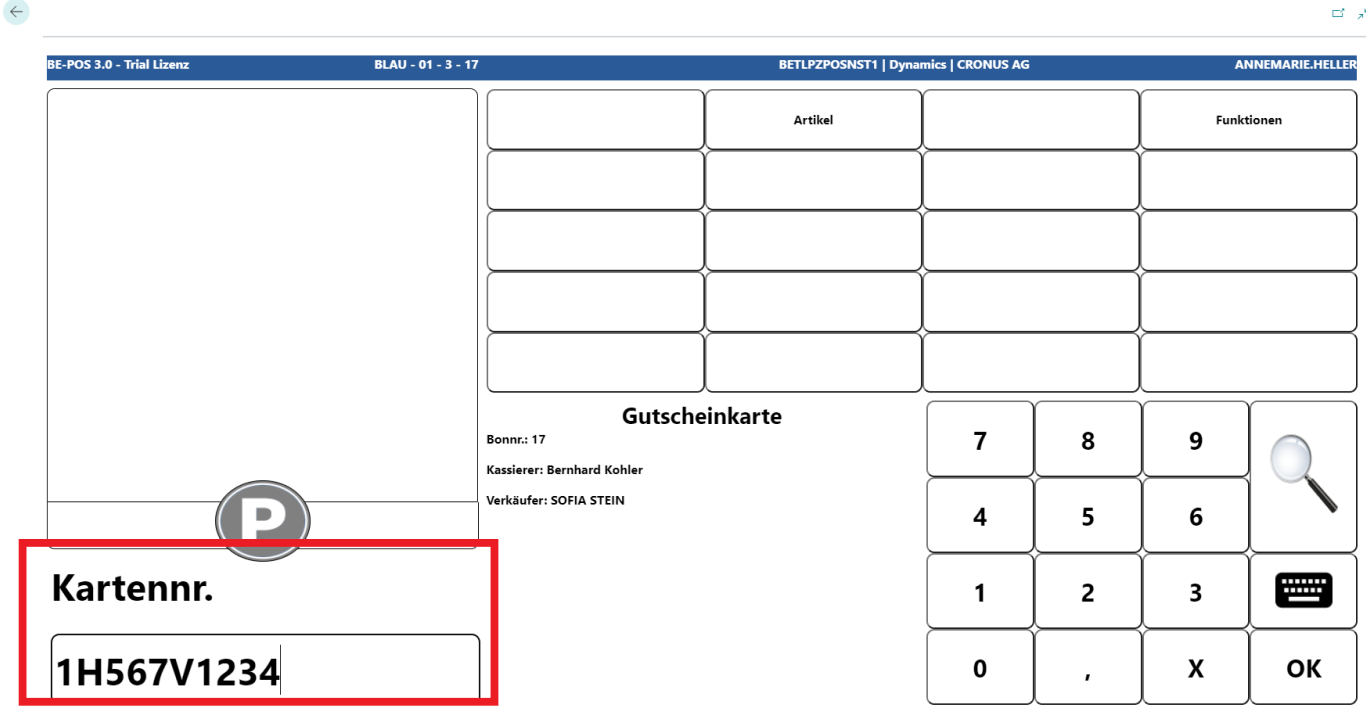
By confirming the voucher number, information about the current value of the card is displayed.
Open Entry Balance and Deposit
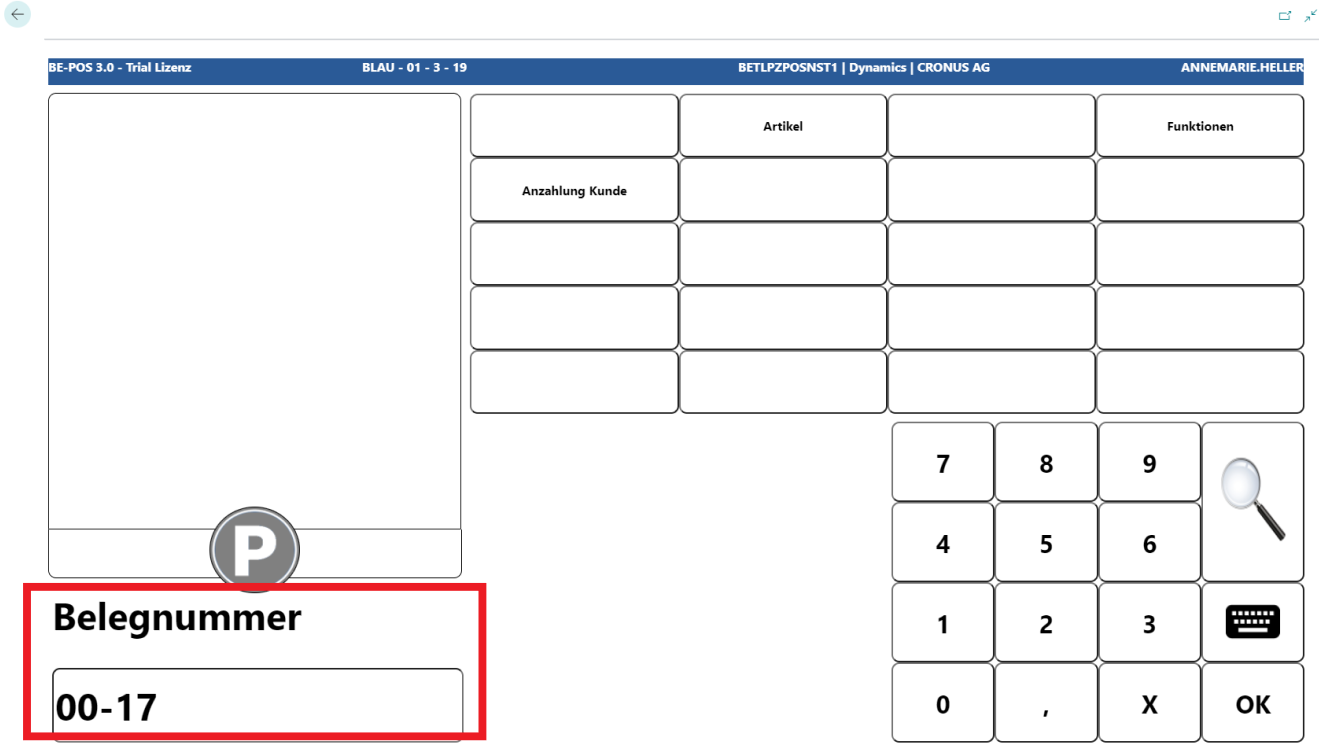
Open Entry Balance
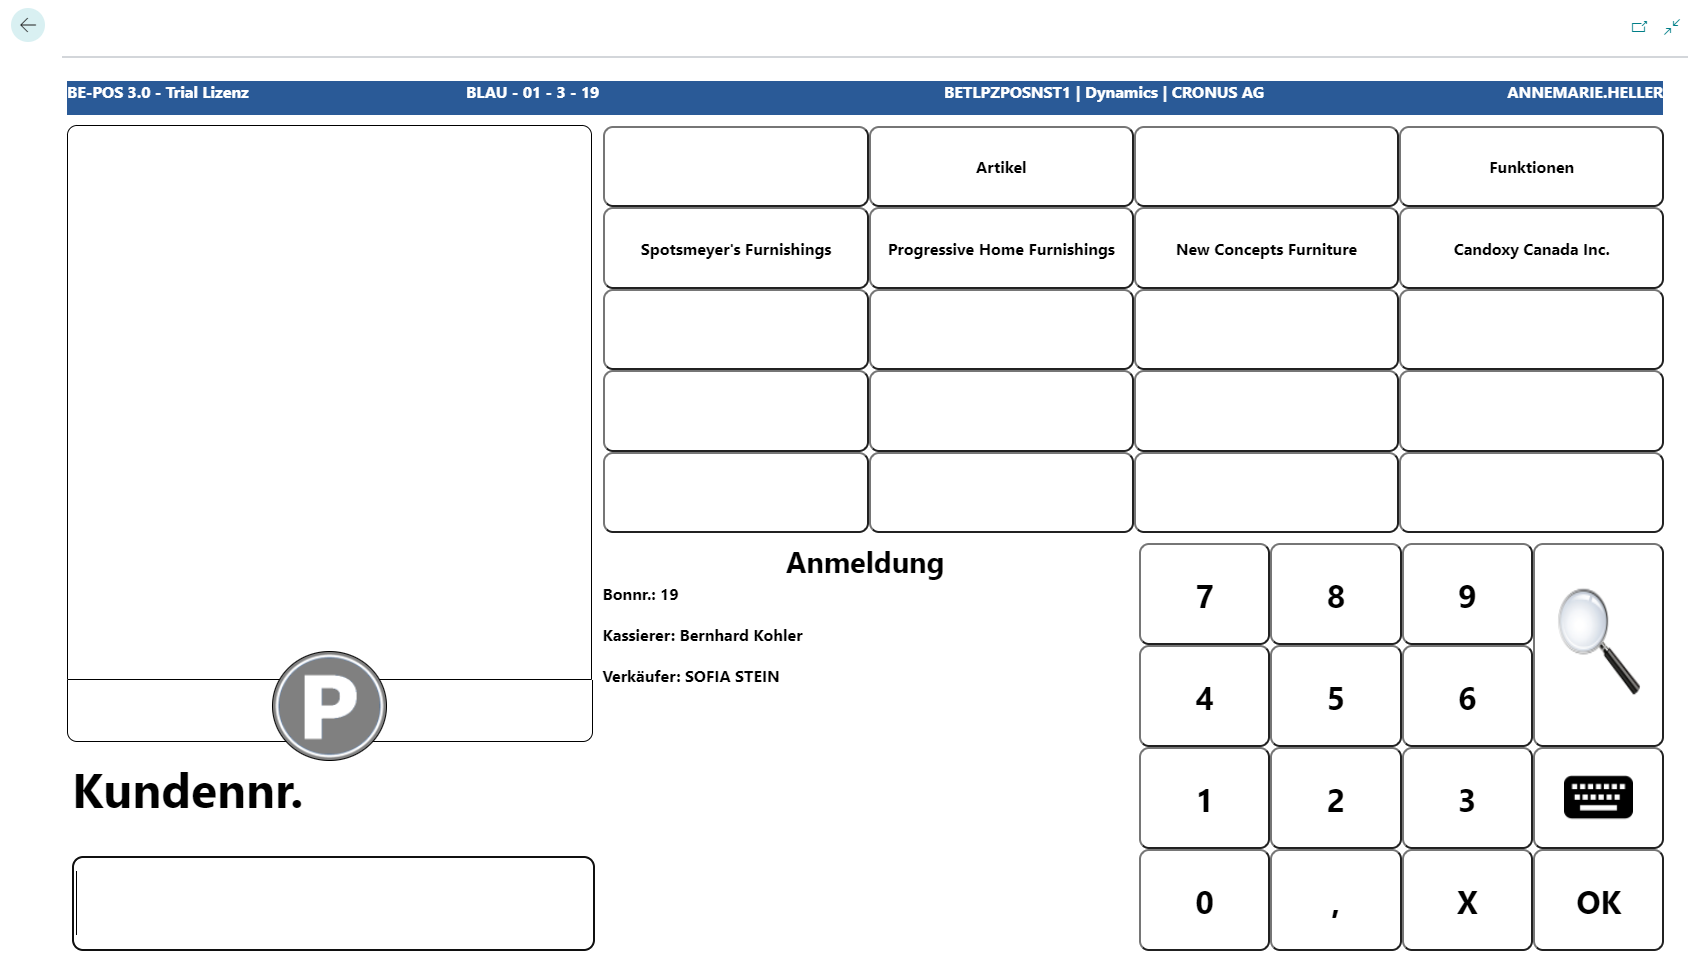
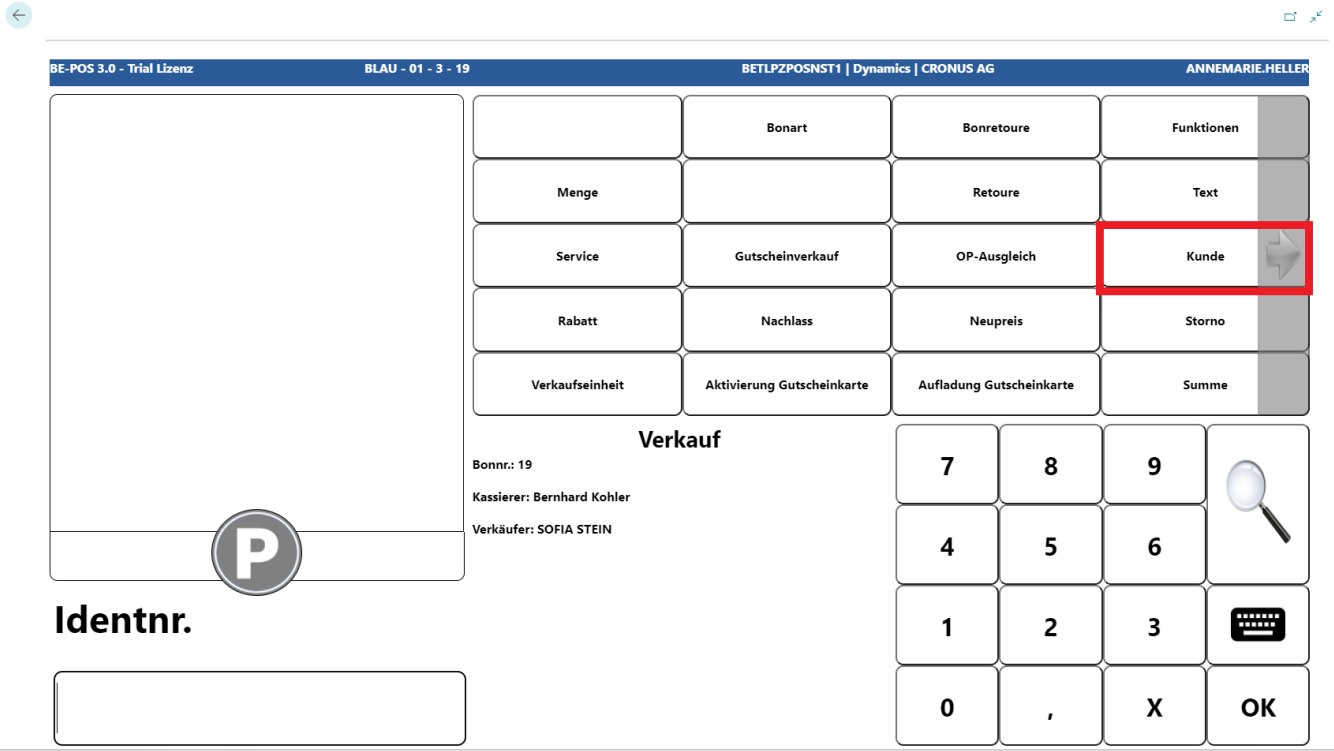
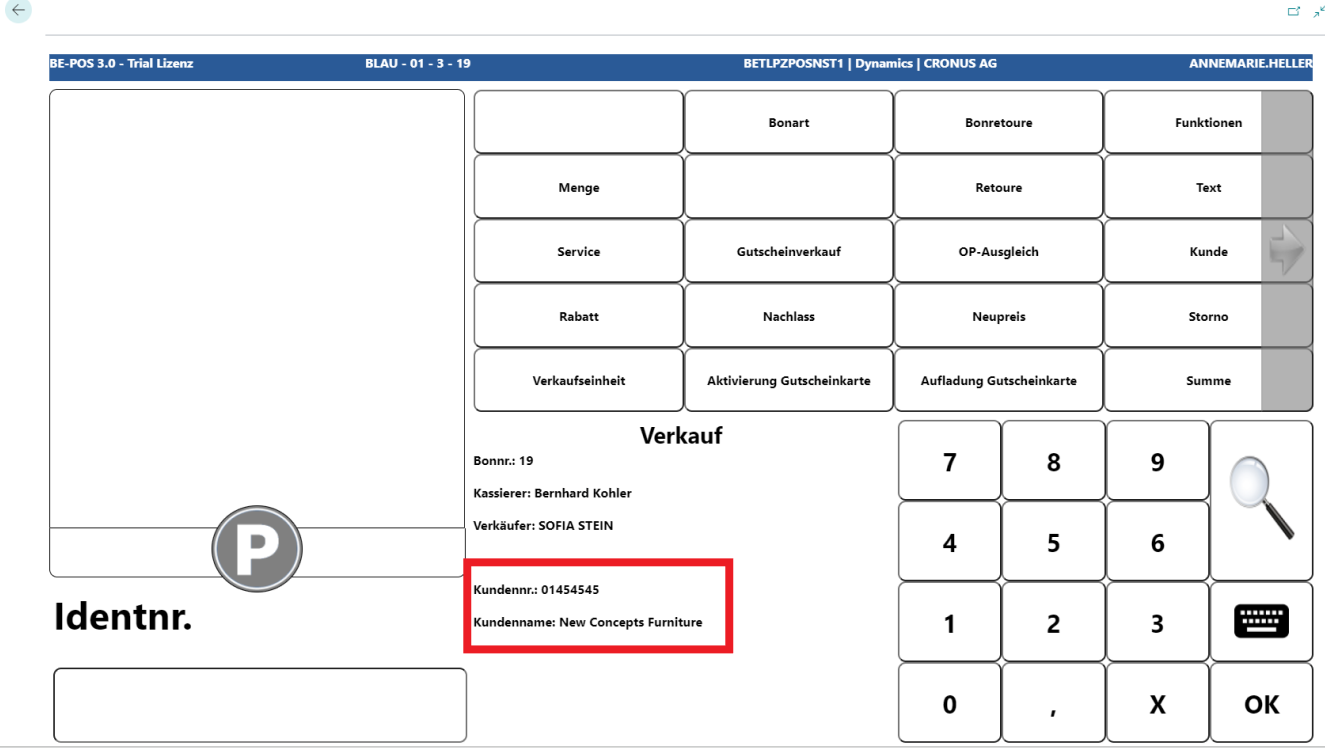
To settle an invoice for a customer, the customer must first be logged in at the cash register.

The customer can be searched for and selected using the customer number, a quick button, or the magnifying glass function.
 Click to enlarge
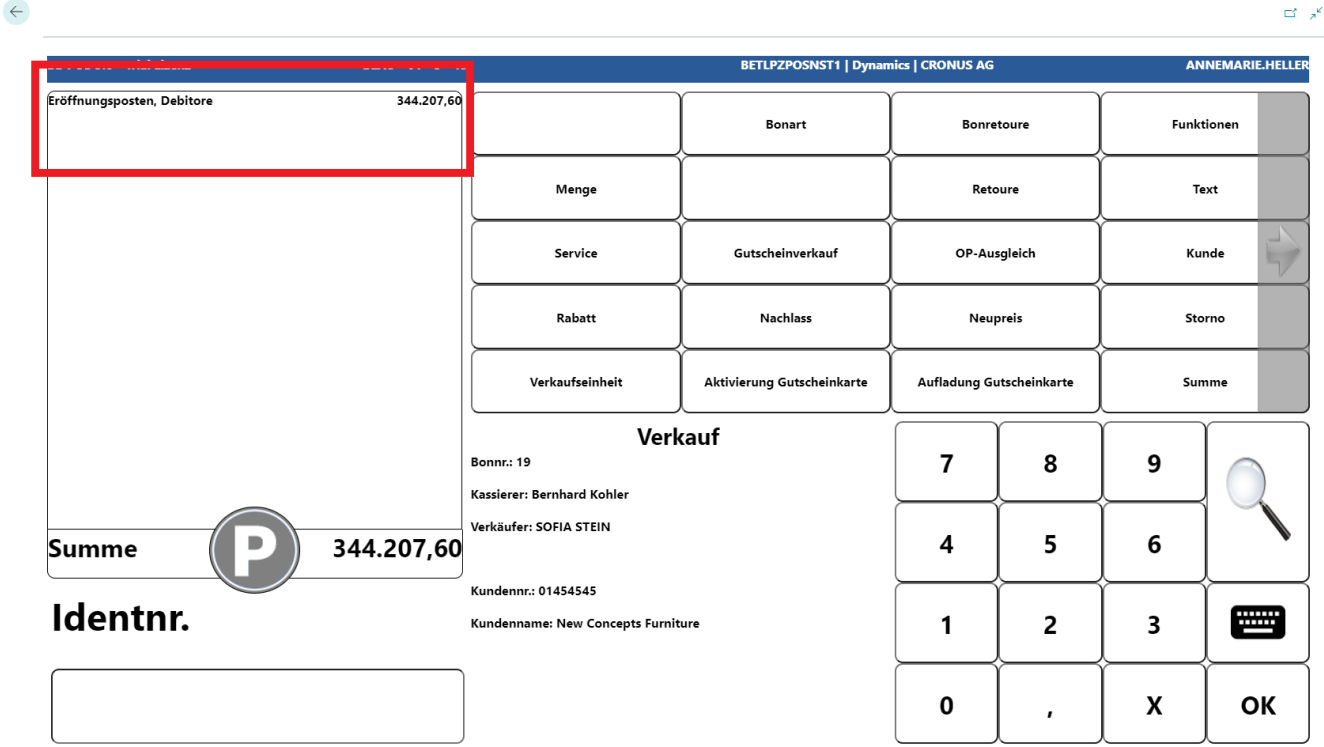
Once the customer has been logged onto the receipt, the customer is visible in the information field.

Then call the Open Entry Balance function.
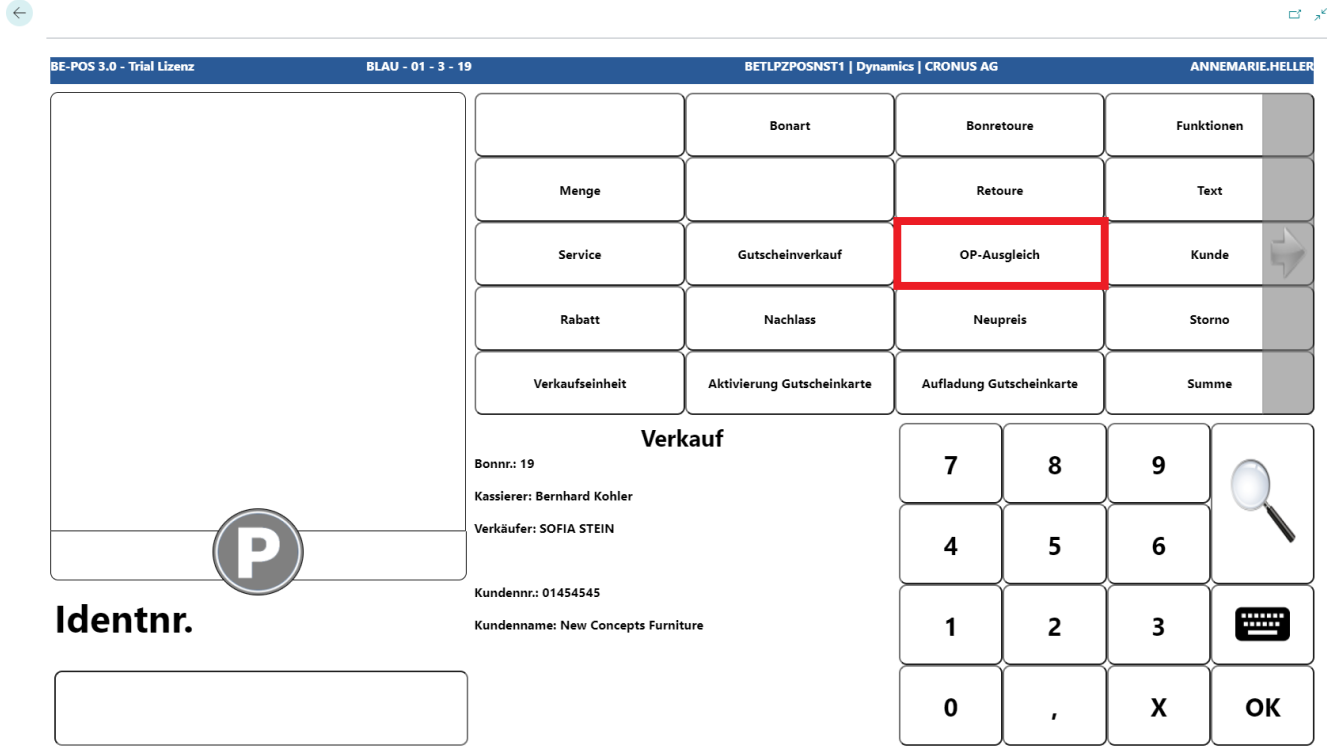
The document number of the invoice to be settled can be entered or searched for using the magnifying glass function.
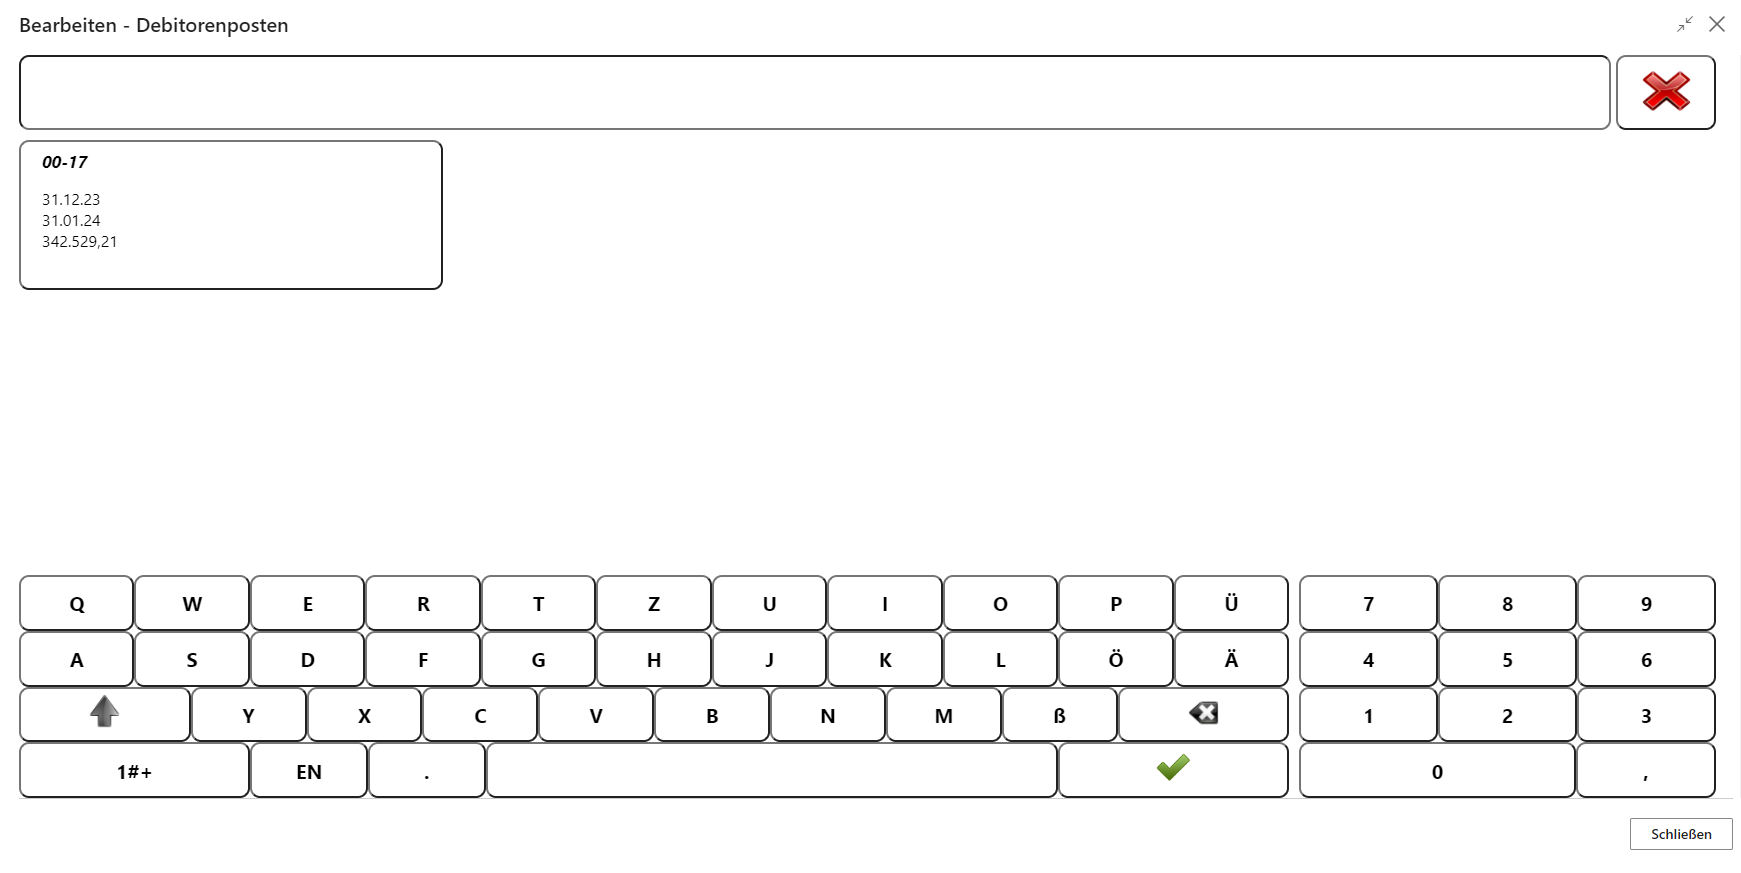
After confirming the document number, the open invoice is transferred to the receipt and can be settled.
Note: Open entry balances cannot be paid again with the Invoice tender.
Deposit
To store a deposit for a customer, the customer must first be logged onto the receipt.
The customer can be searched for and selected using the customer number, a quick button, or the magnifying glass function.
 Click to enlarge
Once the customer has been logged onto the receipt, the customer is visible in the information field.
Then call the Open Entry Balance function.

If you choose the Deposit Customer button, you can enter the amount that is to be credited to the customer as a deposit.

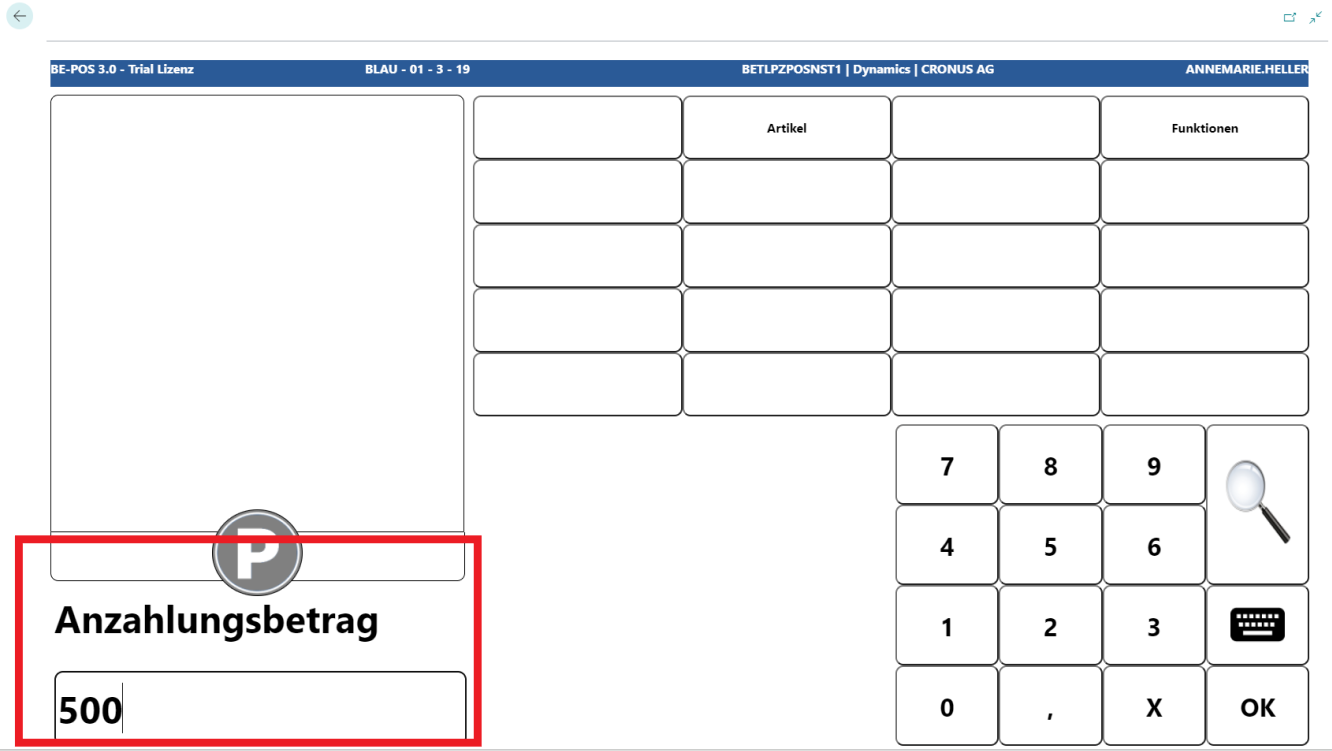
After confirming the amount, a text can be entered to assign the deposit.

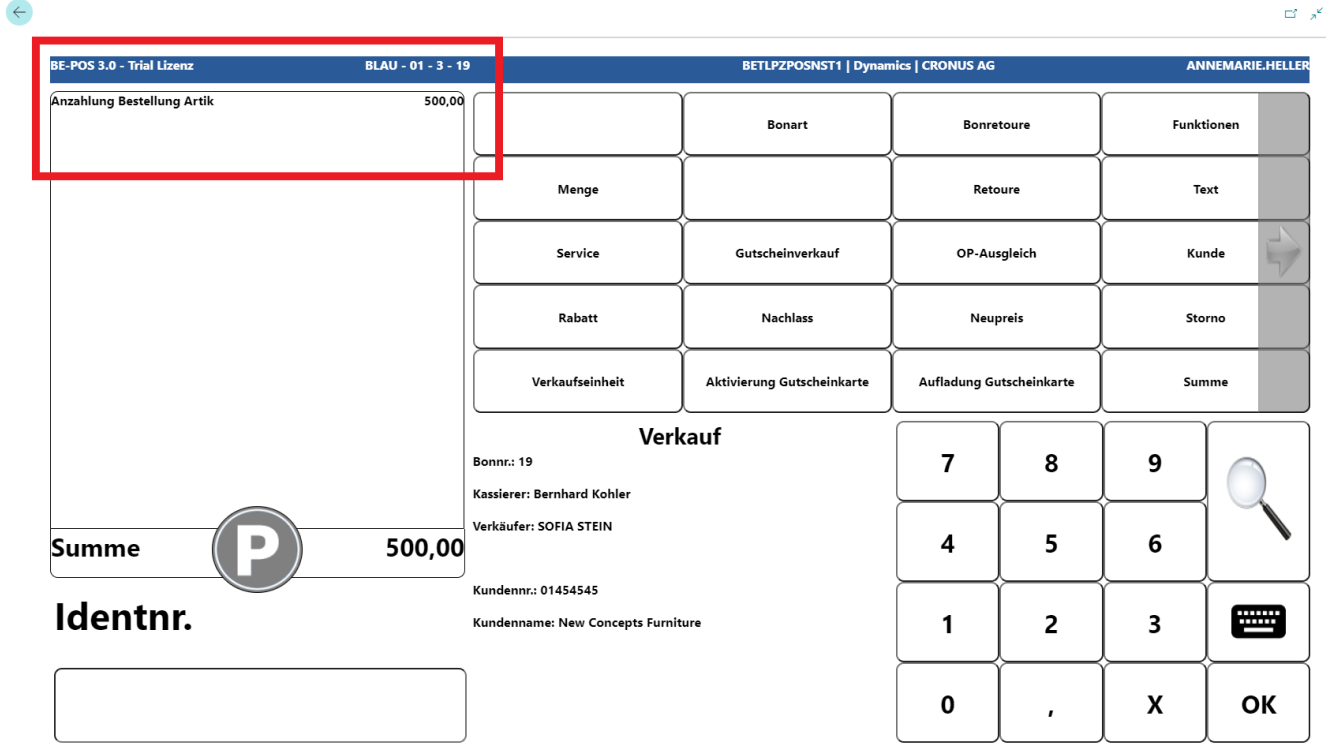
The deposit amount, as well as the assigned text, is transferred to the receipt.
Note: Reversing a deposit works in the same way as the Open Entry Balance function, except that the amount is displayed as negative.
Home Order
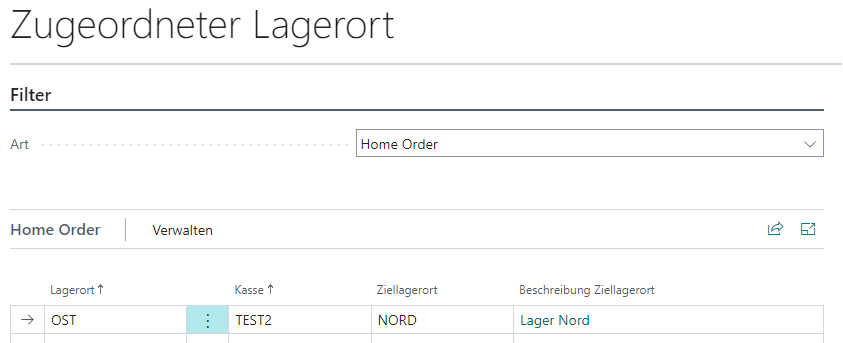
For the Home Order process, the cash register must first be assigned a Home Order location from which item stock can be retrieved. Setup is carried out in the BE-POS Role Center under Setup → Assignment → Assigned Location → Home Order.
Home Order can now be selected in the receipt types.

First, the customer is searched for and selected using the customer number, a quick button, or the magnifying glass function.
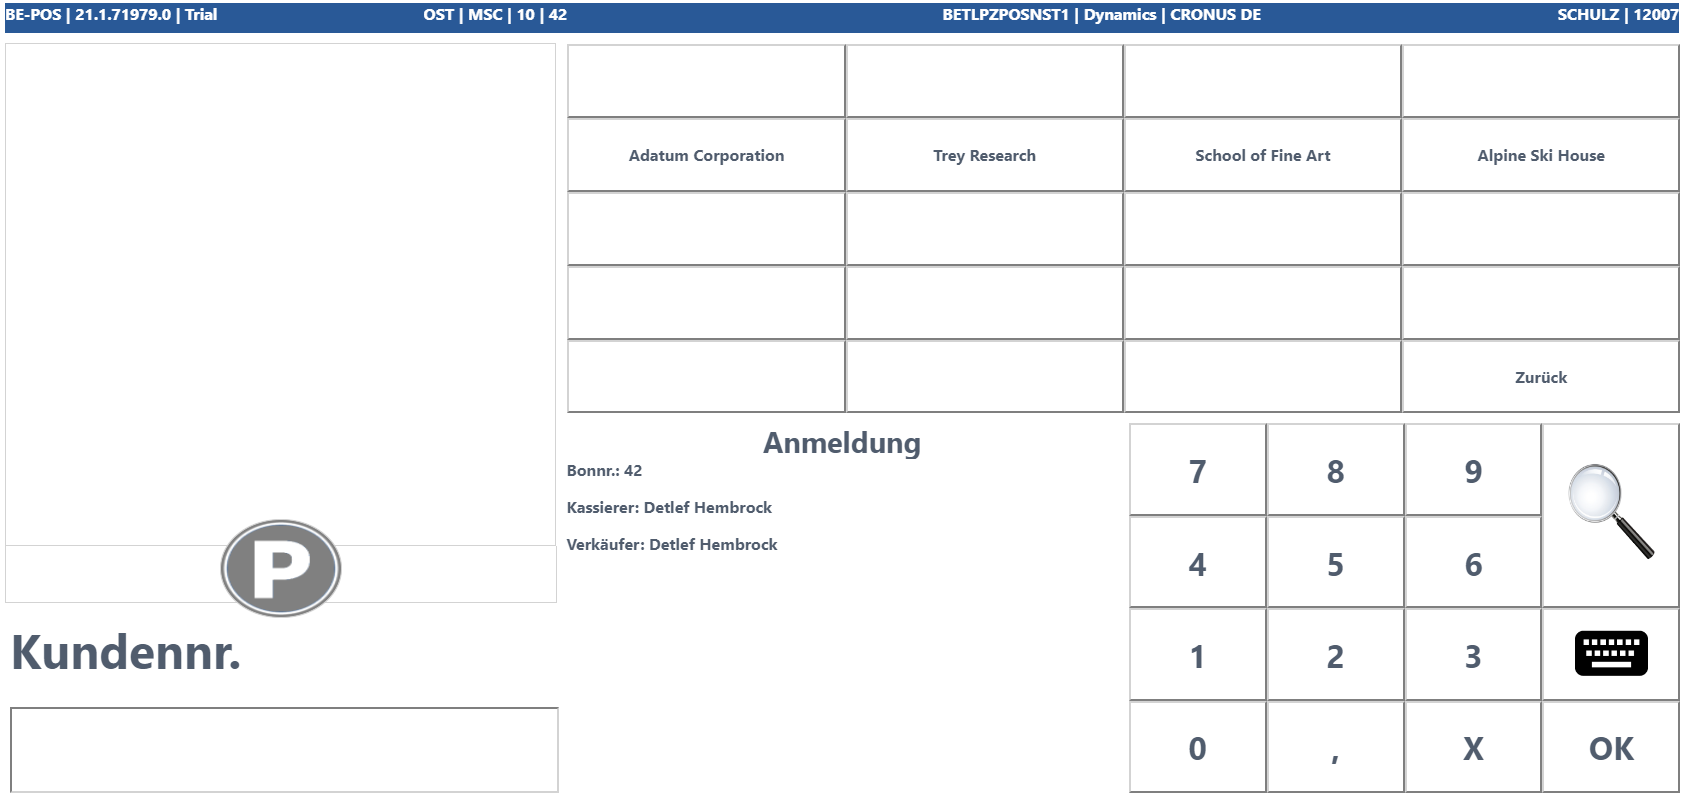
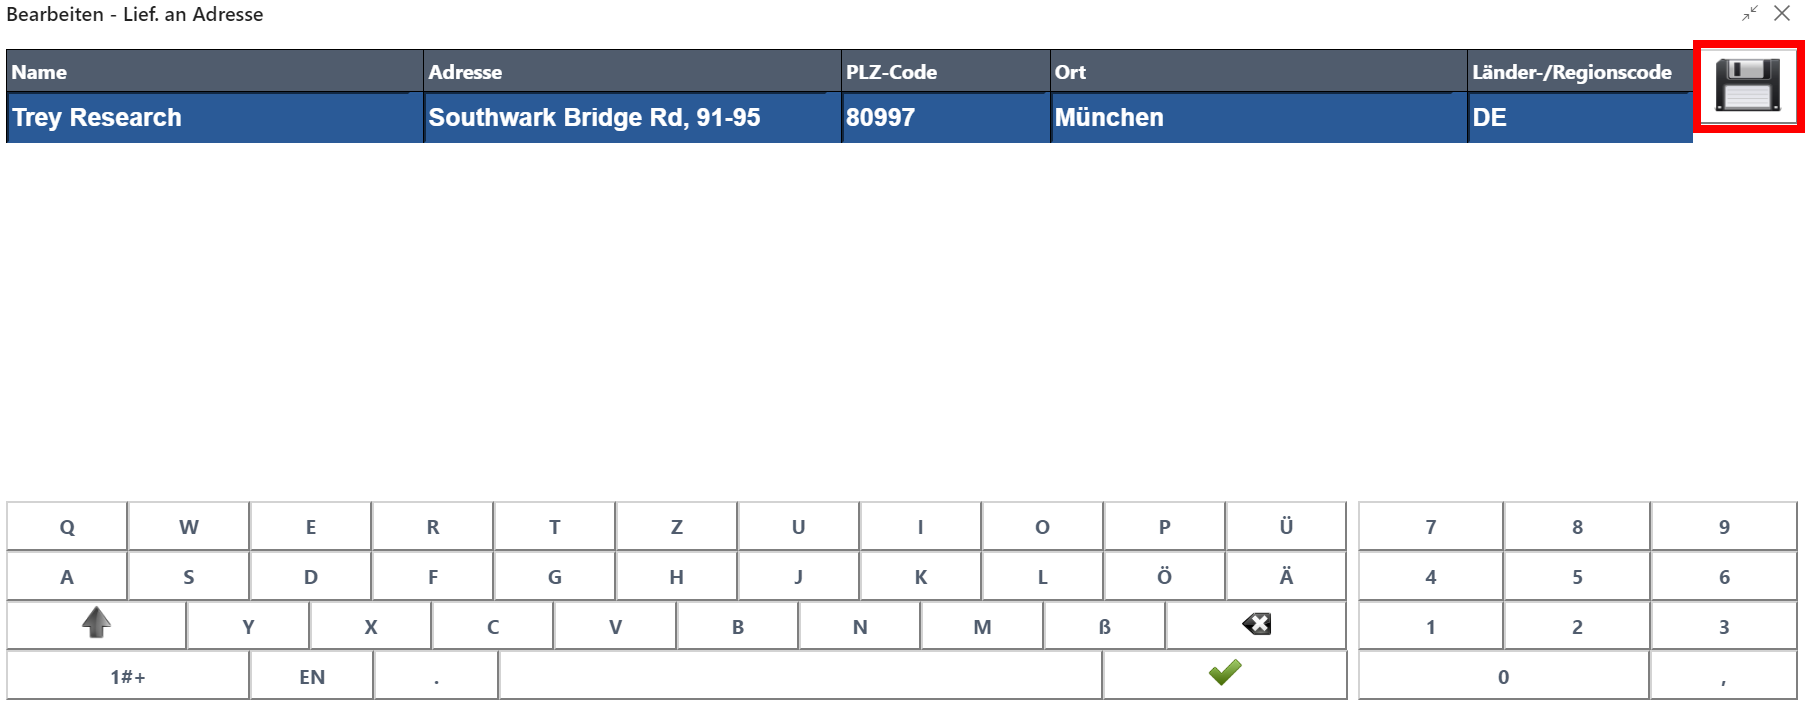
After a customer has been successfully logged onto the receipt, the delivery address can be transferred or edited.
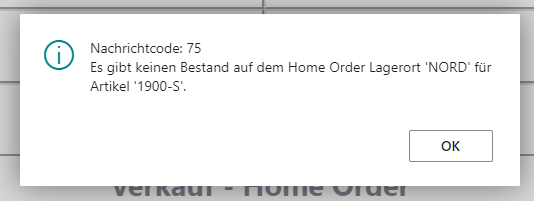
To add an item to the Home Order delivery, the item can be searched for and selected using the item number, quick buttons, or the magnifying glass function. As long as the checkout process is in the Home Order workflow, an inventory check is carried out for each item to be added against the Home Order location. Then specify the quantity in which the required item variant should be added to the Home Order delivery.
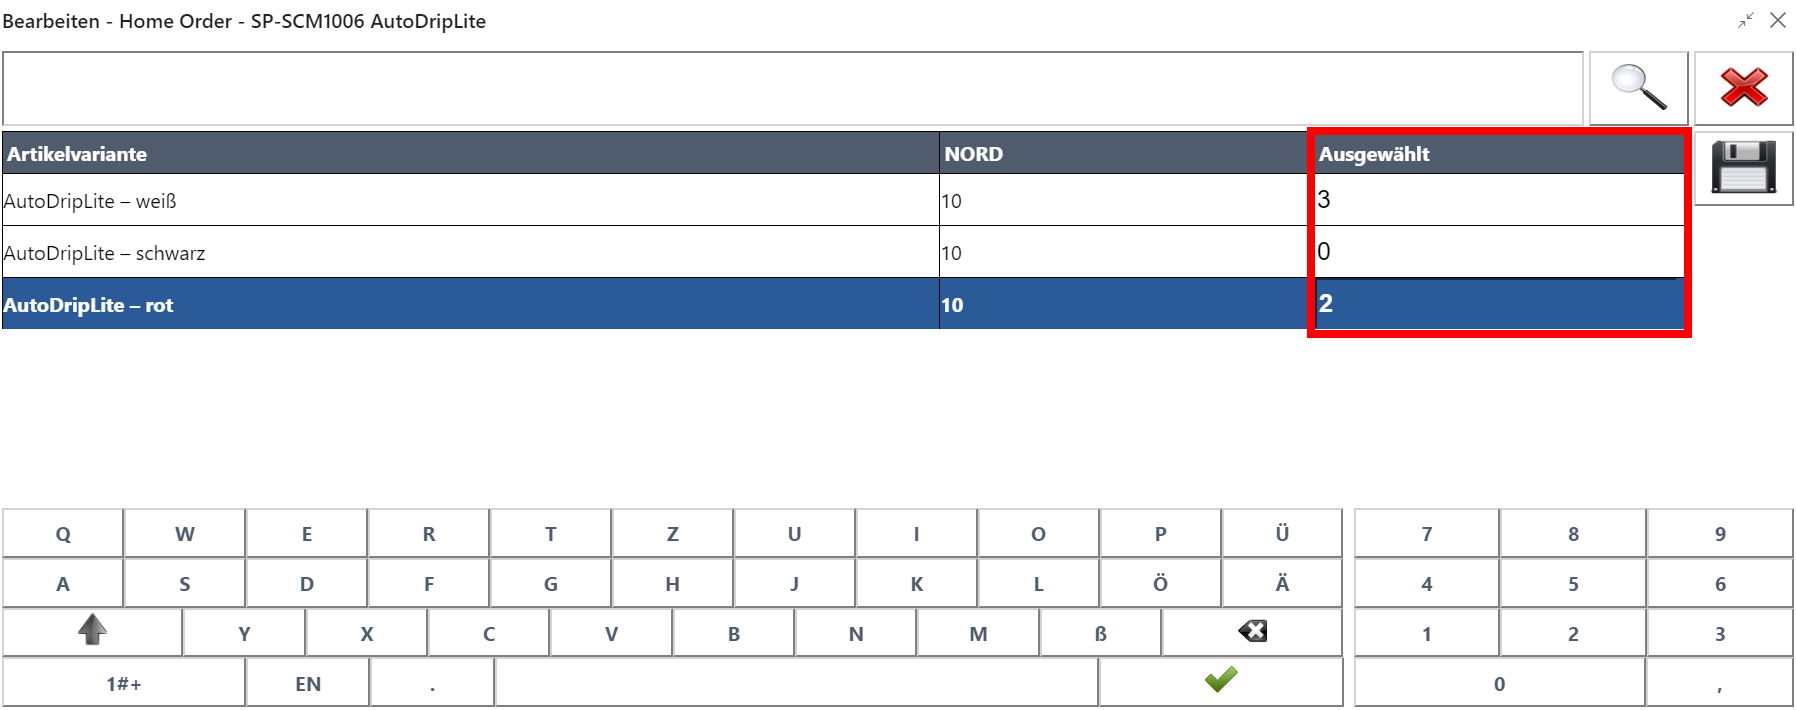
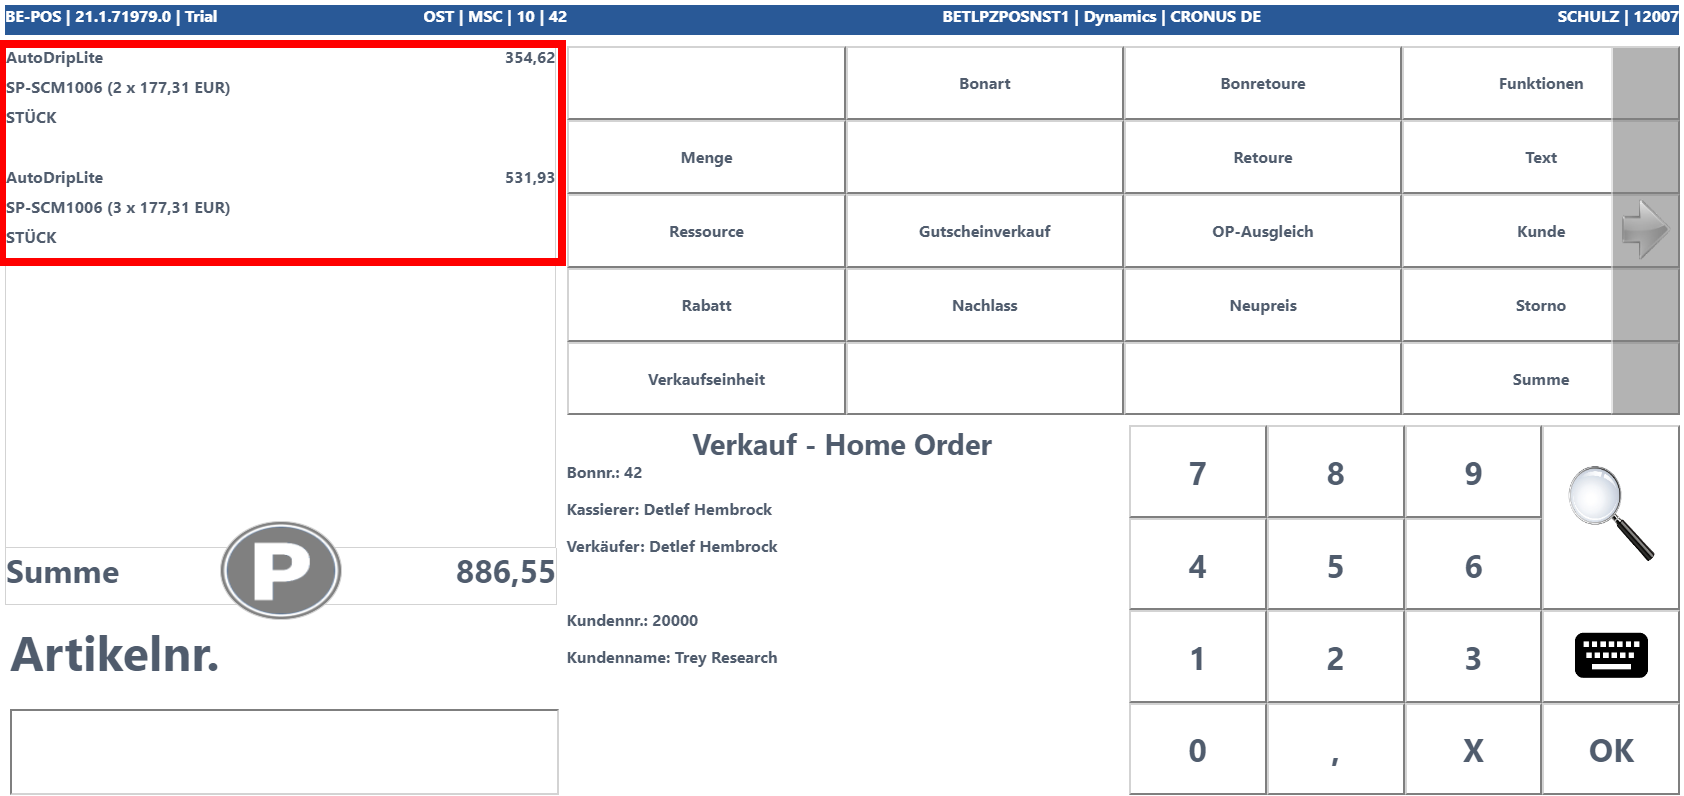
After the selection has been saved, the variants are added to the Home Order delivery in the corresponding quantities.
If an item has no inventory at the Home Order location, that item cannot be added to the Home Order delivery. This is shown by a corresponding message.
Additional Home Order items can be added to the receipt. It is not possible to combine a sale with a Home Order. Once all items have been entered, the receipt can be paid using the Total button and completed with End Receipt.
Park Receipt
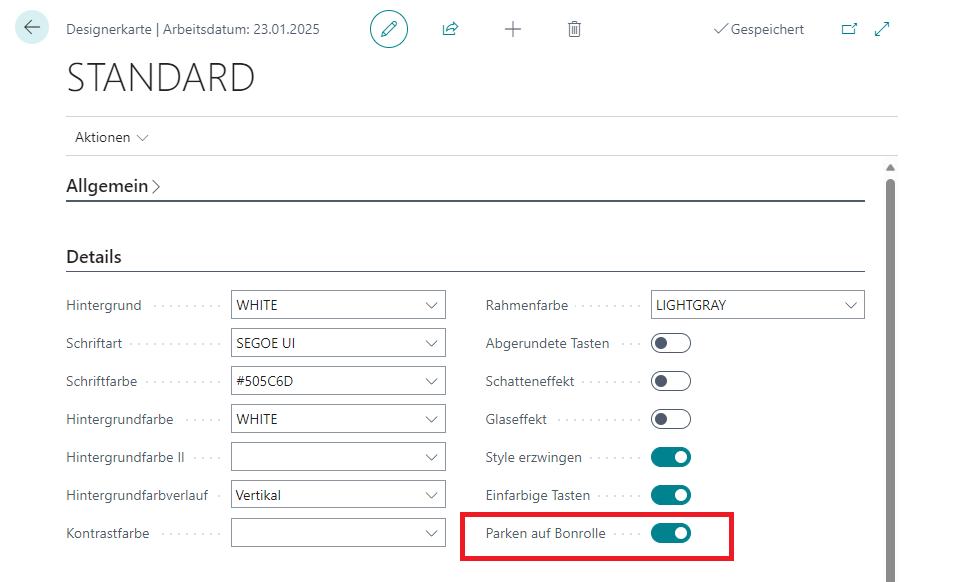
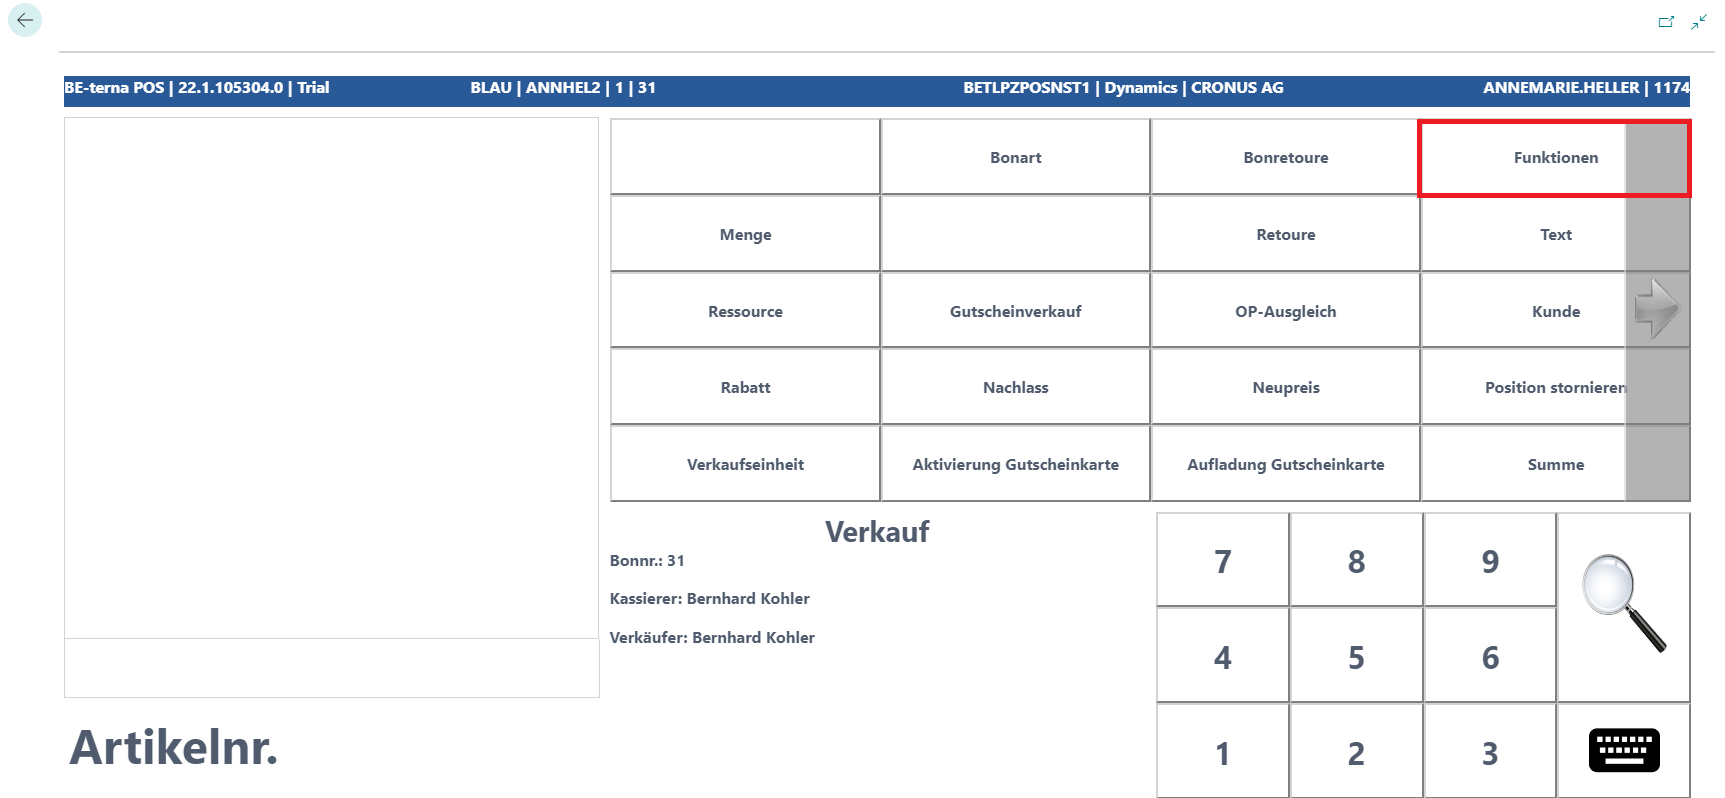
The Park Receipt function makes it possible to set aside a receipt that has not yet been completed until final checkout or cash register closing. Depending on the setup, the corresponding park button is visible in Designer → Interface.
Park on Receipt Roll → the park button is displayed on the receipt roll
 Click to enlarge
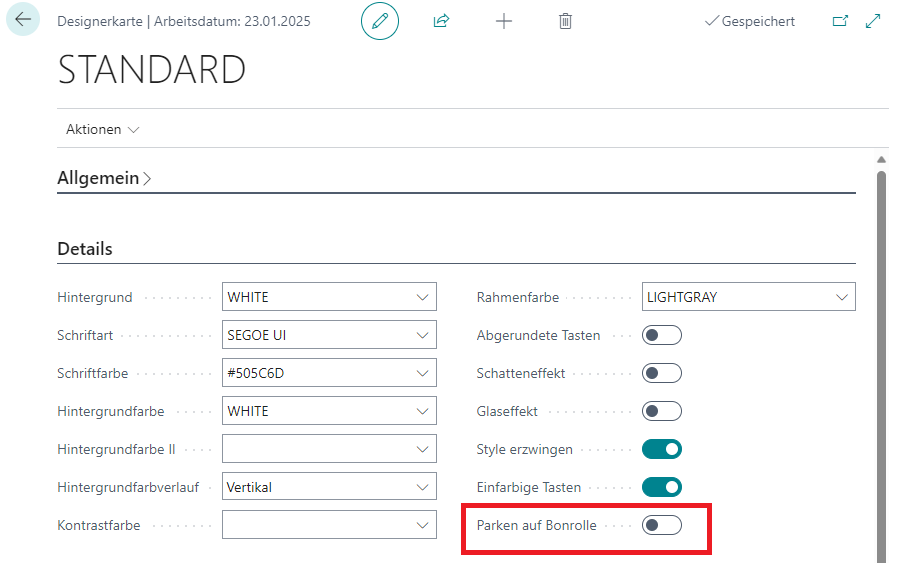
Park under Functions → the park button is available under Functions
 Click to enlarge
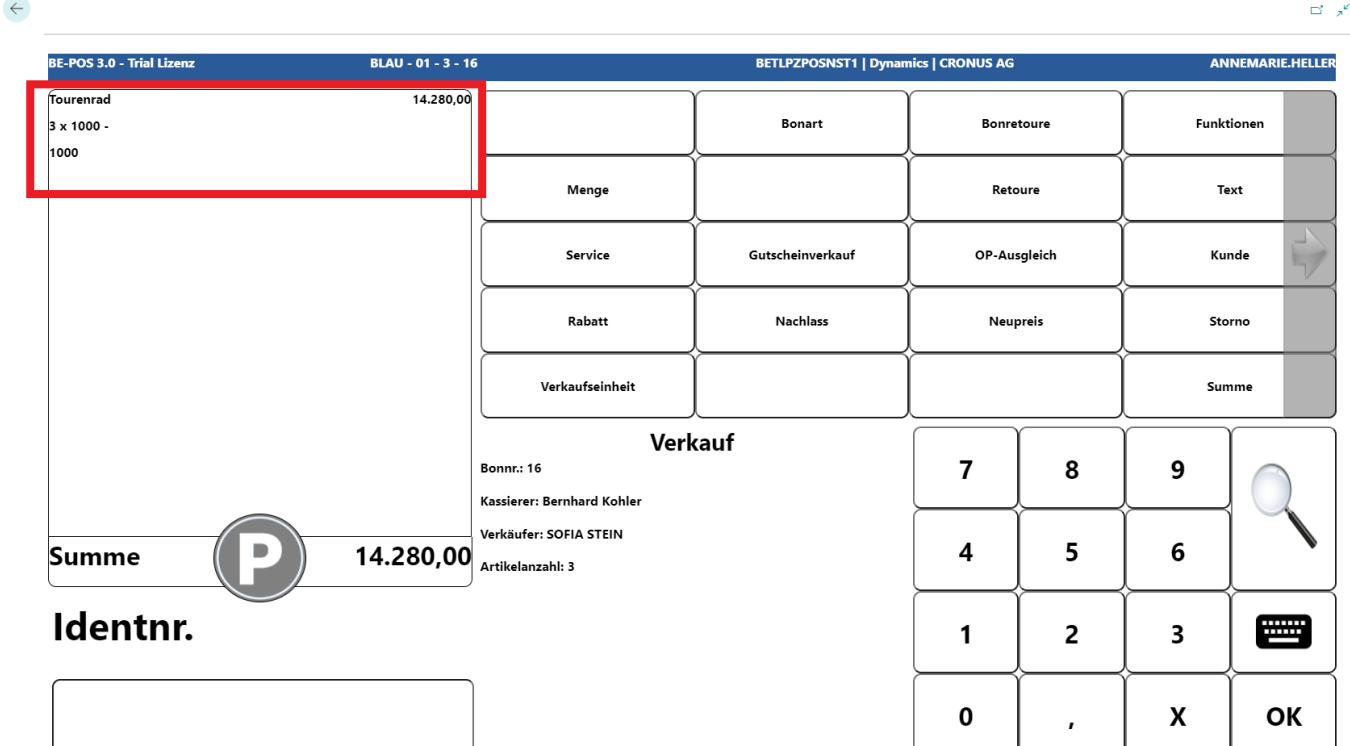
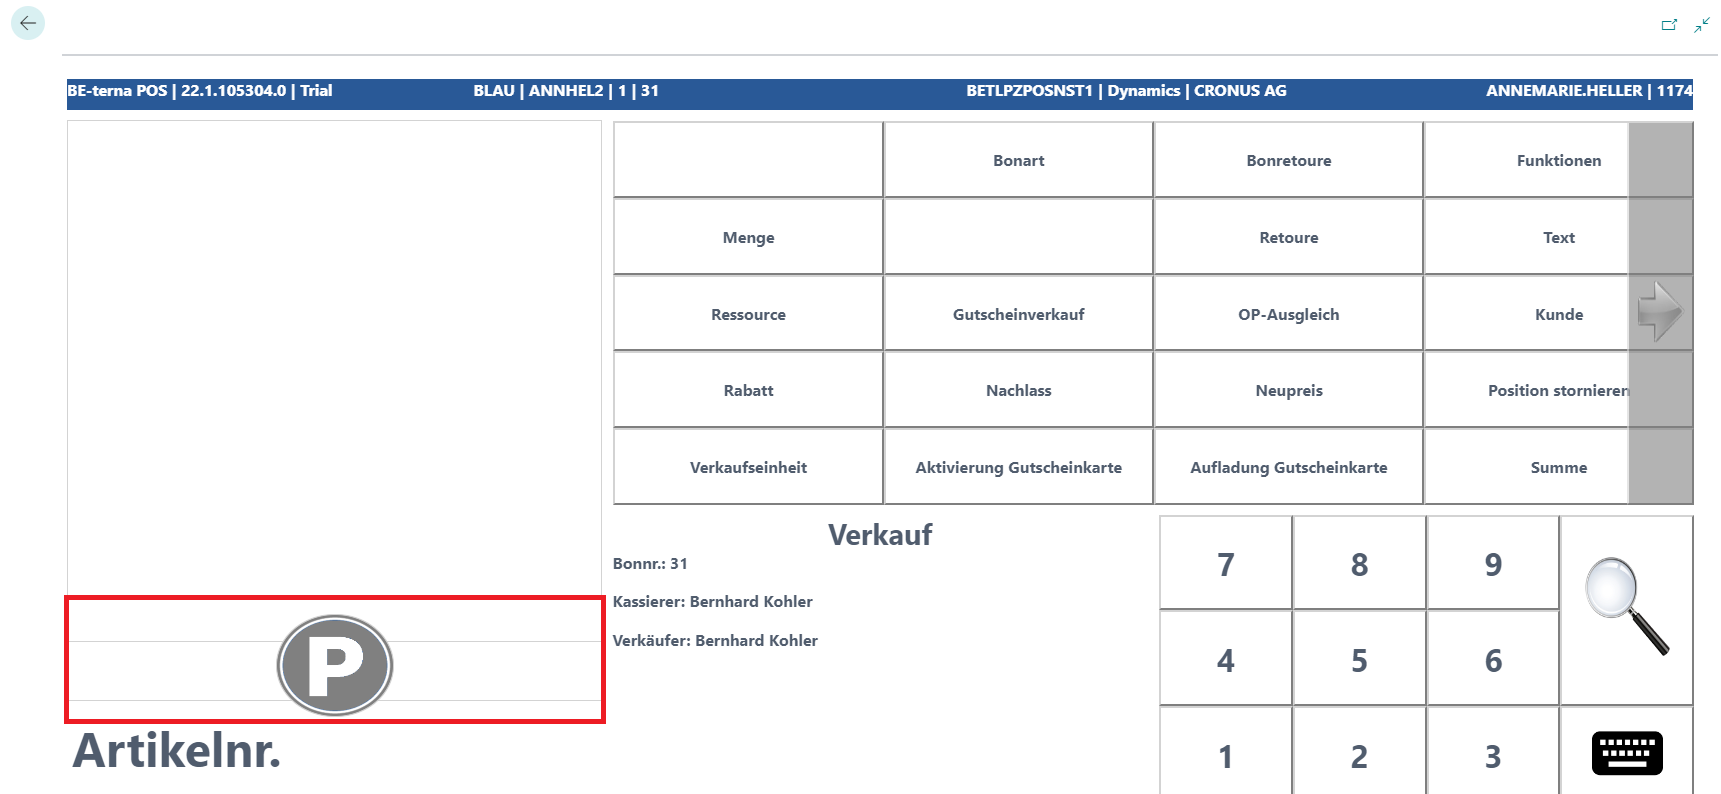
Park on Receipt Roll
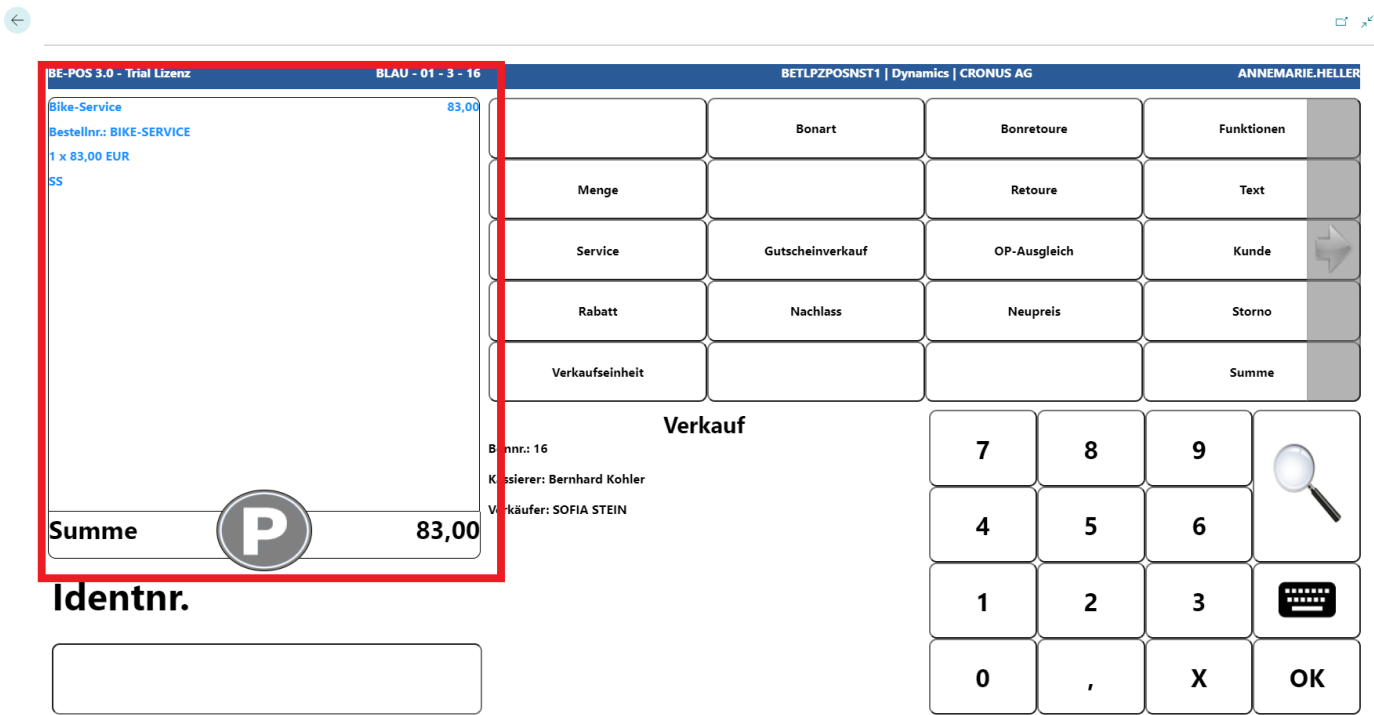
If Park on Receipt Roll is used, the park button is displayed on the checkout screen.
 Click to enlarge
Note: The receipt can be parked in any state as long as it has not yet been completed.
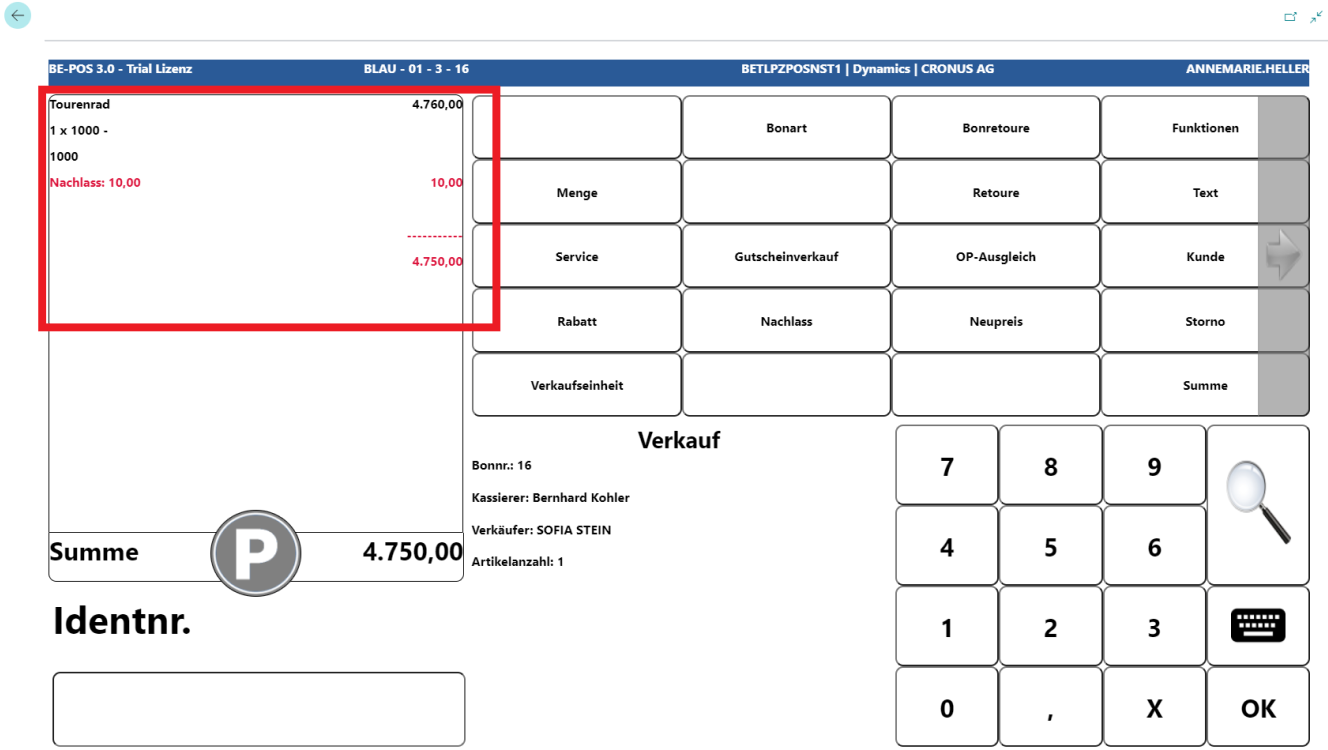
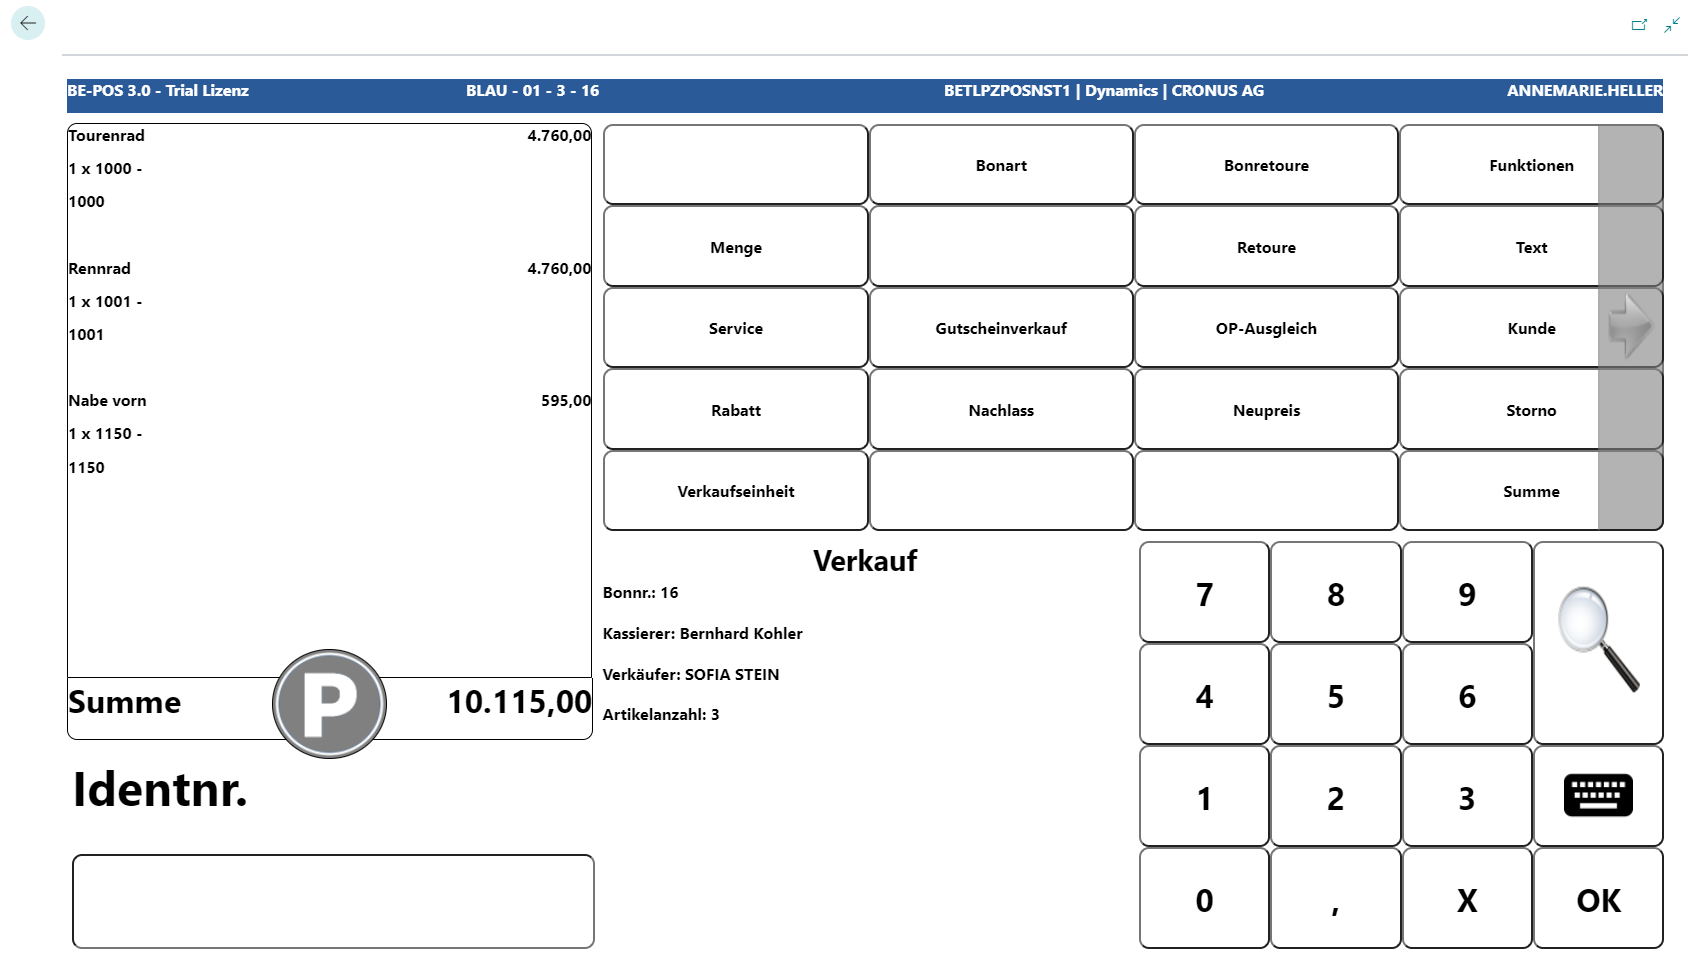
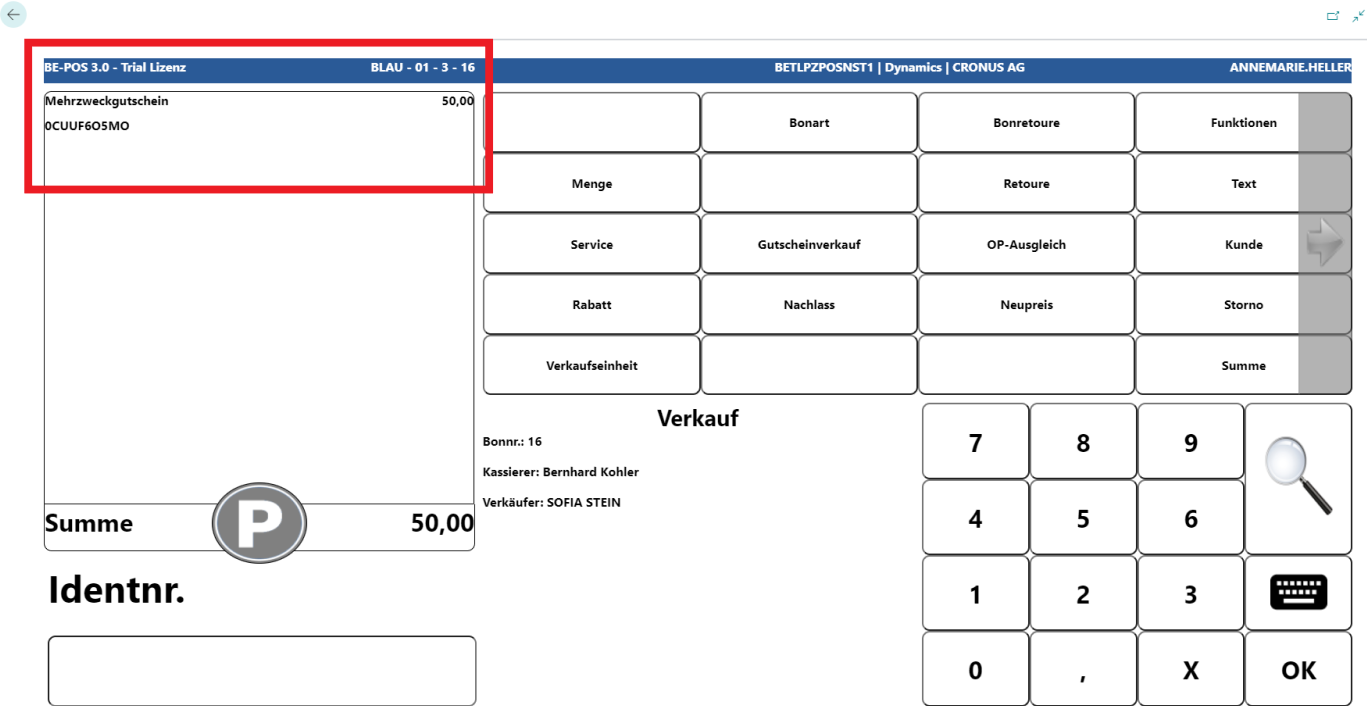
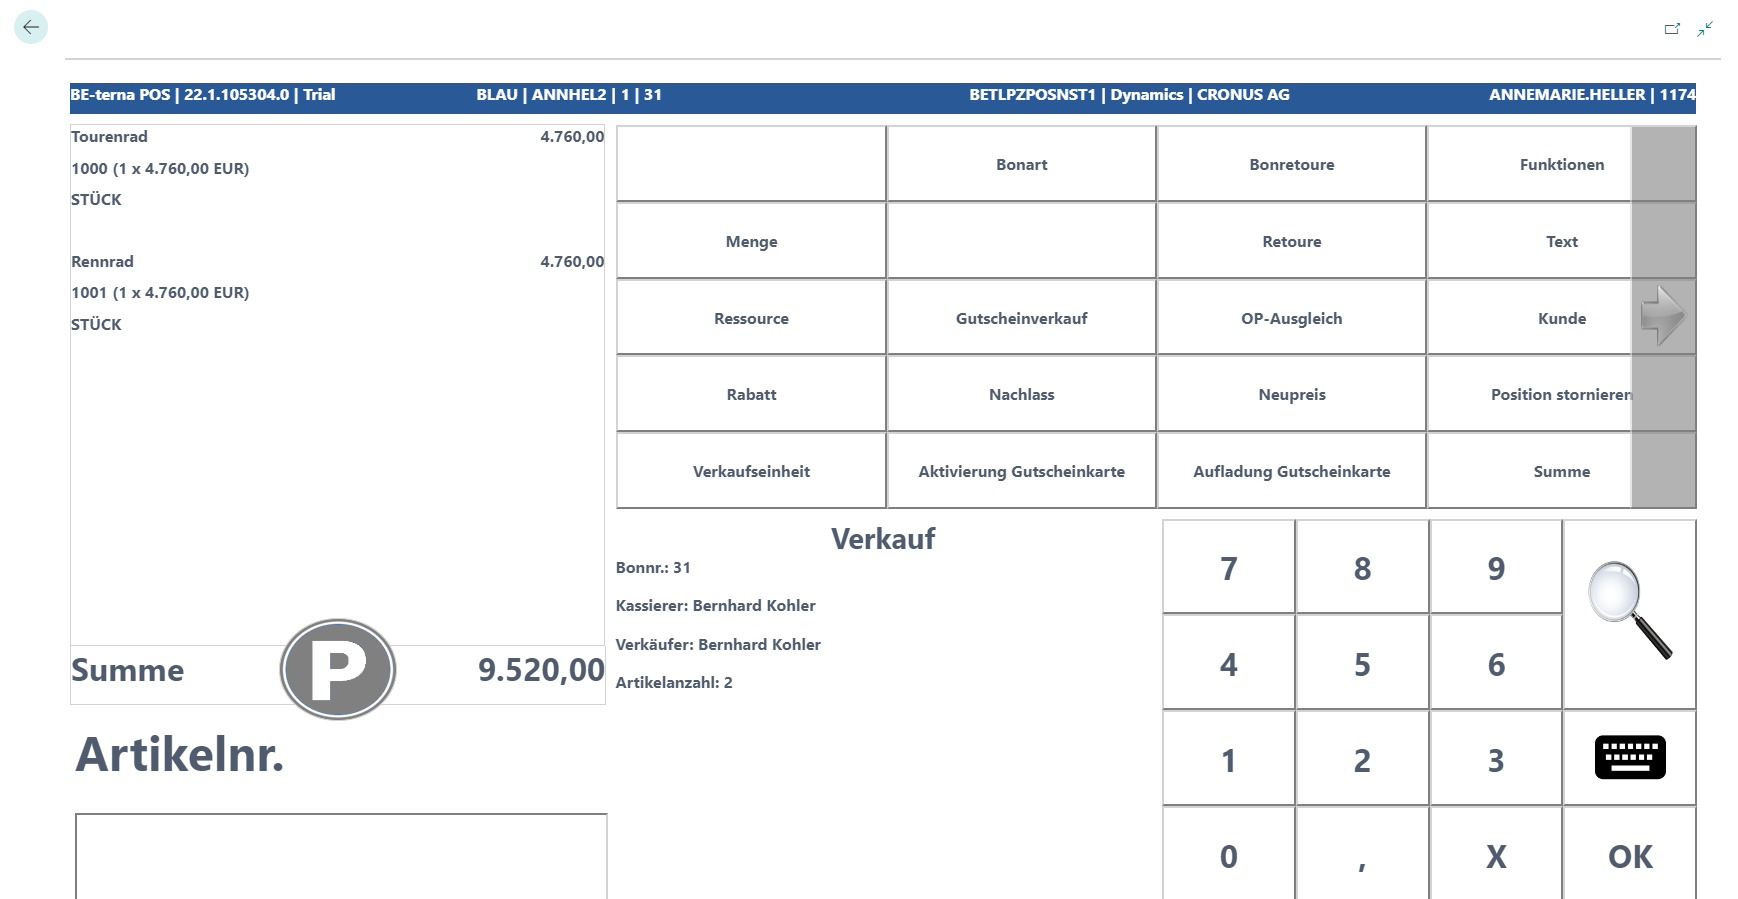
To do this, select the P button in the relevant state.
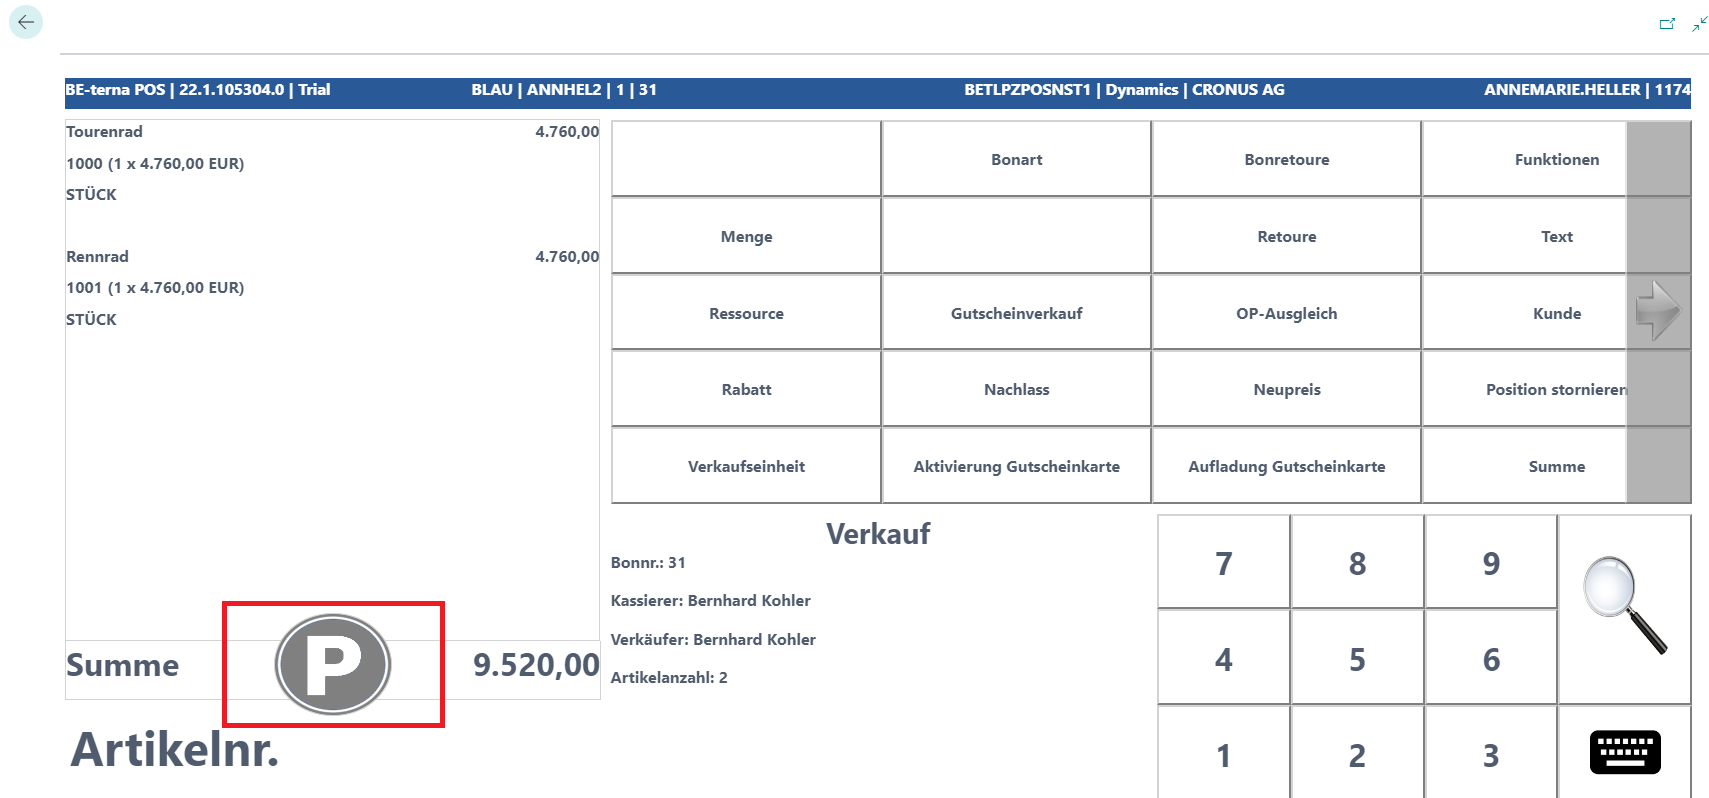 Click to enlarge
A prompt appears asking whether the current receipt should be parked.
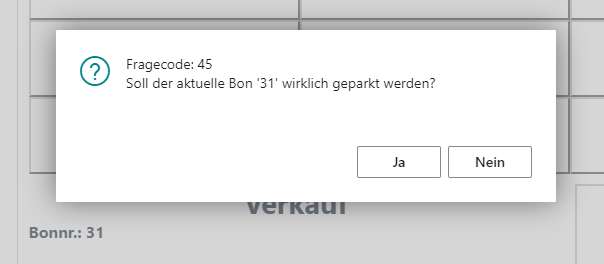 Click to enlarge
If this is answered with No, the receipt remains open and can continue to be edited.
If this is confirmed with Yes, the receipt is moved to the park function and the P button is shown in blue.
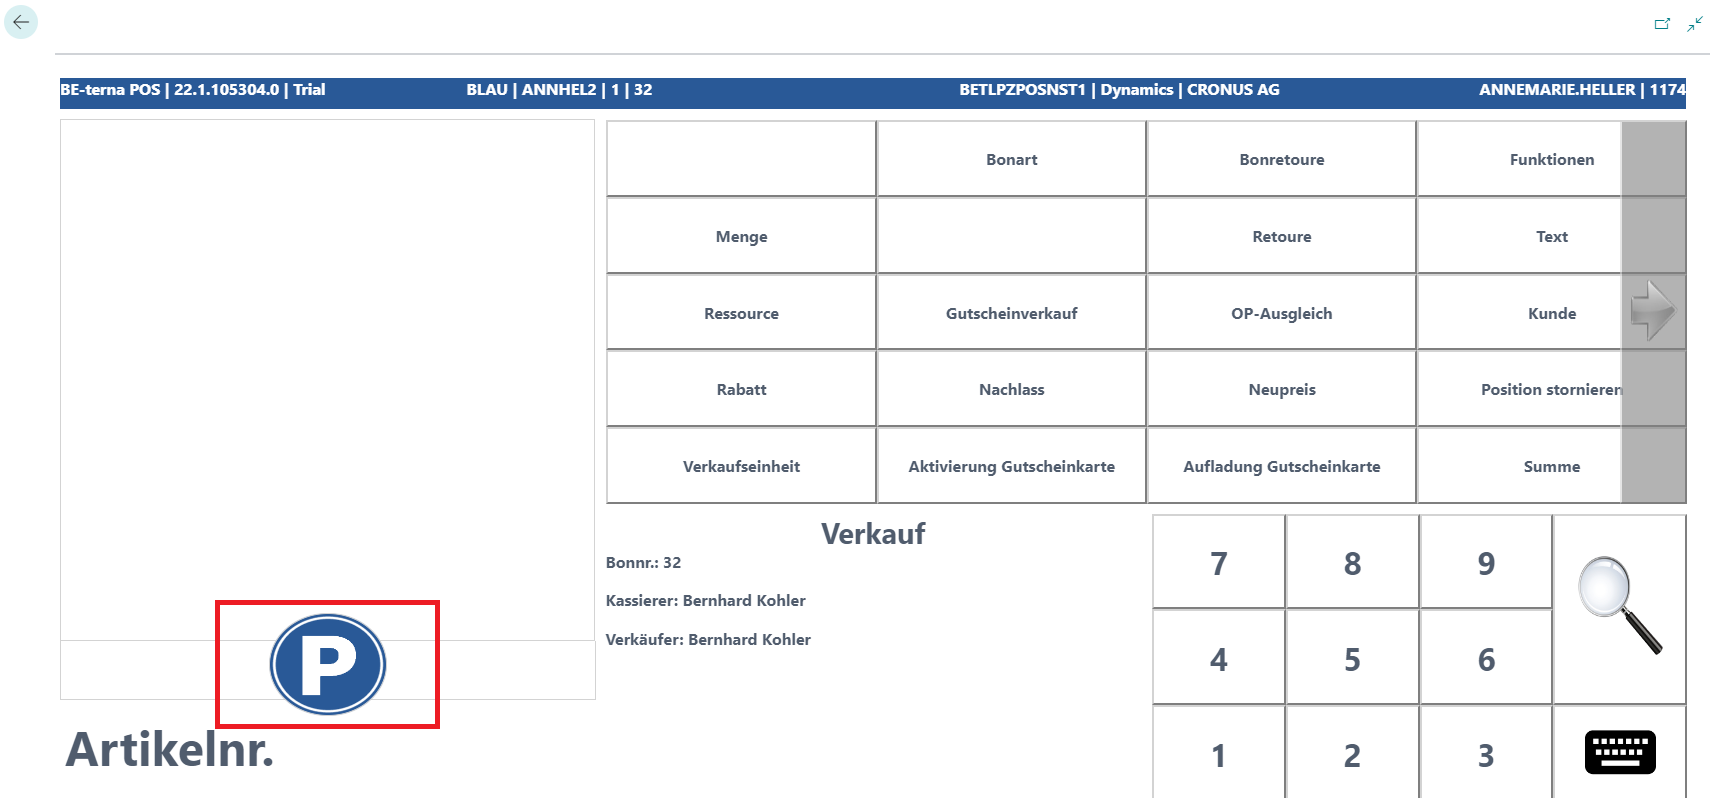
To bring the receipt back into sales mode, apply the P button again.

The overview of parked receipts that were set aside for that day opens.
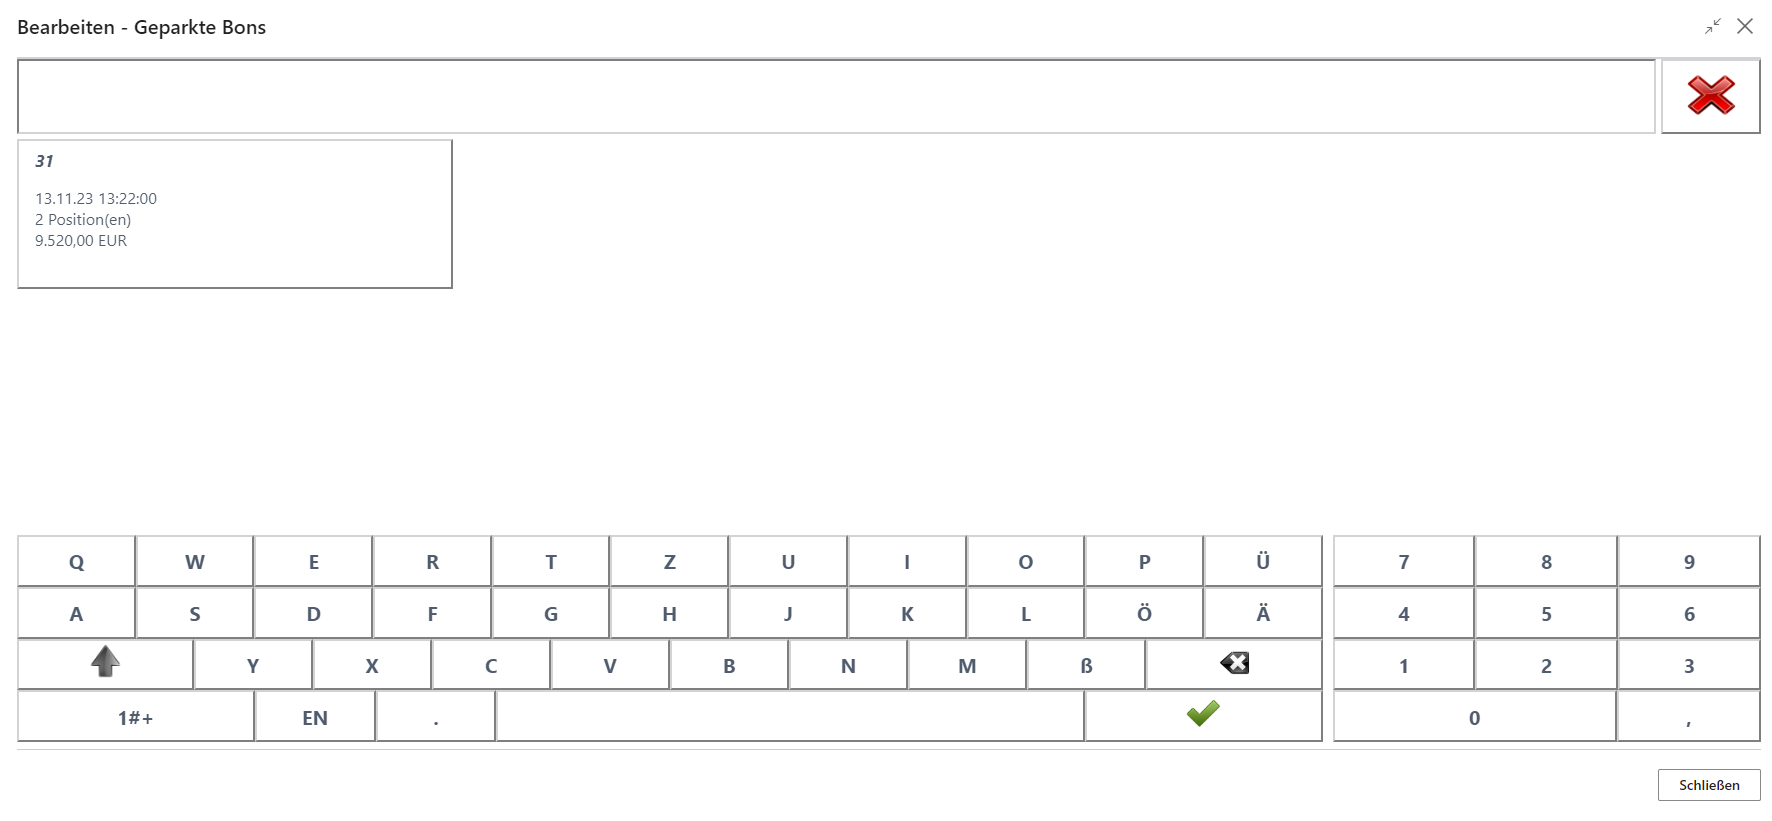
After selecting the required receipt, it is shown again on the receipt roll in the state it had before the park function and can continue to be edited.
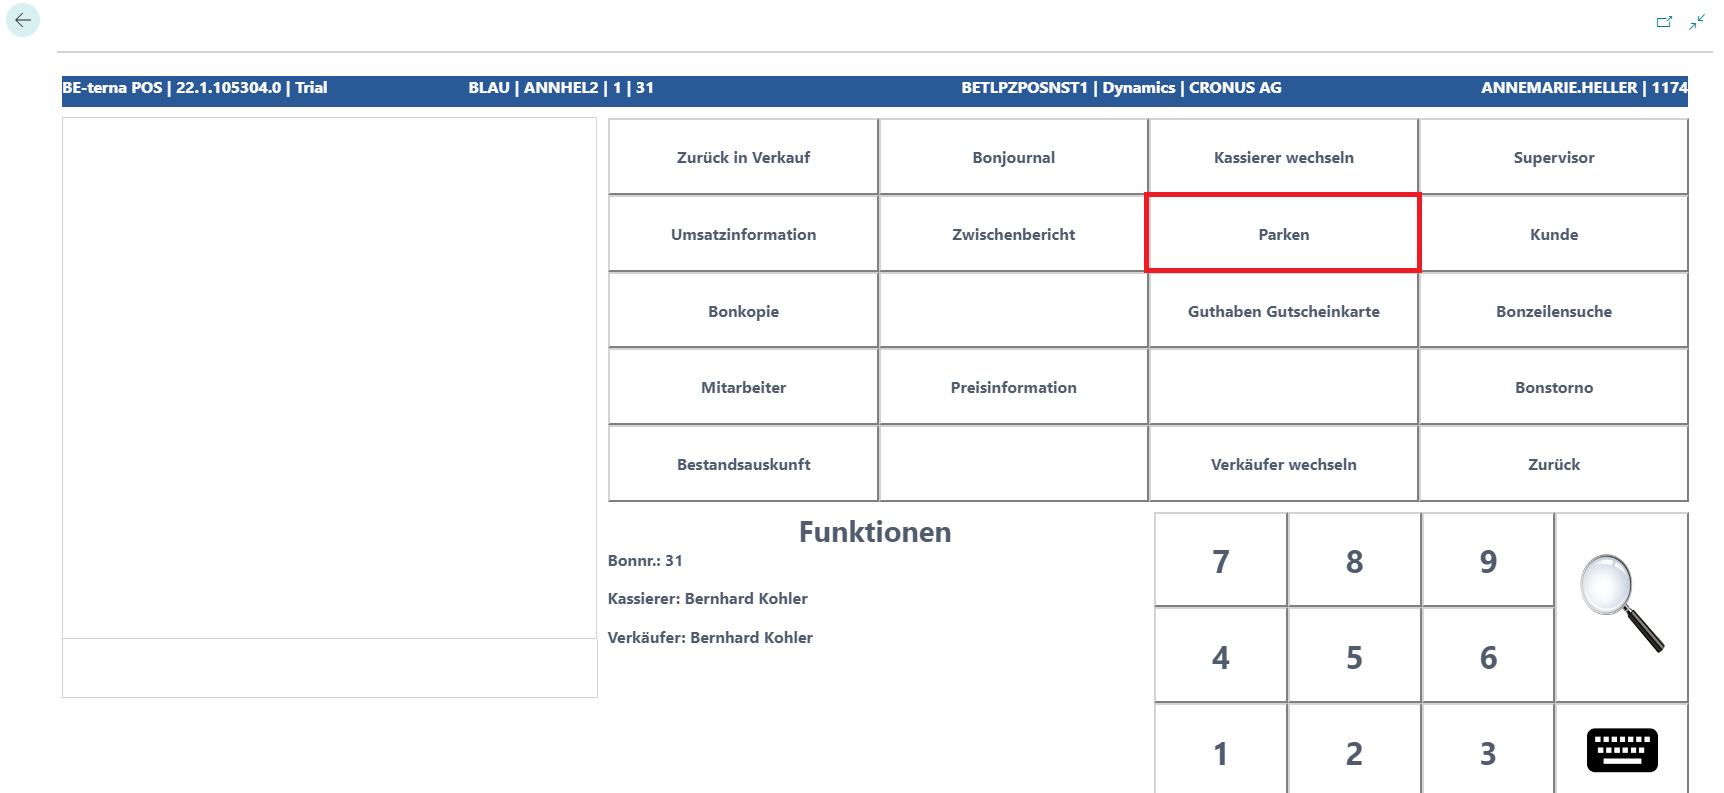
Park under Functions
If Park under Functions is used, the Park button can be found under Functions.
Note: The receipt can be parked in any state as long as it has not yet been completed.
If the receipt is to be parked, it can be moved into the corresponding state after entry via Functions → Park.
A prompt appears asking whether the current receipt should be parked.

If this is answered with No, the receipt remains open and can continue to be edited.
If this is confirmed with Yes, the receipt is moved to the park function and the P button is shown in blue.
To bring the receipt back into sales mode, call the Park function again.

The overview of parked receipts that were set aside for that day opens.

After selecting the required receipt, it is shown again on the receipt roll in the state it had before the park function and can continue to be edited.

Note: For both functions, the receipt roll must be empty in order to open the overview of parked receipts. If new items are already on the receipt, that receipt is also parked.