Fiscalization
The actual signing of receipt data does not take place directly in BE-POS, but is performed by the external providers Fiskaly, Fiskaltrust, and EFSTA. You therefore need an account with one of these three providers. We recommend the provider Fiskaly because no additional dependencies are required and the necessary account is provided by BE-terna.
| Provider | Modules | Contact | Portal |
|---|---|---|---|
| Fiskaly | Germany | sales@fiskaly.com | https://dashboard.fiskaly.com/ |
| EFSTA | Germany, Austria, Italy | office@efsta.eu | https://portal.efsta.net/ |
| Fiskaltrust | France | contact@fiskaltrust.fr | https://portal.fiskaltrust.fr/ |
EFSTA Requirements
To link a cash register with EFSTA, it is first necessary to download an electronic fiscal register, EFR, from the following link: http://public.efsta.net/EFR/
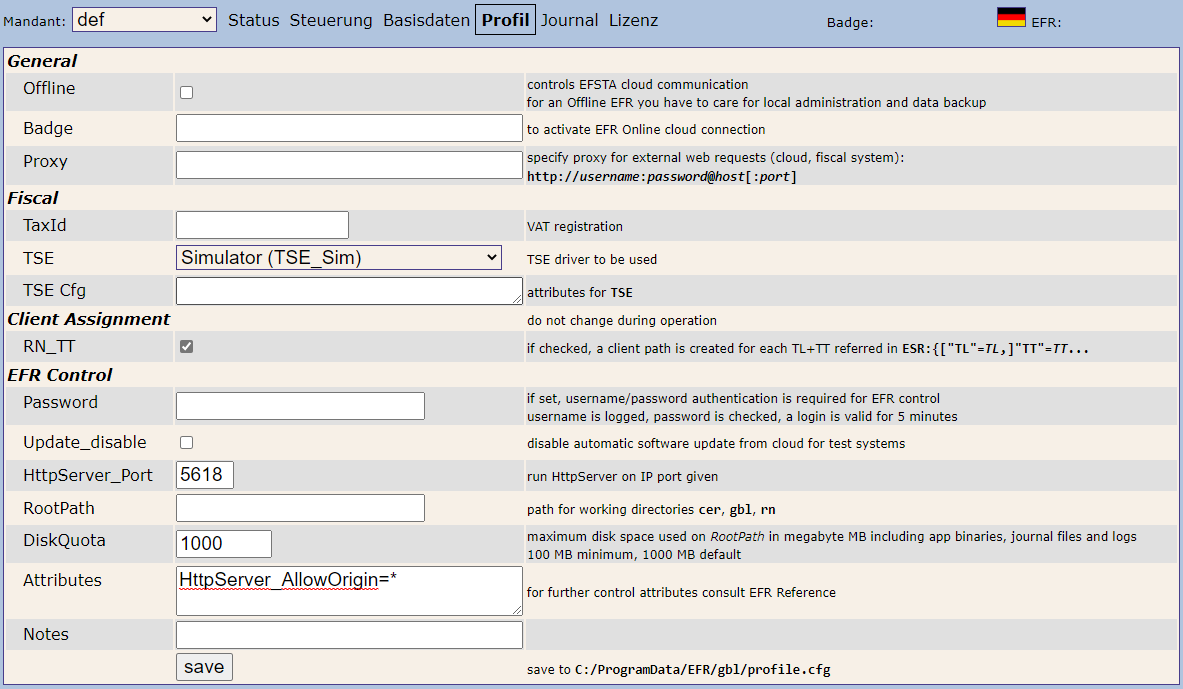
The EFR must then be installed on every cash register. After that, the EFR setup can be opened in the browser via http://localhost:5618/. Under Profile, the badge of the company to be used must be specified. The badge can be viewed in the EFSTA portal in the company details. Under TSE, the TSE to be used must be specified, because EFSTA supports TSEs from various providers. Finally, we recommend setting the RN_TT checkbox so that each cash register uses its own data collection log and specifying HttpServer_AllowOrigin=* under Attributes so that the Business Central web client can communicate with the locally installed service. After that, the local EFR service must be restarted to complete the setup.
Fiscal Setup BE-POS
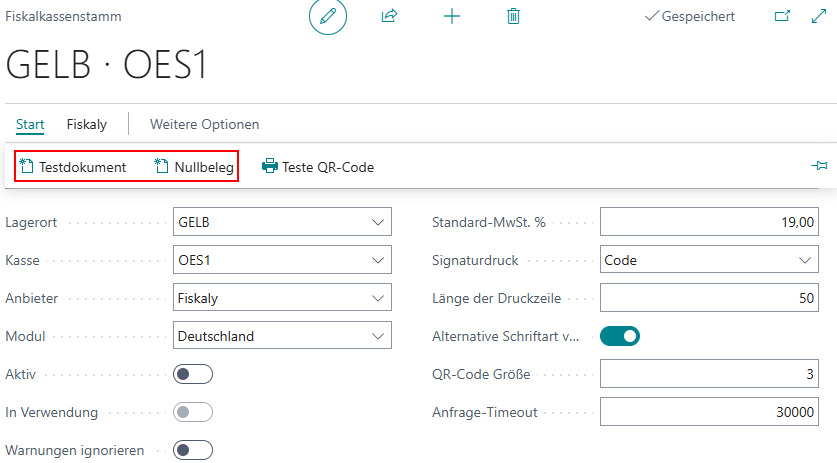
To set up the link between the cash register and the fiscal provider, use Setup → Fiscalization. This depends on the cash register setup.
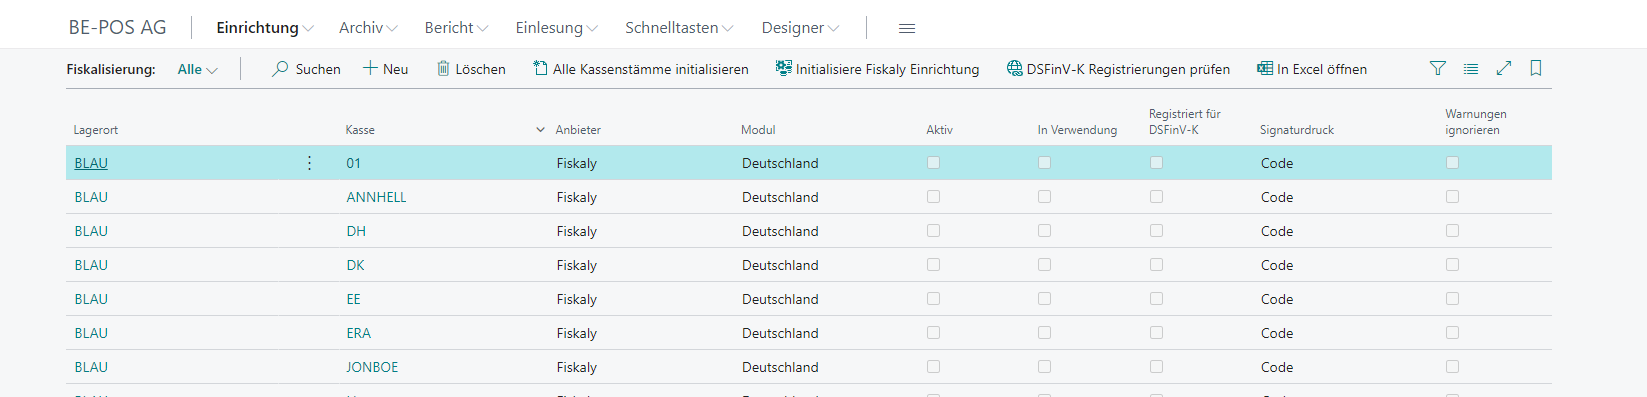
General

| Field | Description |
|---|---|
| Location | Location code |
| Cash Register | Cash register code |
| Provider | Fiscalization provider |
| Module | The country or fiscal module |
| Active | Activates fiscalization |
| In Use | Indicates that the fiscal cash register setup is in use |
| Ignore Warnings | Ignores fiscal warnings during checkout |
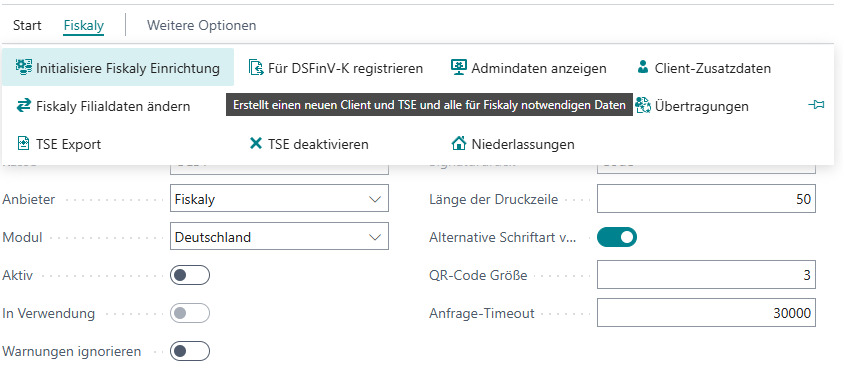
| Default VAT Rate | Specifies the default VAT |
| Signature Print | Defines how the signature should be printed |
| Length of Print Line | Defines the maximum number of characters per print line |
| Use Alternative Font | Defines whether the printer’s alternative font should be used to print the signature, reducing the required space on the receipt |
| QR Code Size | Defines the print size of the QR code. EPSON printers support values between 1 and 16 |
| Request Timeout | Defines the request timeout in milliseconds |
Note: In Germany, currently only code printing is permitted.
Functions

| Field | Description |
|---|---|
| Test Document | Sends a test command to the respective interface |
| Zero Receipt | Creates a receipt with the request to the TSE and the configured service |
| Test QR Code | Sends a test QR code to the receipt printer |
Fiskaly
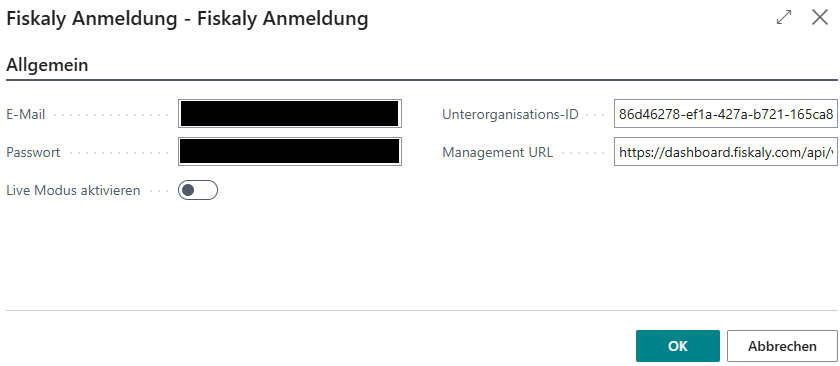
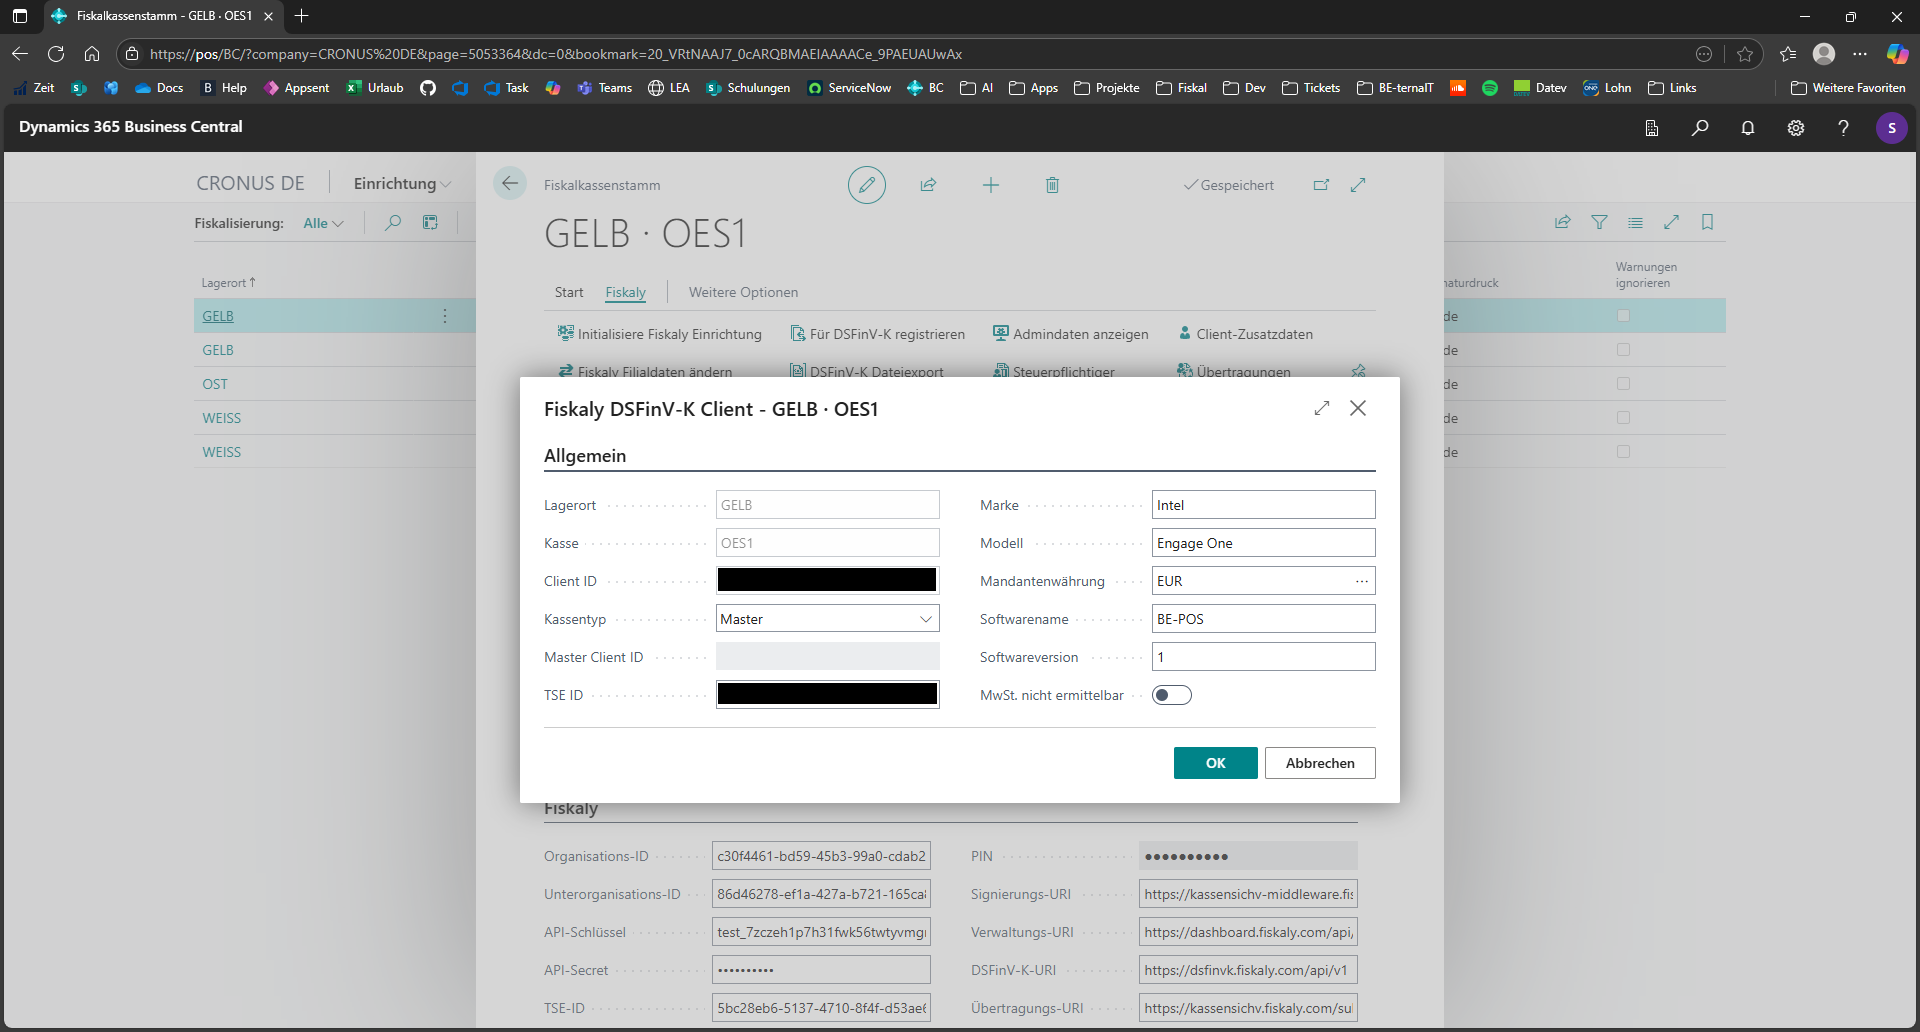
For Fiskaly, the setup can be created automatically using the Initialize Fiskaly Setup function. Only the Fiskaly login data and the organization ID have to be specified, and an admin PIN of at least 6 digits must be assigned.
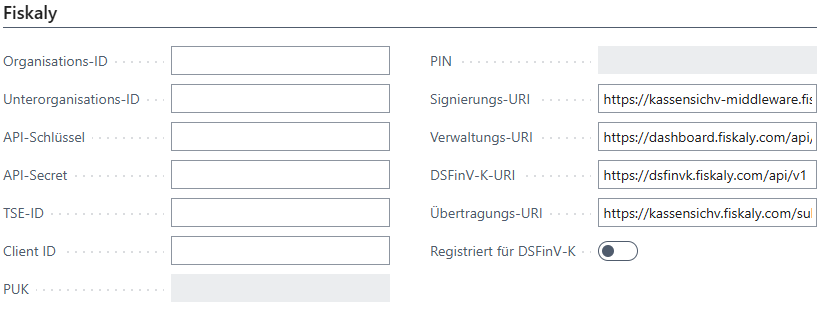
| Field | Description |
|---|---|
| Organization ID | ID of your Fiskaly organization |
| Sub-Organization ID | ID of the Fiskaly organization assigned to the location. Every location should have its own sub-organization |
| API Key | Create an API key in your Fiskaly dashboard. The cash register uses the API key to access the assigned sub-organization |
| API Secret | The secret that belongs to the API key. The cash register uses the API key to access the assigned sub-organization to which the key belongs |
| TSE ID | The ID of your technical security equipment, TSE, in the Fiskaly cloud |
| Client ID | The client ID belongs to this cash register. Every cash register should have its own client ID |
| PUK | The admin PUK |
| PIN | The admin PIN |
| Signing URI | Defines the Sign API address. The cash register uses the Sign API to sign receipts |
| Management URI | Defines the Management API address. The cash register uses the Management API address to create new sub-organizations, API keys, and client IDs |
| DSFinV-K URI | Defines the DSFinV-K API address. The cash register uses the DSFinV-K API to transfer each transaction to Fiskaly in a standardized format |
| Transfer URI | Defines the address for the transfer API of the Fiskaly ERiC interface |
| Registered for DSFinV-K | Indicates whether the cash register has been registered for the Fiskaly DSFinV-K API |
Initialization
- To initialize a new cash register setup, use the Initialize Fiskaly Setup action.
- In the next window, the values for API Key and API Secret are requested. These values are the same for every cash register and customer because they represent the connection to the BE-terna Fiskaly account and can only be obtained from the cash register provider BE-POS.

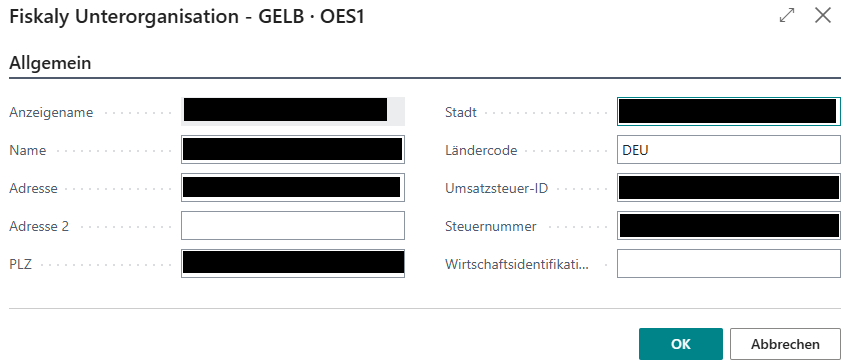
- This is followed by the display of the company data determined via the respective location or tenant.
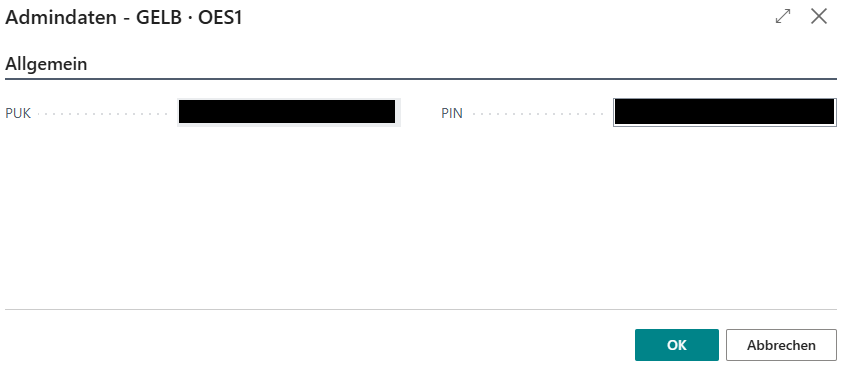
- Next, the PUK, which is unique for each cash register, is displayed and a PIN with at least six digits is required, although the same PIN can be used for all cash registers. The PUK does not necessarily have to be noted because it can be viewed at any time via the password-protected admin data. Normally, these values are not needed; they serve only for admin identification of the interface.
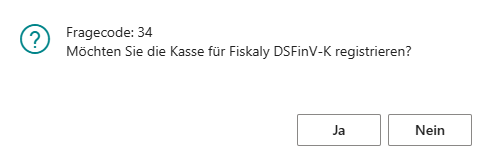
- You are then asked whether the cash register should be registered for DSFINV-K, which is confirmed with Yes.
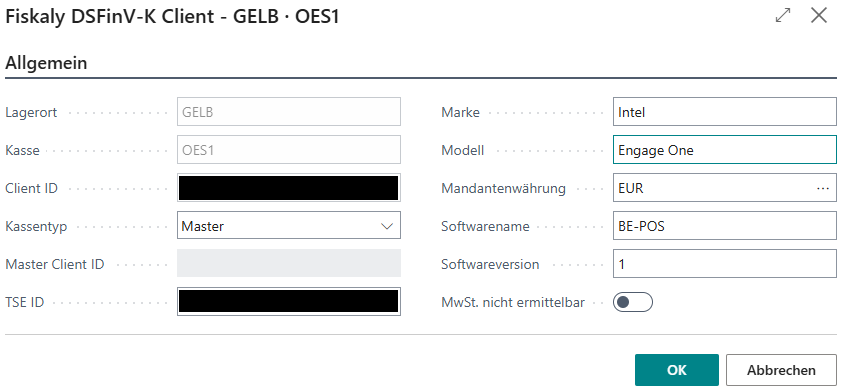
- Next, the DSFINV-K-relevant data is displayed, where only the brand & model of the hardware used still has to be added.
- The configuration is now complete and can be checked by creating a test document and a zero receipt.
- The final step is to activate the Fiskaly setup for the respective cash register setup. However, this should only be done immediately before commissioning, because after that no changes are possible and the respective cash register setup is permanently linked to the respective Fiskaly setup.

Actions
The following actions are available for Fiskaly.

Initialize Fiskaly Setup
Creates a new client and TSE for this cash register setup and, if necessary, a new sub-organization. This action is described in detail in the Initialization section above.
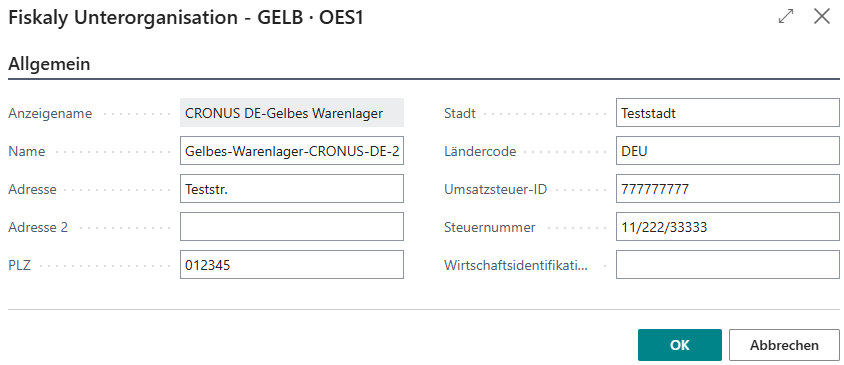
Change Fiskaly Branch Data
This action can be used to view and change the branch data of the assigned Fiskaly sub-organization. Confirm the login data first. The branch data is then displayed.
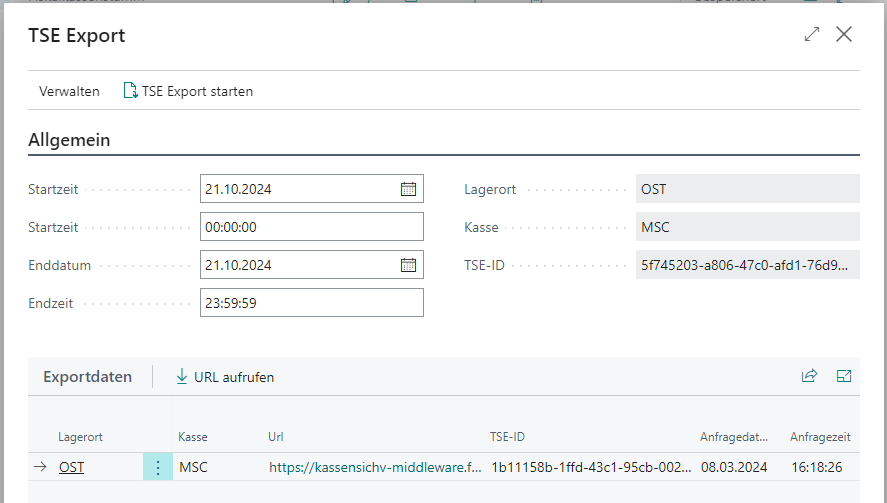
TSE Export
Using TSE Export, all individual transactions of the TSE can be exported and downloaded as a ZIP archive. The data to be exported can be filtered to a specific period.
Register for DSFinV-K
This can be used to register the Fiskaly client for the DSFinV-K interface, through which completed cash register closings, including all receipts and Fiskaly signatures, are transferred either via a job queue or manually. When registering, it is mandatory to specify the hardware manufacturer and model. If the Fiskaly client is already registered for the DSFinV-K interface, this action can be used to change the registration data.
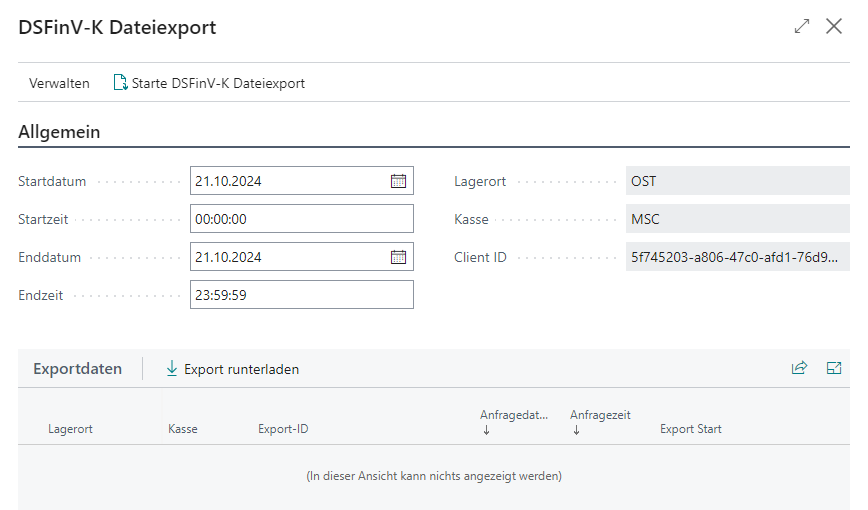
DSFinV-K File Export
The DSFinV-K file export downloads all cash register closings transferred to Fiskaly for this Fiskaly client in the specified period as a ZIP archive. The data contained in the ZIP archive corresponds to the format of the DSFinV-K interface.
Deactivate TSE
This action deactivates the TSE of the current Fiskaly client.
Show Admin Data
After the password has been entered successfully, this action displays the admin PUK and PIN.

Fiskaly Notification to Tax Office

Reporting the cash register data to the tax office is done with the fiscal provider Fiskaly via the Submission API. A prerequisite for the report is that all cash registers to be reported already have an active Fiskaly TSE. Only then can an end device be reported to the tax office.
Notification of the Taxpayer
The Taxpayer action retrieves the taxpayer data stored in Fiskaly and opens the setup card. If no data has yet been stored in Fiskaly, the card is prefilled with the data from the company information.
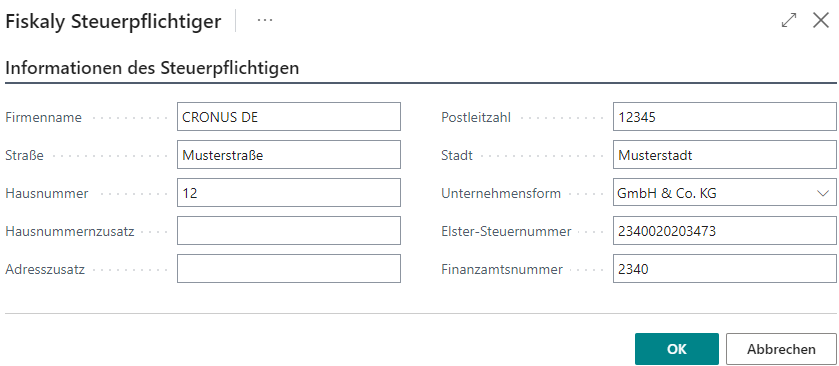
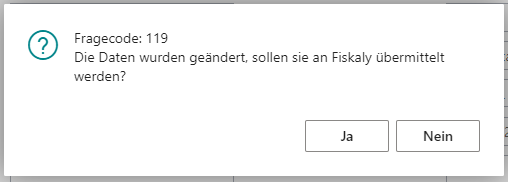
Please check the data for correctness and completeness. The 13-digit Elster tax number can be determined from the combination of federal state and tax number using various tools and websites. When closing the input form, if data has changed or if no data has yet been transmitted to Fiskaly, a prompt is displayed asking whether the data should be sent to Fiskaly. If the transmission is successful, the input form closes without a message; a notification is displayed only in the event of an error.
Notification of Branches
The Branches action retrieves the branch data stored in Fiskaly, corresponding to the locations, and opens the setup list. If no data has yet been stored in Fiskaly, the data is prepared from the location data. The branch list shows only those branches that have at least one cash register with an active TSE.

Please check the address data for correctness and completeness. If a branch is closed, this must be reported by means of an updated notification with a filled closure date. When the dialog is closed, all records for which the Send Data checkbox is active are transmitted to Fiskaly. If the transmission is successful, the branch list closes without a message; only error cases display a notification.
Notification of Client Additional Data
The Client Additional Data action retrieves the clients stored in Fiskaly, corresponding to the cash registers, and opens the setup overview. If no data has yet been stored in Fiskaly, the overview is prefilled with the DSFinV-K data stored in Fiskaly for this cash register. The fields Software, Software Version, Type, Acquisition Date, and Commissioning Date are also prefilled for new cash registers.

Please check the data for correctness and completeness. When the input form is closed, all records for which the Send Data checkbox is active are sent to Fiskaly. If the transmission is successful, the form closes without a message; a notification is displayed only in the event of an error.
Notification to the Tax Authority
With the Transfers action, the cash register data can be reported to the tax authority and all transfers can be managed. Under Start, transfers can be prepared, created, and checked. The ERiC/Elster Notification group contains the actions with which the previously created transfers can be sent to the tax authority. The actions in both groups are arranged so that they can be executed from left to right.

| Action | Description |
|---|---|
| Prepare Transfers | Creates one transfer per branch. Note: There may be only one transfer per branch that does not have the status Transfer Successful. All created transfers are prefilled with the taxpayer data. Please check this data for correctness. |
| Create Transfers | This transmits prepared transfers to Fiskaly. If the status is faulty after a transfer has been updated, the validation XML file can be downloaded via Retrieve ERiC/Elster Validation XML in order to inspect the relevant errors. After correcting the errors, the failed transfer should be removed via Delete Transfer, and a new transfer should be prepared and sent. |
| Check Transfer | Updates the status of an existing transfer. |
| Retrieve ERiC/Elster Validation XML | In the event of an error, this can be used to download the ERiC/Elster validation XML file that contains the corresponding error messages. |
| Retrieve Transfer Preview PDF | If the transfer has the status Validation Successful, the summary of the data must be downloaded as a PDF via Retrieve Transfer Preview PDF and checked manually, because this document contains the data that will be sent to the tax authority. Once the data has been checked, the notification to ERiC/Elster can be made in the next step via the actions in the ERiC/Elster Notification group. |
| Delete Transfer | Deletes a failed transfer. |
| Retrieve Transfer XML | Downloads the transfer in XML format. |

| Action | Description |
|---|---|
| Send Notification | Sends a successful checked transfer to the tax authority. The status of the send process can be updated via Check Notification. Depending on the status, error handling may be required via Retrieve Notification XML. |
| Check Notification | Updates the status of a sent notification. |
| Cancel Notification | Cancels the sending process to the tax authority. This is only possible within a very short period between creation of the notification and before processing of the notification by the tax authority, status Transfer Pending. |
| Retrieve Notification XML | Downloads the ERiC/Elster notification XML file. This action can only be used in the event of an error. |
| Retrieve Notification PDF | This action can only be executed for transfers that were successfully sent to the tax authority, status Transfer Successful. The downloaded notification PDF should be stored with or added to the procedural documentation. |
EFSTA
Before EFSTA can be set up, the electronic fiscal register, EFR, must first be installed locally on the PC. After that, the URL to the EFR can be stored under Request URI with the suffix /register.
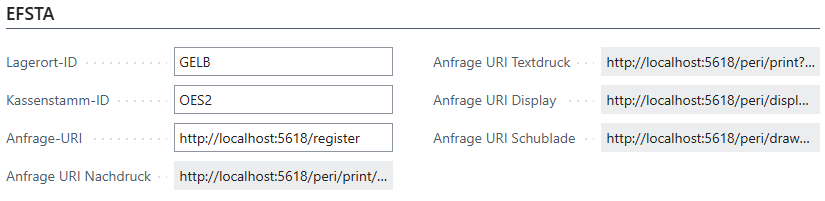
| Field | Description |
|---|---|
| Location ID | Location code |
| Cash Register Setup ID | Cash register code |
| Request URI | Specifies the request address |
| Request URI Reprint | Specifies the request address for reprint |
| Request URI Text Print | Specifies the request address for text printing |
| Request URI Display | Specifies the request address for the customer display |
| Request URI Drawer | Specifies the request address for the drawer |
Note: All information about EFSTA can be found in the EFSTA manual.
EFSTA Italy via Fattura PA

Fattura PA is the abbreviation for Fatturazione elettronica verso la Pubblica amministrazione and refers to the format used in Italy for electronic invoice exchange between companies.
The Fattura PA setup can be used to define how the export of Fattura PA files should be carried out.
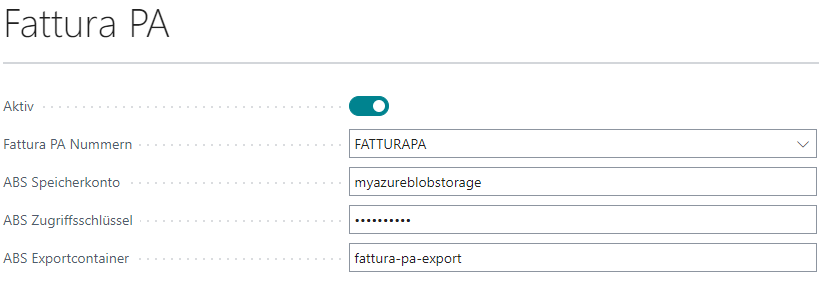
Setup
| Field | Description |
|---|---|
| Active | Activates the option to enter invoice data at the cash register and creates a job queue entry for the automatic export of XML files to Azure BLOB storage. |
| Fattura PA Numbers | Specifies the number series for creating the invoice data records. This number is also included in the XML file name. |
| ABS Storage Account | Specifies the name of the Azure storage account. |
| ABS Access Key | The access key for the storage account. |
| ABS Export Container | The name of the container in which the Fattura PA XML files are stored. |
Fiskaltrust
Note: This module supports the French fiscalization requirements. To use Fiskaltrust for France, login credentials and a locally running service are required. The credentials and the service can be generated after signing in to the Fiskaltrust portal for France.
Setup
Setup in the Fiskaltrust portal
- Create a location.
- Create Rest Helper, signature creation unit, and queue, and assign the signature creation unit to the queue.
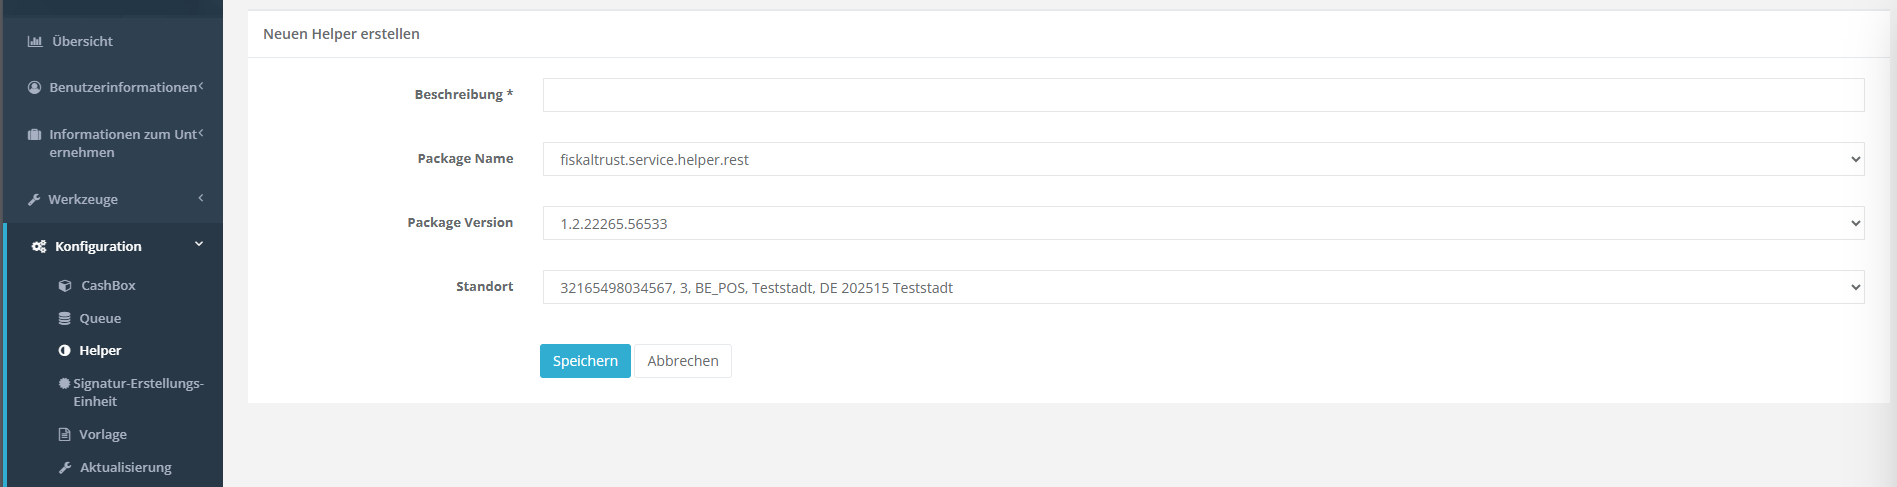
- Create a CashBox: description and location must be stored here.
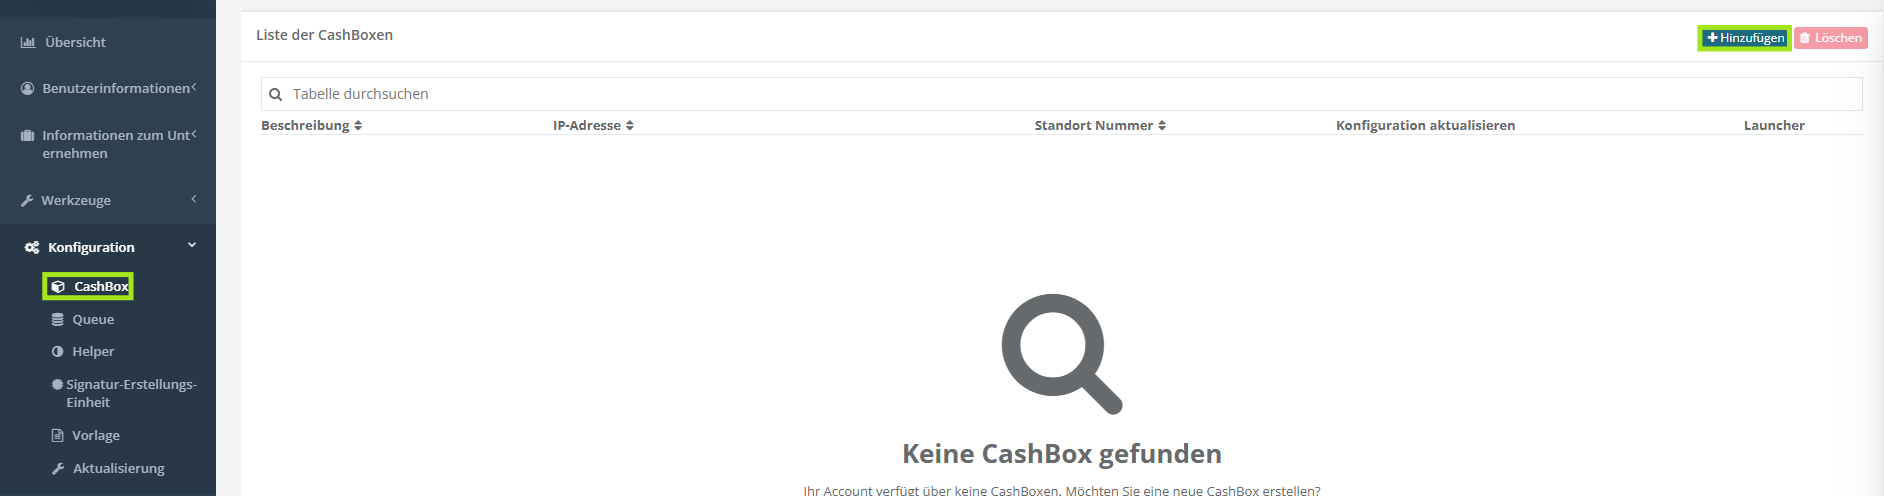
- Link: In the CashBox configuration, the queue and the helper must be selected.
- Update the configuration and download the ZIP file for installation.

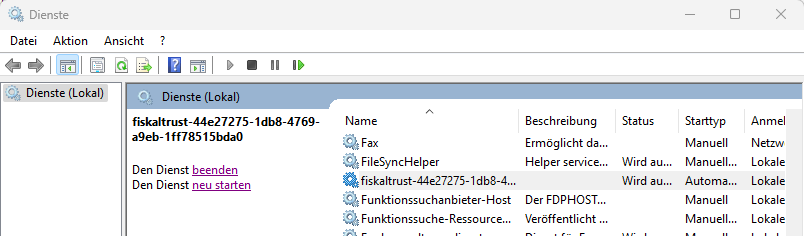
Installation of the local service
- Extract the folder from the included ZIP file. The ZIP file should not be blocked. To check this, right-click the ZIP file and choose Properties. The file can then be extracted via the context menu.
- Open PowerShell: Search for PowerShell via the start menu and start the application as Administrator to open the PowerShell console with administrator rights.
- Navigate to the installation directory: Use the
cdcommand followed by the path to the installation directory, the extracted folder, of the service in which the executable file is located. You can then use thedircommand to check that the file exists and that it is the correct directory. - Execute the installation command: To start the installation, call
install-service.cmd. - Check the installed service: Search for Services via the start menu. The service can be found under fiskaltrust-… If it is not started, it must be started.
Setup in the cash register software
The data obtained from the Fiskaltrust portal is now entered into the corresponding fields.
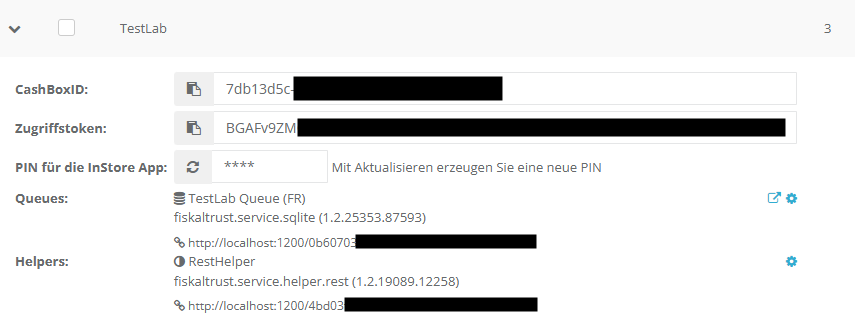

| Field | Description |
|---|---|
| Cashbox ID | This is the link between the fiscalization unit and the cash register. It is displayed in the Fiskaltrust portal. |
| Access Token | Required to ensure valid access to the locally running service. |
| Base URL | Specifies the request address of the local service. |
The data should be checked here after the CashBox has been set up correctly:
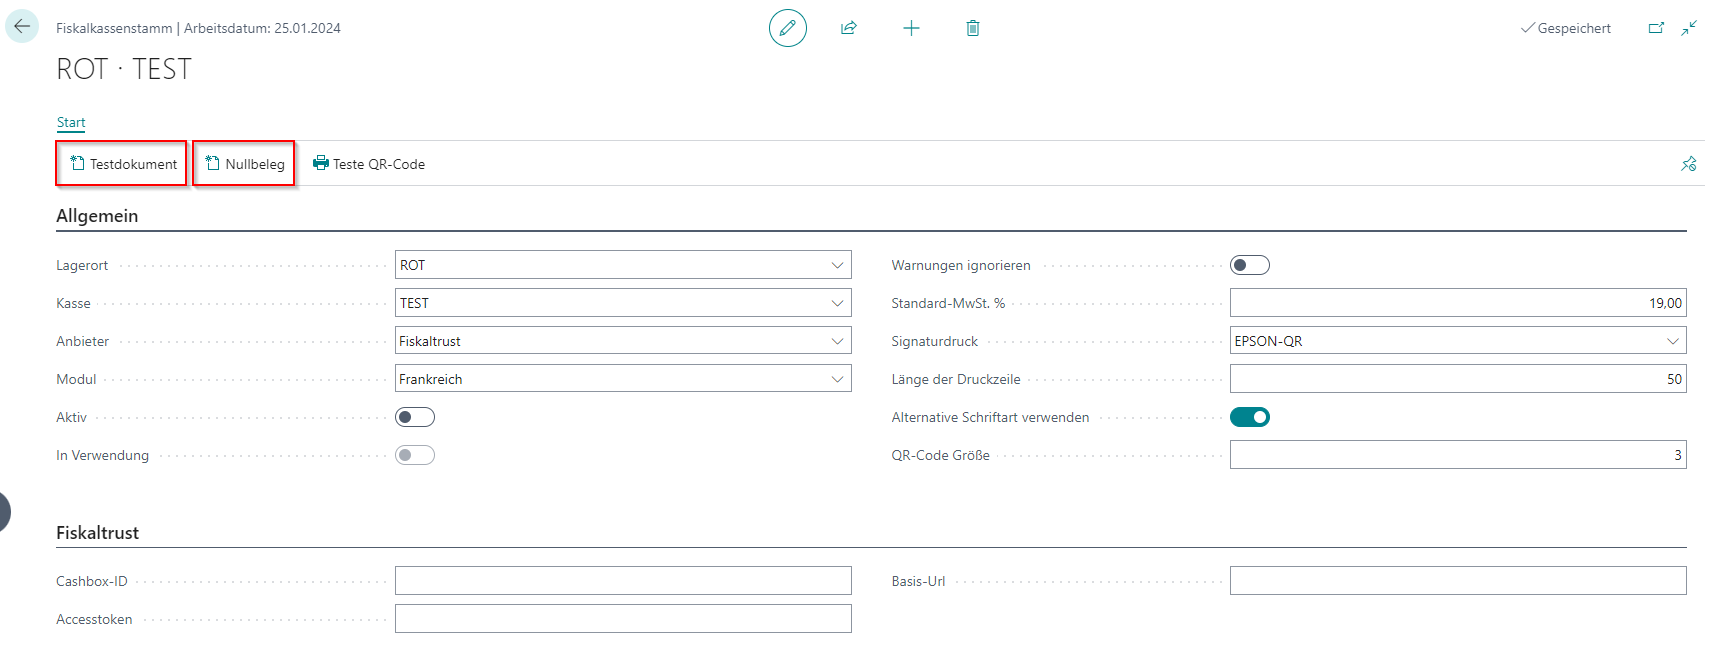
Once the configuration is complete, it can be checked by creating a test document and a zero receipt.
First use
If the setup is complete and the test receipt is successful, proceed with the following instruction. To create a valid start receipt, a POS process must be started. After that, all posted receipts are marked with a fiscalization signature.