Production Order Management
Purpose
This page describes production order management in BE-terna Manufacturing. It explains how orders are created with meaningful defaults, reviewed before release and finish, reported through workers and journals, enriched with item tracking, and corrected or reopened in a controlled way when necessary.
Business Value
- Transfers key defaults such as assigned user, posting group, and location automatically into new production orders.
- Provides dedicated overview pages for release status and readiness to finish.
- Supports workers with a dedicated time registration role center, authentication, and filtered order visibility.
- Controls item tracking and automatic quantity calculation directly in the production order and output journal context.
- Automatically proposes the matching application entry for negative correction postings.
- Allows finished production orders to be reopened for required follow-up postings.
Area: Production Order Management
Create production orders with standard defaults
New production orders can be created manually, from sales orders, from planning suggestions, or from order planning. When the related switches are enabled in Manufacturing Setup, the system automatically transfers Assigned User ID, Gen. Bus. Posting Group, and Location Code into the order.
The most important rules are:
- The default for Assigned User ID is the currently signed-in user.
- The Default Gen. Bus. Posting Group is transferred into the production order and its related postings.
- The Default Output Location Code from Manufacturing Setup is only used for manually created production orders if no specific output location is maintained on the item.
- For orders created from sales orders, planning suggestions, and order planning, the user and posting group are also transferred.
This keeps the default fields consistent across all creation paths and makes later filtering, assignment, and analysis much easier.
For every new order, verify these three points:
- Were Assigned User ID and Gen. Bus. Posting Group defaulted as expected?
- Was the correct Output Location Code transferred?
- Was the order fully built through Process > Refresh Production Order after creation?
Use the production order worksheet for daily control and actions
For daily control across all statuses, the Production Order Worksheet is the most efficient entry point. The page is intentionally non-editable and serves as a working list for filtering, navigation, and actions. Actual changes are then carried out in the Production Order Card or in the relevant journal.
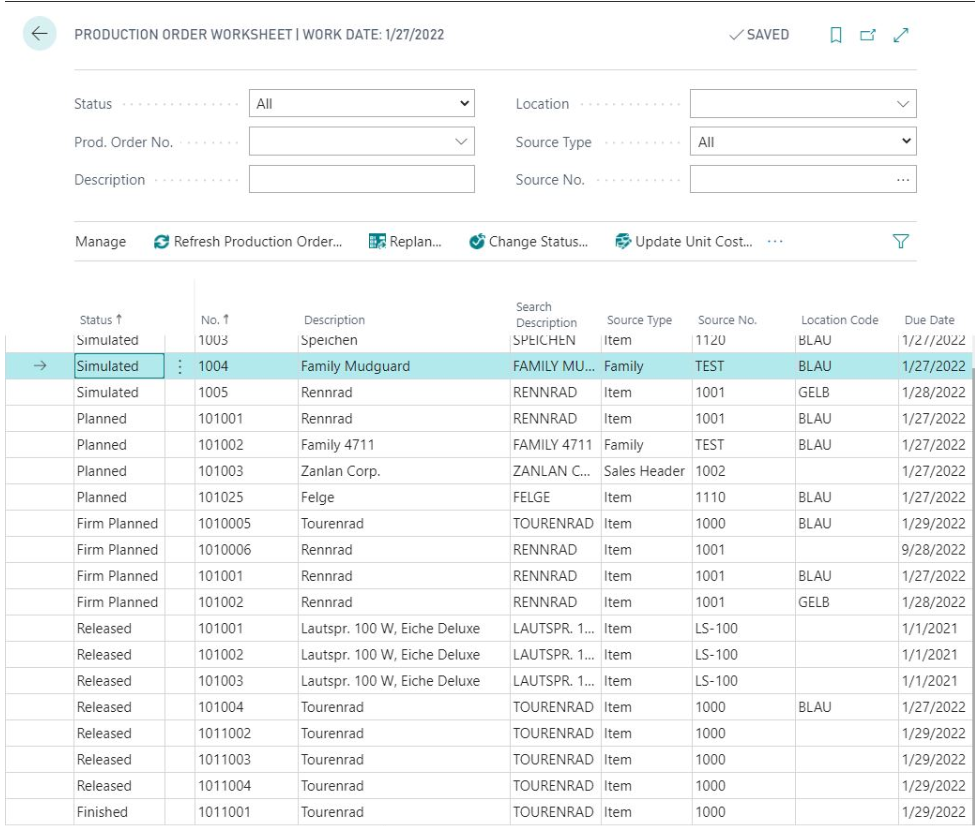
The predefined filters are especially useful for:
- Status across Simulated, Planned, Firm Planned, Released, and Finished
- Prod. Order No. and Description to find a specific order quickly
- Location and Source Type / Source No. for cross-order questions and follow-up analysis
Through Manage, users can reach actions such as Refresh Production Order, Replan, Change Status, Update Unit Cost, Open Production Journal, Create Warehouse Documents, reports, and entry navigation. Use this worksheet whenever you want to narrow down the relevant orders first and only then switch to the detailed card.
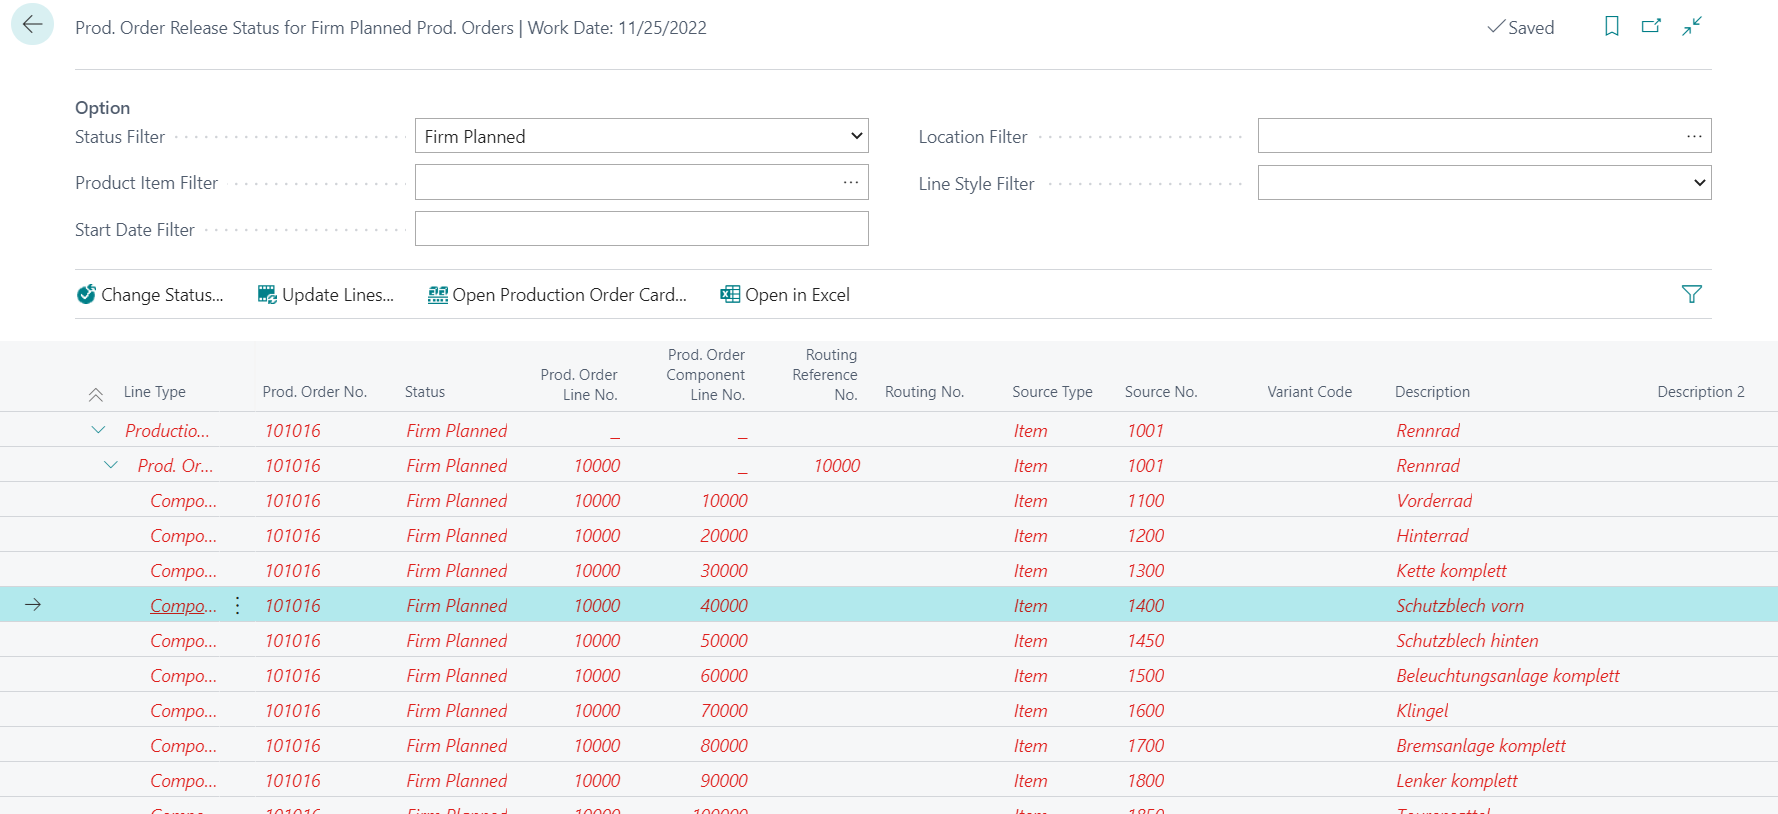
Review release and finishing in a structured way
For firm planned production orders, the page Release Status for Firm Planned Prod. Orders provides a structured overview. It displays the production order header, lines, and components in a tree and uses colors to indicate whether material is fully available or whether shortages still exist.
In day-to-day work, the status sequence is usually handled like this:
- Review Planned or Firm Planned orders for material and date feasibility.
- Only then move them to Released.
- Before switching to Finished, review component consumption, warehouse activities, and capacity postings.
- Use Reopen only for corrections, follow-up postings, or reversals.
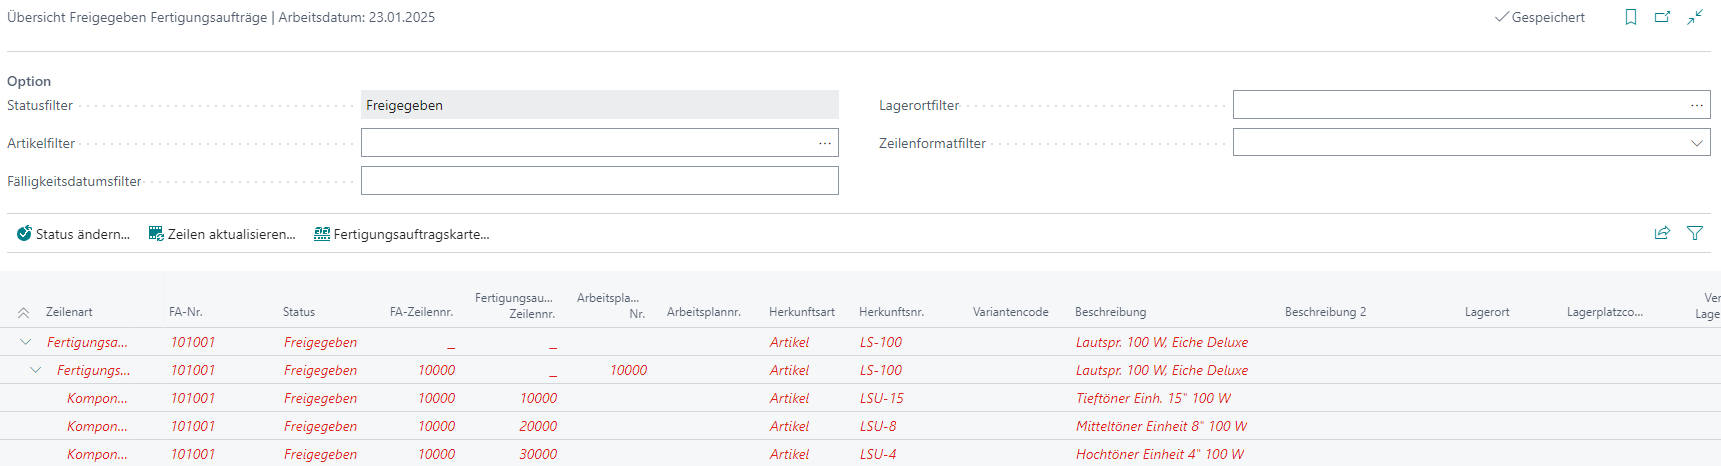
For released production orders, the page Overview of Production Orders Ready to Finish supports the finish check. It shows per order, line, component, and routing line whether the prerequisites for finishing are met. Checks include open warehouse picks, remaining consumption, and capacity ledger entries.
Important for the business interpretation:
- In the release review, header, line, and component are evaluated in a tree. Components with insufficient available inventory are marked red, which also turns the superior lines red.
- In the finish review, Ready to Finish = No typically means that open warehouse picks, remaining consumption, or missing capacity entries still exist.
- The color indicator is a warning, not a technical blocker. A status change is still possible, but it should be an explicit decision.
The overview pages do not technically block a status change. Instead, they provide a solid working basis for the decision. If many orders exist, use the related setup list to provide predefined filters for period, status, and additional criteria.
Typical check sequence before release or finish:
- Open the relevant overview page.
- Review material availability, open warehouse activities, remaining quantities, and capacity entries.
- Use predefined filters from the Production Order Control Setup List where needed.
- Only then change the status in the actual production order.
Prepare workers and time registration
Workers use a dedicated simplified role center, especially suited for terminals in production or directly at the machine.
For the initial setup, follow this sequence:
- Open My Settings and set the role to the dedicated worker role center.
- Open the Workers list from that role center and create a new worker master record.
- Use a unique No. such as the personnel number or chip ID.
- Add further worker information such as name, department, cost center, and communication details where required.
- Optionally maintain Dimensions on the worker record.
- Define the Worker Authentication Type in Manufacturing Setup.
- Configure either Number and Password or PIN authentication.
- Maintain optional filters for Work Center Group, Work Center, and Department if workers should only see specific operations.
For a full trial run from setup to first reporting, use this end-to-end sequence next:
- Decide in Manufacturing Setup whether workers should sign in with Number and Password or with PIN.
- Open the worker card and assign the required credentials through Start > Change Password or Start > Change PIN. A PIN is especially useful for barcode or RFID scenarios and must be unique within the company.
- Maintain the intended business filters for Work Center Group, Work Center, and Department on the worker master first instead of changing them ad hoc during registration.
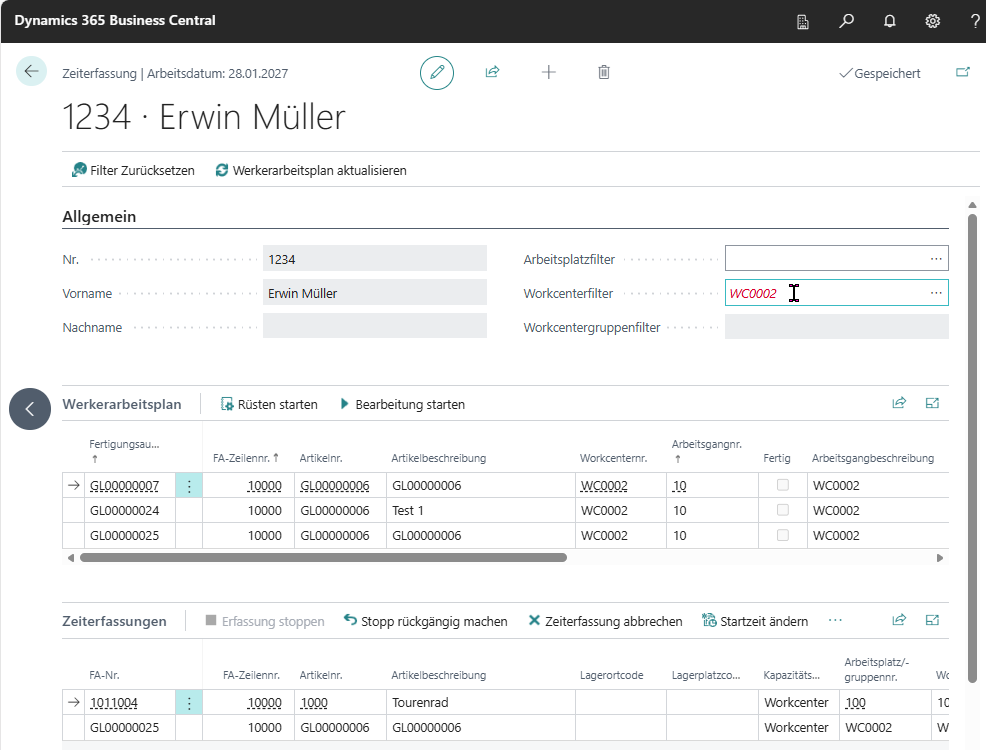
- Then open Time Registration and sign in with the selected method.
- Right after sign-in, verify in the header area that the correct worker and the expected filters are shown.
- In the Worker Schedule section, confirm that only released and relevant operations are visible.
- Start one operation through Setup or Run, stop or correct it as a test, and then transfer it into the Output Journal.
- Review time, quantity, location, bin, and where relevant item tracking there before the final posting step.
Register time and report progress through workers
The typical operational flow is:
- Sign in as the worker.
- Select the operation in the worker schedule and start Setup or Run.
- Stop, cancel, or correct the time registration entry if necessary.
- Adjust location, bin, or item tracking details where needed.
- Transfer the registration into the output journal and post it after review.
This keeps time and quantity reporting closer to the real production process without forcing final posting directly at the machine.
Important usage notes from practice:
- The worker routing section only shows released operations and, where applicable, only those matching the worker filters.
- Manually changed filters on the time registration page are visually highlighted.
- Functions such as stop, undo stop, cancel registration, and start/end time correction help resolve incorrect entries.
- Before the transfer into the output journal, Location Code and Bin Code can still be adjusted.
The fastest way to analyze common issues is this sequence:
- If a worker cannot sign in, compare the Worker Authentication Type in Manufacturing Setup with the credentials maintained on the worker card.
- If no operations are visible, check the production order status Released and the filters for Department, Work Center Group, and Work Center.
- If a manual filter change causes unexpected results, review the visually highlighted filter values on the Time Registration page and reset them where needed.
- If a worker assumes the entry was already posted, verify whether it was only transferred into the Output Journal or actually posted there afterwards.
- If a time entry on the last operation cannot be posted, also review the consistency between Finished Quantity and the related item tracking lines.
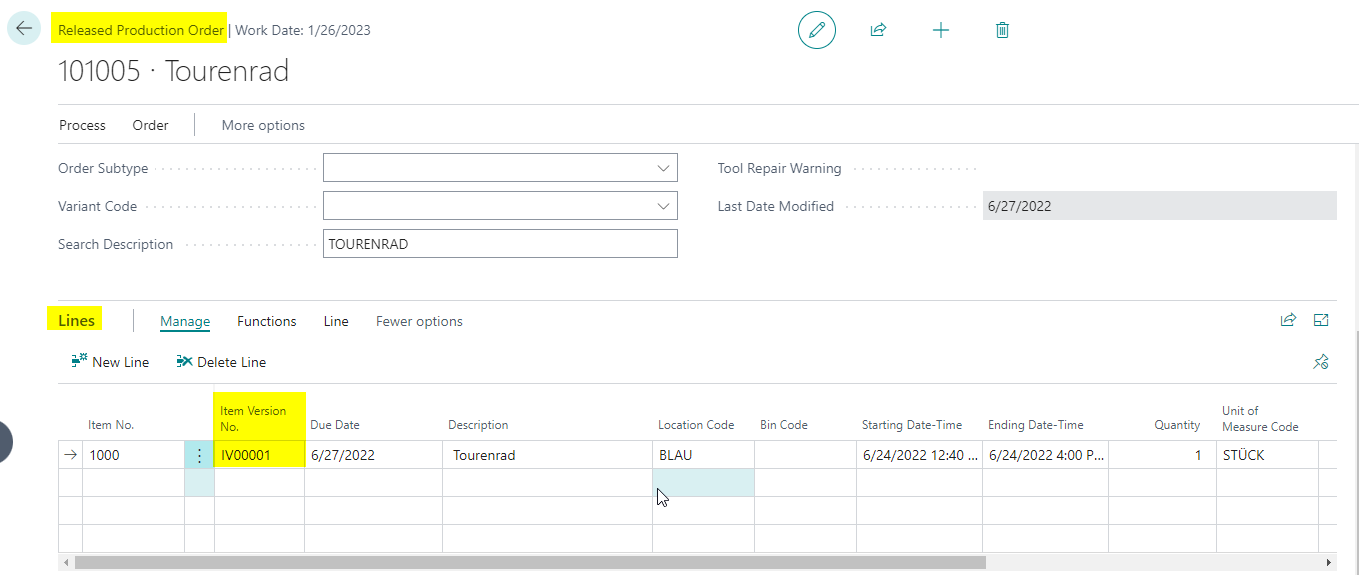
Control item tracking in the order and during reporting
The Item Tracking Code Card contains additional options to control where serial, lot, and package numbers come from. For serial and lot numbers you can use item number series, the production or assembly order number, or Transfer from Main Component.
Important rules are:
- Automatic numbers from item number series or the production or assembly order number are created when the production order is refreshed or the quantity is validated in an assembly order.
- Transfer from the main component works when the same tracking logic is set on the tracking code, the main component, and the output item, and the main component is flagged accordingly in the BOM.
- Supported combinations are serial no. + lot no. from main component and lot no. + package no. from main component. The combined option serial no. + package no. from main component in one tracking code is not supported.
For practical verification, the typical sequence is:
- Maintain the required logic on the Item Tracking Code Card.
- Make sure the main component and the output item both use the same tracking logic.
- Create or refresh the production order.
- Check in the last operation, in the related item tracking lines, or in worker time registration whether the serial and lot information was proposed as expected.
When tracked items are reported in the last operation, BE-terna Manufacturing also copies existing item tracking information from the production order line into the worker time entry. Through Item Tracking Lines, users can adjust this information before posting.
Check the following points:
- Were the tracking values copied when the last operation was started?
- Do partial quantities or changed serial or lot assignments require manual adjustment?
- Does the finished quantity still match the assigned item tracking lines?
If the consistency check fails, the time entry cannot be posted.
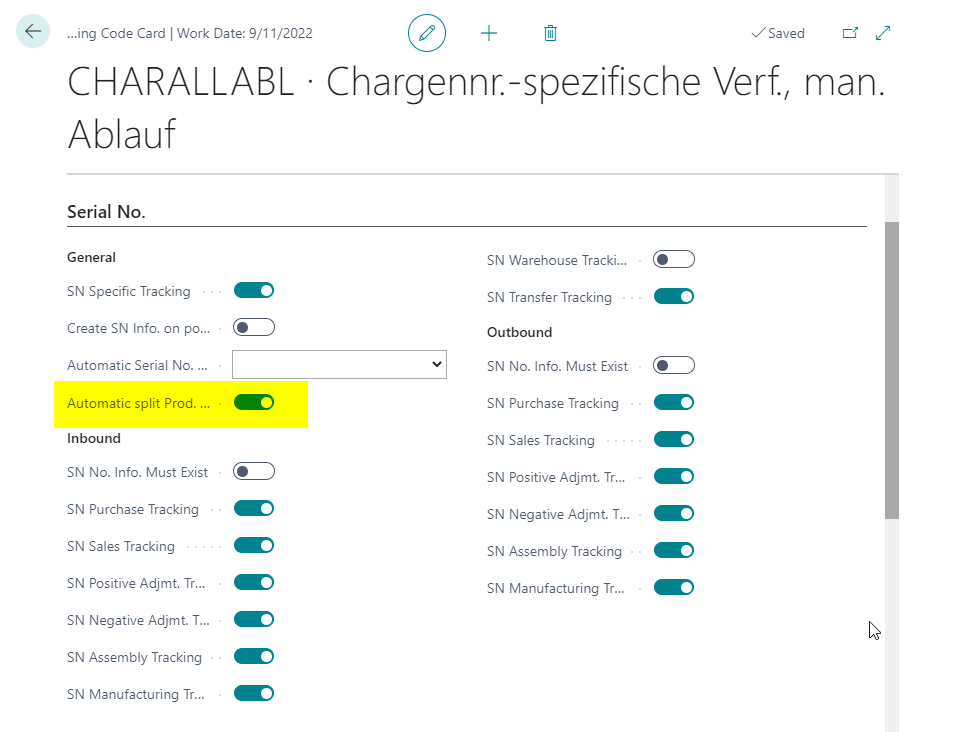
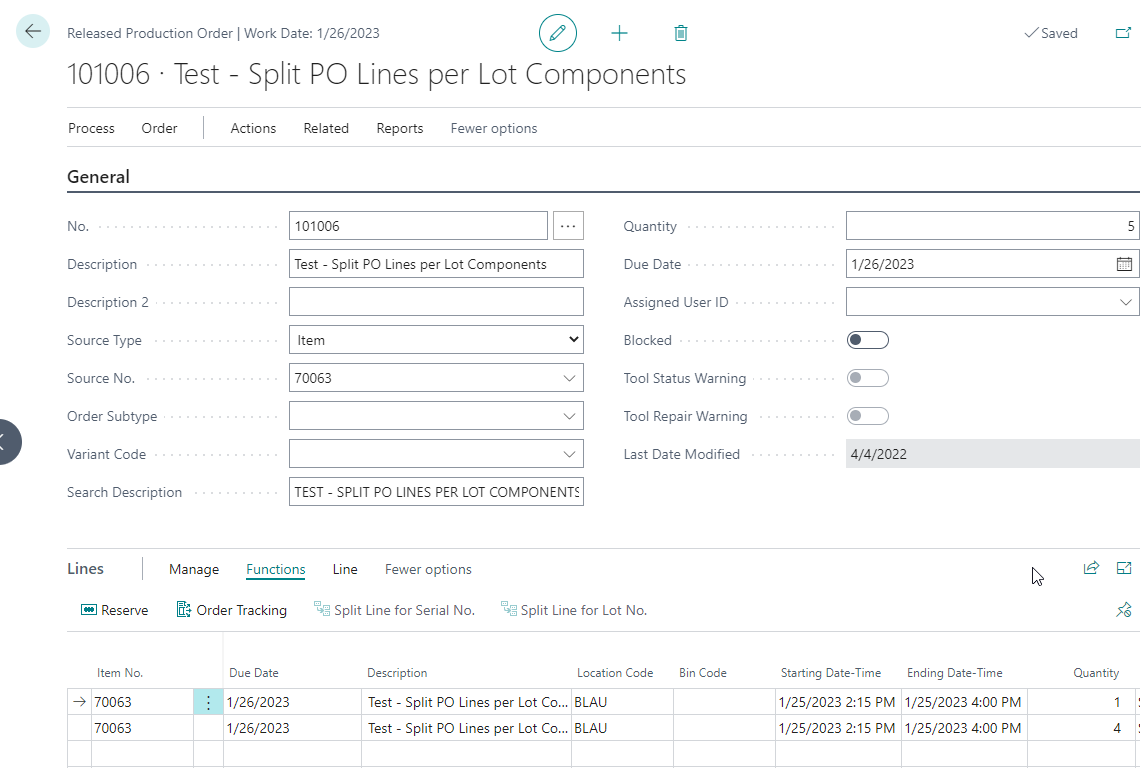
Split production order lines by lot or serial number where needed
If different lots or serial numbers must be reported separately inside one order, production order lines can be split deliberately. This keeps component, routing, reservation, and item tracking information traceable per partial quantity.
For serial-tracked finished items, the split is controlled through the item tracking code. Activate Automatic split Prod. Order Lines there and then refresh the production order with a quantity greater than 1.
For lot-tracked finished items, Split Line for Lot No. becomes available after a partial output posting. First post a partial quantity in the output journal, refresh the page if needed, and then split the remaining quantity into a new line.
Use this split especially when:
- partial quantities must be finished under different lot or serial numbers,
- component tracking must be assigned unambiguously to one reported quantity,
- a remaining quantity must continue separately after a partial output posting.
Calculate quantities automatically in the output journal
When Calculation Method for Output and Consumption Active is enabled in Manufacturing Setup, the item controls how output and consumption interact in the output journal. The available options are Standard, Finished Quantity Calculated from Consumption, and Consumption from Output Quantity.
Set up the function in this order:
- Open Manufacturing Setup and activate the calculation method for output and consumption.
- Open the Item Card.
- Select the required option in the item field that controls the automatic quantity method.
- Make sure routing, production BOM, and, where relevant, the main component are set up correctly.
- Create a released production order and open the Output Journal through the line actions.
In practice this means:
- Standard keeps the default behavior with remaining quantities and expected component consumption.
- Finished Quantity Calculated from Consumption is useful where the actual output is derived from the raw material usage.
- Consumption from Output Quantity calculates component consumption automatically from the reported output quantity and updates run time accordingly.
Typical verification by option:
- Standard: Enter a consumption or output quantity and confirm that the other quantity is not recalculated automatically.
- Finished Quantity Calculated from Consumption: Enter the consumption quantity of the relevant main component and verify that Finished Quantity and Run Time are recalculated.
- Consumption from Output Quantity: Enter the Finished Quantity and verify that the component consumption lines and run time are recalculated.
Review scrap quantities and existing item tracking lines especially carefully in these automatic scenarios. Manual review is still required where automation and tracking interact.
Correct and reopen orders in a controlled way
If consumption or output must be corrected, BE-terna Manufacturing can automatically propose the Applies-to Entry No. for negative quantities in the output journal, consumption journal, and output reporting journal. Users no longer need to search for the matching entry manually.
The sequence is similar in every journal:
- Open the relevant released production order or the journal directly.
- Enter posting date, order, line, and item or operation.
- Enter the negative quantity.
- Review Applies-to Entry No..
- Review Unit of Measure Code and cost-related fields where relevant.
- Post the journal.
In the production journal, the matching counter-entry is proposed directly for negative quantities:
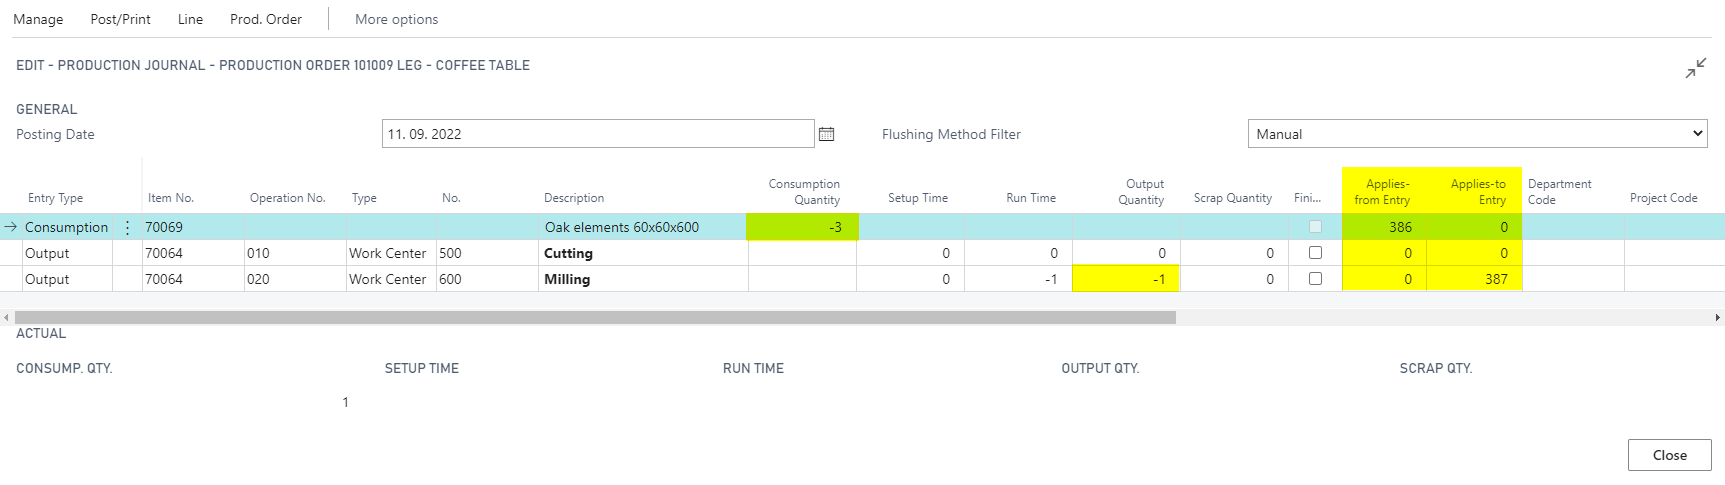
Pay attention to these practical differences:
- In the Production Journal, consumption and output corrections can be reviewed together in one order context.
- In the Consumption Journal, the original consumption posting is referenced through the application entry field.
- In the Output Journal, the original output posting or related item ledger entry is referenced.
- If the application field stays empty, the original counter-entry is often already closed or already fully applied and should be reviewed before posting.
Finished production orders can be reopened for required follow-up postings. Keep these rules in mind:
- Reopening is intended only for corrections, reversals, or additional postings.
- For backward-flushed components or operations, finishing the reopened order again does not create a second automatic backward posting.
- Reopened orders are not rescheduled for capacity planning.
- Reopened orders should therefore not be used again as part of normal operational planning.
For controlled reopening, this sequence works well:
- Open the finished production order from the Finished Production Orders list.
- Choose Process > Reopen Finished Production Order.
- After the status change, verify that the order appears again in the Released Production Orders list.
- Check the Reopened indicator on the order header so everyone can still see that the order had already been finished once.
- Carry out only the required follow-up postings, reversals, or corrections.
- Finish the order again afterwards and review the finished order one more time for completeness.
Review inventory and planning parameters in context
In addition to output and consumption reporting, BE-terna Manufacturing provides further context information directly in the working page. This includes inventory visibility in production or consumption journals and location-specific planning details in FactBoxes on planning or requisition worksheets. That helps users decide immediately whether quantities, replenishment parameters, and the location context fit together.
This inventory visibility is especially useful before backward flushing or correction postings, because users can immediately see whether the selected location or bin is still plausible for the intended posting.
For practical use, the key point is this: the inventory value in the output journal is a read-only real-time check while the journal line is being edited. This lets users confirm before posting whether the current location, bin, remaining order quantity, and planned consumption still fit together or whether a transfer, quantity adjustment, or order correction is required first.
Check these points deliberately:
- Does the displayed inventory match the selected Location Code and, where applicable, Bin Code?
- Is the planned consumption or output quantity consistent with the remaining production order quantity?
- Is a transfer, replenishment movement, or order-data correction still required before posting?
Model rework through document types
If quality deviations require structured rework, you can model this through a dedicated Document Type with Rework activated and a dedicated routing assigned to it.
Use the following sequence:
- Create a separate routing for the rework process and set it to Certified.
- Open Document Type and create an entry with Document Type = Production.
- Activate Rework and assign the rework routing.
- Create the production order with that document type.
- Run Process > Refresh Production Order.
- Open the assigned routing on the production order line through Line > Routing.
If rework is created frequently with one preferred document type, also maintain that entry in Manufacturing Setup as the default for rework. This lets the creation function work directly with the intended subtype.
Rework can be created not only in a newly entered order but also from existing source documents. Supported entry points are:
- Sales Order through Line > Create Production Order for Rework
- Released Production Order through Process or Action > Create Production Order for Rework
- Finished Production Order through Process or Action > Create Production Order for Rework
Run through this check once end to end:
- Set up the rework routing and Document Type as described above.
- Maintain the preferred default subtype for rework in Manufacturing Setup if users should not have to select it manually every time.
- Start Create Production Order for Rework from the required source document.
- Confirm the default subtype or deliberately choose another document type that is marked as Rework.
- In the created production order, verify that the Document Type is correct and that the expected rework routing was transferred.
Result
- You can create production orders from all common source processes with consistent defaults.
- You know how BE-terna Manufacturing supports release and finish reviews.
- You can handle reporting, item tracking, quantity automation, corrections, and reopening in one coherent business context.
Links