Repairing Tools
Purpose
Repair orders support structured repair of tools. Faults, fault reasons, and resolutions can be documented. When a repair is finished, the tool can receive a new service life, new number of cavities, and a new status.
Production can see during planning that tools are unavailable because of repairs, or manually check tool status. Finished repair orders remain available as proof and as a knowledge base.
Recommended Setup Data
- Fault Codes, Fault Reason Codes, and Resolution Codes if repairs should be classified.
- Number series for Repair Order Nos. and Finished Repair Nos. in Manufacturing Setup.
If the number should be retained when finishing, use identical number series for open and finished repairs.
Create a Repair Order
- Open Tool Repairs.
- Select +New.
- Press
Enterif the number should be assigned from the number series, or enter a repair number. - Fill the fields.
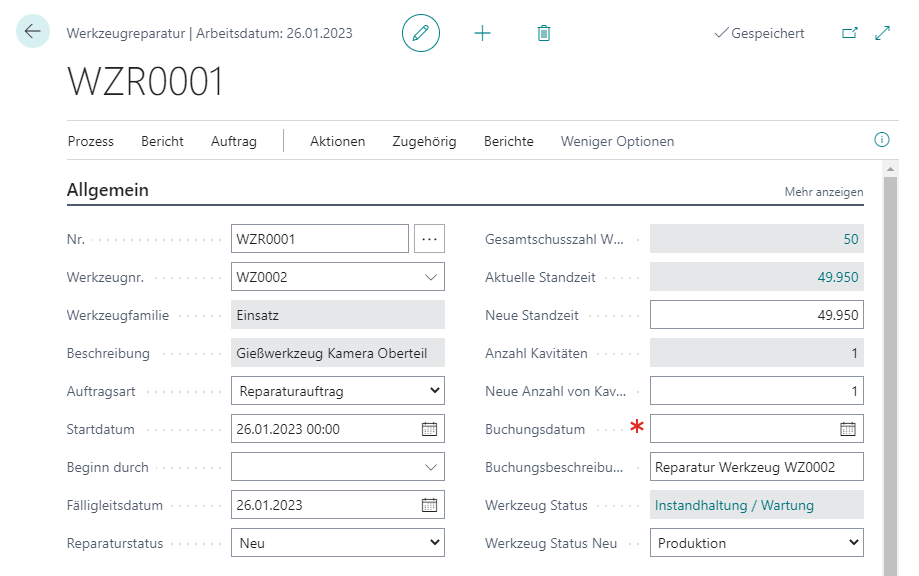
| Field | Meaning |
|---|---|
| Tool No. | Tool number. When entered, Business Central copies Tool Family, Description, and initializes the posting description. |
| Tool Family | Informational field from the tool card. |
| Description | Informational field from the tool card. |
| Order Type | Repair Order creates a tool ledger entry of type Repair when posted. Service creates an entry of type Resetting. |
| Starting Date | Planned starting date and optional starting time. |
| Started By | User ID or code of the person who should start the repair. |
| Due Date | Date when the tool should be available again. |
| Repair Status | Starts as New and can be changed to In Process when repair starts. |
| New Service Life | Defaulted from current service life. When posted, this value is transferred into tool ledger entries as of the posting date. |
| New Number of Cavities | Defaulted from current number and updates the tool card when posted. |
| Posting Date | Posting date for the repair order. It affects the processing of new service life. |
| Posting Description | Transferred into tool ledger entries during posting. |
| New Tool Status | Usually suggested as Production and transferred into the tool card during posting. |
Assign Fault Codes
Fault codes are optional, but they help prepare the repair and build a knowledge base.
- Open the repair card.
- Select Process.
- Depending on the need, select Faults, Fault Reasons, or Resolutions.
- Enter only codes that were prepared in setup.
Business Central shows assigned codes in FactBoxes on the repair card.
Carry Out Repair
When repair actually starts, set Repair Status to In Process and fill Started By with the user ID or responsible code.
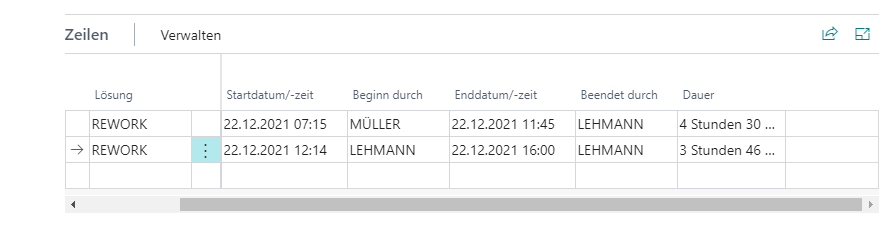
Document the performed work in the lines. These lines remain available after the repair is finished.
Finish the Repair Order
Finishing is always connected with posting a tool ledger entry. Before posting, review:
- Posting Date,
- New Service Life,
- New Tool Status,
- New Number of Cavities.
- Select Process > Post.
- Confirm the question with Yes.
The posting function creates a tool ledger entry, updates the tool card, and moves the order to Finished Tool Repairs. Finished repair orders can no longer be changed. Through Find Entries, Business Central shows the tool ledger entry that was posted when finishing.
Result
After posting, the repair is historized. New service life, new number of cavities, and new tool status are effective, and the finished repair order remains available as proof.
Links